Another Allison's Exhaust

OK I conversed with the Car Chemistry folks and they assured me the most effective location on the Allison's exhaust system would be immediately following the collector. So I ordered one and will either slide it into the exhaust (after the collector flange) or weld it to a flange and sandwich it between the existing flanges. Mixed reviews on the web -- some say no power loss and others say there is a power loss. If it reduces drone and I can't "feel" the perf difference then I will keep it in there. Stay tuned...

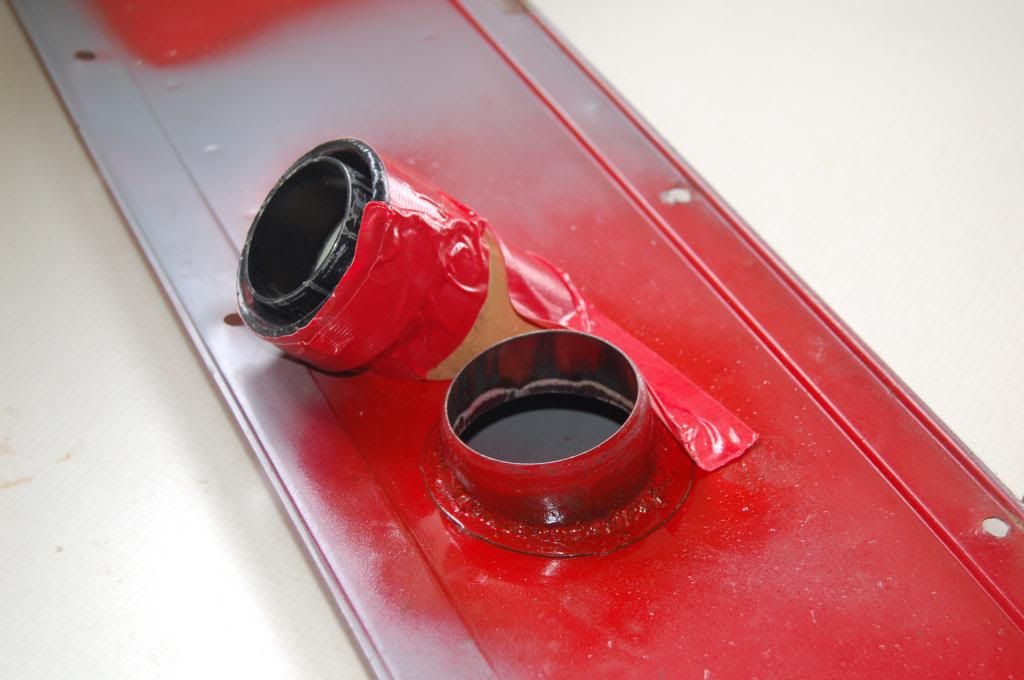
I made another mod today to the cooling duct. Mark Allison modified the header to provide access for the OEM injector cooling duct. But the injector shroud is SO close to one of the manifold tubes that my silicone duct nearly (does?) touch it. This is high-temp silicone but still gets melty and smelly that close to the header. So I located a 2-1/2 x 2-1/4" reducer exhaust adapter and the narrow end very tightly fits inside the shroud, effectively extending its length. I shortened the silicone duct and now it is much further from the header. It's probably just fine the way it is but I also foil taped it just to aid in the reflection of heat away from it. Starting to look like the lunar module in there :)

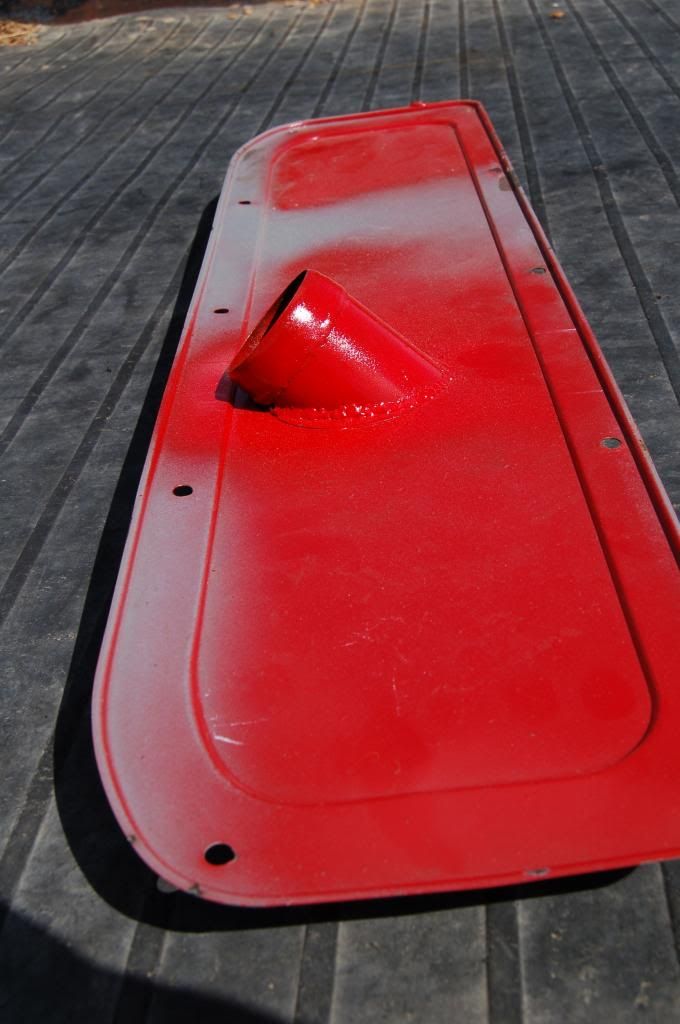
Will take it for a test spin in the next few days but I'm feeling very confident with this mod. Will be good to have my injector cooling ductwork functioning again since the fan often kicks-in after longer drives on hot days -- it's definitely doing the job it was intended-for by the Fiat engineers... Pics below of the modified duct.


I taped my injector cooling mod for an Allison header to the inspection panel, just to verify the angle.
DSC_0038_zps648210fe.jpg

Finished.
DSC_0038_zps9e7e2832.jpg
 
Baffle

If you get the Car Chemistry baffle, keep us posted. My 78 has a MagnaFlow, according to the PO, and its quite loud when you get on it. This would be cheaper and easier than getting a new muffler.
 
Wow. That looks really good. A lot of work to correct things. Maybe Allison should provide this upgrade for FI cars as well ;) *should* you go back to a stock header, I assume this mod will still work?

Very nice.
 
Tim, Mark has more than one version of the X1/9 header. Jim has the older style where one of the exhaust tubes blocks the standard routing for the injector cooling shroud. He made some changes to it and I have a newer one which does not block the standard injector shroud routing. But the new design places an exhaust tube so close (nearly touching) the injector shroud that the silicone tube which is used to connect the shroud to the access panel duct can burn/melt. So my modification was rather minor -- I used a metal extension off the shroud and shortened the silicon piece so it's further from the exhaust tube and (so far) doesn't burn nor melt. But the routing path is identical to stock.

For the older manifold like Jim has, the duct had to be routed differently and connect with the access panel at a different point (which also required a change to the access panel).
 
If you get the baffle, can you take a couple of pics showing the discs? - hard to see what level of venting it has from the side view they show..
I can say that adding baffles to a turbo charged car with a high output setup definitely creates a flow restriction :(. Don't know if an NA setup pushes enough CFM's at a high enough rate to overwhelm the flow restriction created by these baffles.

I'd like to know more about them, as I may need to add something like this to my Volvo - the local Po-Po don't like the noise level my free-flowing Magnaflows generate....

On the headers, did you check your water branch pipe for clearance? With the AC version header, it was touching the pipe on mine - I had to squash the branch pipe to gain an air gap.
 
baffel

Just got mine yesterday. I tried to put it in the tail pipe but need to grind it in. With it stuck in with only one baffle in the pipe there was a noticeable drop in sound. I was going to try it in the pipe right after the header but I think it will have to be cut down to fit.


Last edited:
With my version of the Allison's header there is clearance for the branch pipe. I will try to get a photo...

Docpan, did you put a cap in your baffle or did you leave it open?
 
Thanks for taking the pics - I lightened them, as yours are too dark to see any detail

20140614_002004_zps4c9a5a40.jpg


20140614_001901_zps944f0ab6.jpg


Looks like the flow through holes are a decent size.
 

Aw poop... Was thinking that the collector is 2.5" so I ordered a 2.5" version of the baffle. But upon closer examination, the exhaust tubing (I think) is 2.0" -- is that what you ordered and does it fit?
 
My correct-size (2") baffle replacement arrived today. I ordered the three baffle version. I chose to install mine in the exhaust section immediately after the flange that connects to the header collector. I spoke with the owner of Car Chemistry and he suggested this would be the best location for my exhaust config (even though his website says to insert after the CAT and this places it before the CAT). Like Docpan, mine didn't fit well until I used a grinder to take a little material off the diameter of the baffles. With a light hammer tap it fit snugly.

Bolted everything back together and took the X for a spin. There's a noticeable reduction in drone and overall exhaust noise db's. Still very throaty but less obnoxious. Growls pretty loud when you put your foot into it (a LITTLE less than before) but cruising sound and drone is significantly more tame now. I'd say it's very similar or just a touch louder than the prior setup I had with the IAP header and stock muffler. I can't really "feel" any difference in performance.

I think it's acceptable now. I'll need to drive some additional miles before I decide if the sound is where I want it. If not, I can add a cap to the front of the baffle but would prefer not to since it would further restrict exhaust flow. But I definitely recommend one of these baffles for anyone with an Allison's exhaust that wants to tame the drone and take a little edge off the noise.
 
Hey Greg... If you still have the other baffle for parts...

or you have a mind to... what if there were another "baffle-plate" added to what there is now?

What if you remove the baffle, added a plate or two, made up from parts or on your own, tack welded in place... and test driven?

(I would further suggest cutting them or making then in two parts to fit over the core and in between the other baffles...)

Just a thought and a project for you next winter...
 
Good ideas Tony. The Car Chemistry folks recommend that you start with either two or three baffles (they're made that way) and then modify the sound by adding a cap to the front of the baffle and/or wrap the area between baffles with stainless steel wool.

Wifey and I drove for a good 90 minutes today (she drove half :) ) for church and errands and I think I'm pretty satisfied with the sound now. Just loud enough to get your attention but not too loud for me. If I change my mind and decide to tame the noise further, I will probably pull the exhaust apart at the flange where the front of the baffle is now exposed and add a cap to it.

or you have a mind to... what if there were another "baffle-plate" added to what there is now?

What if you remove the baffle, added a plate or two, made up from parts or on your own, tack welded in place... and test driven?

(I would further suggest cutting them or making then in two parts to fit over the core and in between the other baffles...)

Just a thought and a project for you next winter...
 
Back
Top