BallJoints
REPAIR OF FIAT X1/9 REAR BALL JOINT
By Greg Schultz
The X1/9 rear ball joints were never available as a separate item, you had to buy the whole suspension arm for about $500, now these are almost impossible to get. There is a possible source in the UK that may be able to supply new parts at great expense, the Monte Hospital, email monte.hospital@clara.co.uk, may have the ball joint itself for about A$300 before shipping. I suspect this may be supplied from a German co., Gruppo Ricambi Bielstein, www.bielstein.com, if you can read German, although their catalogue only seems to list the complete suspension arm, and I’m not sure if it’s still available.
The best option in Australia is to repair the old joint. Fiatorque in Sydney and RestoraCar in Melbourne can get it done for about $250 to $350, and Dino Enterprises in NZ for about $150. But we now have a source in Adelaide, Mike Quinn Precision Engineering, 18 Deacon Ave, Richmond, SA, (08) 8351 9666, just down the road from KartMania. The cost is quite reasonable, about $100, plus a donor ball joint if the ball in yours is too badly worn.
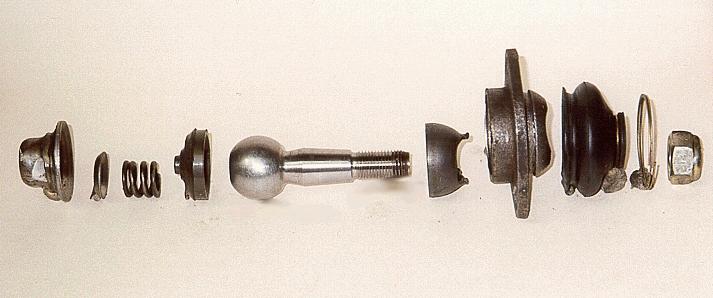
You will need to remove the suspension arm, clean it up, and deliver to the engineering shop, it’s not a motor garage. If you suspect the ball itself is worn, you can provide a donor joint, or be prepared to organise getting one delivered if required, after the old joint has been disassembled and examined. I pulled apart a good used Fiat 132 front lower ball joint (thanks Garren) for my repair, the ball / shaft is virtually identical to the X1/9 (see drawing), the 124 upper ball joint is probably the same also, but you should check. They’re not hard to get apart, just grind away the swaged edge of the body from the end cap, tap the end of the shaft and it will knock the end cap off, if you have ground enough away to release it (see photo).
The repair involves disassembling the old joint by grinding away the swaged edge that retains a steel ring, that allows the ball and seat to be extracted. The original seat is a one piece plastic piece that is sprung over the ball, this is replaced with a machined two piece phosphor bronze seat. A grease nipple is put in the side of the joint, best orientation is facing the front of the car (seedrawing) for grease gun access. Then reassembled with the old ball/shaft if ok, or the donor one if required, retaining ring refitted and welded in place.
If you use a donor joint you can fit the rubber boot from it as well, if the original was damaged. Check that the groove that retains the boot is clear before fitting, and not damaged by the welding. Also check that the grease nipple thread is not too long, and binding on the ball when done up tight. Finally, give it a good dose of molybdenum disulphide extreme pressure grease specifically for ball joints and CV joints, actually, if you do this before fitting the boot you can see that the grease is coming through ok.
After you have fitted the suspension arm back on your car, you may want to consider fitting a grease nipple to the other ball joint, if it doesn’t already have one. Although if it’s still an original type joint with the plastic seat, I’m not sure if greasing it will prolong it’s life very much.
If you have any questions regarding this repair method feel free to call me on 8396 2409.
Update
UPDATE TO REPAIR OF X1/9 REAR BALL JOINT
One drawback to the repair of the rear suspension lower ball joint described in a previous article, by fitting a bronze seat and welding the steel ring back in place to hold it together, is that if it needs replacing in the future it will have to be attacked again with an angle grinder to get it apart. It also requires regular greasing to prevent premature wear.
Mike Quinn Precision Engineering can now fit the complete internals from a donor 124 or 132 front lower ball joint into the X1/9 housing, so it uses the new plastic seat instead of making a bronze one, and it’s removable, not welded in place. This is done by tapping a large diameter thread into the X1/9 housing and machining and screw cutting the outer diameter of the donor joint and screwing it in place.
You will probably still want a grease nipple fitted, but it won’t require as regular greasing as a metal on metal joint. New donor joints may vary internally depending on the manufacturer, one with a one piece plastic seat as per the original X1/9 is preferred, unfortunately you can’t tell until it’s been cut apart. Cost of the work is about $200 plus about $30 for the donor joint.
