Budget rotisserie

Rodger

True Classic
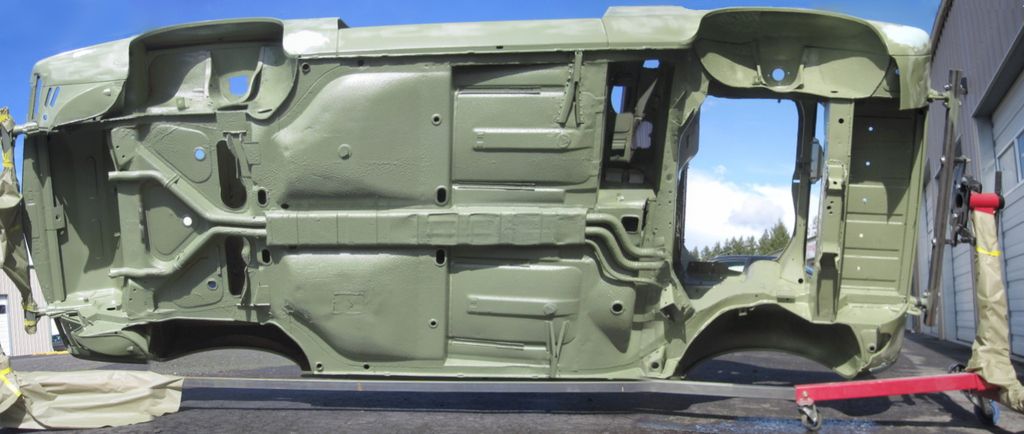
I have my '81 stripped and almost ready to go to the body shop. I have seen pics of X's on rotisserie's and thought that was cool and I really wanted every inch of this car gone over by the body/paint shop so I decided to build one.

I already had a Harbor Freight 750lb engine stand so I just got another one on sale. I took the lower crossbeams with the fixed wheels and flipped them over so the wheels are on top, then got some casters and mounted them to the lower crossbeams with U bolts. This accomplished two things. It raised the height about 5 inches at the crossbeam and pretty much levels the rotating part that the car will attach to. I didn't want to cut them up as I would like to use them again as engine stands, plus I don't weld.

I got some 1.5 inch square tubing with 1/8 inch wall, one 40 inches long for the front and the other 43" long for the back. Drilled a few 1/2" holes to mount the tubing to the bumper shocks and the engine stand plates. Used my hoist to lift the car up by the tie down hooks and slid the stands into the shock mount tubes one end at a time.

Once I had it all on the rotisserie, I got another 9 foot section of 1.5 inch square tubing but with 1/16 inch wall to tie the two stands together to make it more stable for moving. Since the ends of the stands are higher than where the single pivoting wheels are, the two inch tubing of the stands are not parallel to the floor anymore. I cut a slight bevel, 2 inches from the ends of my 9 foot piece which allowed me slide about 3 inches of it into each stand. I drilled a horizontal hole and placed a bolt though it. I drilled the hole larger than the bolt and used a Nylok nut to secure it loosely because I found that when I spin the car the stands want to pivot slightly off of the center line. This slight looseness creates a hinge effect for this pivoting to occur.

Total cost was probably under $300 for the two stands, 4 casters, tubing, bolts, etc. Since I used the stands pretty much as is, they are not quite tall enough to allow the car to spin completely around, but it will allow the car to rotate to almost vertical which allows great access to the bottom of the car. It is amazing what you can see when the car is on its side.

IMG_0847.JPG

IMG_0848.JPG

IMG_0850.JPG

IMG_0851.JPG

IMG_0866.JPG

IMG_0843.JPG

IMG_0845.JPG

IMG_0853.JPG
 
Last edited:
Rotisserie

Hey Roger,
Nice work,
I am planning on doing the same thing for 74, but its a bit more rusty than yours. Thanks for sharing the pictures.
Glen
 
Nice.

There are not very many pictures out there of the underside of an X 1/9. For all sorts of purposes it would be a real service to the rest of us if you could get some got images of the underside. Maybe section by section across the bottom, square-on views. I am thinking not only of images that would help in figuring out where things are for servicing, but for drafting purposes as well. Before and after the work, too.
 
Can do.

If it ever stops raining here in the NW, I will roll it outside and pressure wash the bottom then take some good straight on pics. Of course, if I am going to pressure wash it, I guess the rain doesn't matter.:)
 
You could also just call AAA and roll it up on a flatbed...

(just tell them it won't start...) and have it sent over to your favorite Media Blaster! (With all the money you saved building the Rotisserie, you can now spend it on the blaster!) The driver only hasta hook one engine-stand and pull the entire thing up the ramp! Easy-Peasy!

I would also HIGHLY recommend you have the blaster throw on a coat of sealer so it doesn't get wet, rust and turn to dust, before you can get it back home...
 
Thanks for all the links.

Great advice. Blasting definitely looks like the way to go. I will check with the body shop that I am using to see if they have someone they use or if they do it themselves.
 
Hey Tony,

I once bought a 50 dollar X parts car, and a good friend of mine (god rest his soul now)with AAA, actually did that for me to get it home- Hahahaha, they even slid it right into my garage- classic! I think you get so many free tows, and he was about to lose one due to a new policy

as for the rotissarie- very cool, but I would have widened the base out a bit
 
Bottom pictures

Well it took me a while to get them due to the K20 detour and all of the engine compartment fabrication, but the X has been chromate sealed and is ready for the final body work before paint. I wheeled it outside and took several pictures of the bottom. I tried to get as perpendicular to it as possible but hard to do as the rotisserie will not allow it to go totally straight up and down on its side. Here are a couple of photos.
Hope they are of some use.
Chromate sealer 08.JPG
Bottom photos 01.JPG
Bottom photos 03.JPG
Bottom photos 02.JPG
 
Last edited:
Looks very similar to mine, I added telescoping verticals so I could adjust the height. I haven't had an X on it yet just the car trailer I built on it.
20150402_100211.jpg
 
Dude! Dude!

Those are great shots. Thanks for taking the time to document that. I'll bet those images will really be useful down "the road."
 
The three images combined to roughly show the complete bottom side of the chassis.

Another variation of the images, more adjusting and tweaking:
X%20bottom%202b.jpg


X%20Bottom.jpg
[/URL]
 
Last edited:
Hey Rodger... great stuff... What I am about to say...

may be something you are already planning and also be somewhat nebulous, but since you have gone to so much trouble so far...

Have you considered cleaning up some of the patches and rivets a bit and hitting the bottom with "bed-liner" or pebble-type undercoating?

They also make it is colors that might contrast or match your body color.

http://www.tcpglobal.com/Auto-Body/Custom-Bedliner/?gclid=CLDS_8m-3sQCFZRgfgodgRkAIA


  • Black Base

  • GM White

  • Bright White

  • Mesa Gray

  • Dove Gray

  • Shoreline Beige

  • Dakota Brown

  • Safety Yellow

  • Lime Green

  • Emerald Green

  • Safety Blue

  • Reflex Blue

  • Bright Purple

  • Safety Orange

  • Hot Rod Red

  • Blood Red

  • Bright Silver

  • Pewter Metalic

  • Charcoal Metalic

  • Black Metalic


Just sayin'...
 
Yes, that is in the plan

The bottom and inner fenders will have a thin, black layer of Rhino-liner to provide that "pebbled" look and sound insulation. I had no idea you could get it in so many colors. I will stay with classic black. Boring, I know, but the rest of the car should be pretty exciting.

As far as the "rivets" go, I assume you are looking at the welds on the driver's side jack point. The PO must have run over something as that was totally bent and the floor pan behind the driver's seat was humped up from it. Also, the cooling tunnel has been flattened some in that same area. They also had to repair the passenger floor board where the drain hole was as that was rusted out. I got a new jack point from Henk and to install it, the body shop had to drill out the old spot welds, then weld in the new one and fill the holes. Yes, they are not as clean as the other side, but it is a minor thing and the body shop is getting a little tired of my nitpicking. They say that I am one of the pickiest customers they have ever had. Of course, they will do what ever I ask, but since their labor charge is by the hour, I figured it was not worth the time to improve something no one will see. Once the Rhino-liner is on, the repairs will not be that noticeable.

I wanted to get the pictures while it was in the green chromate as I figured it would be easier to see detail, than if was all black.
 
There ya go... all good! I know of one fella here...

who inspected the car every day and talked with the worker or two and slipped them a $20. The best One-Day Paint Job I have every seen!
 
Outriggers

Finally finished installing the performance head on my '79 FI conversion so it freed up my garage workshop space for the '81 K20 project. Moved the finished shell from the storage shed to the garage. :dance: I will be working on it while still on the rotisserie for a while and I know I will be leaning on it. One of the body shop guys almost tipped it over one time and I certainly do not want to do that. I fashioned some simple outriggers out of some 2x4s I had laying around so now I feel a lot better.

IMG_1582.JPG
IMG_1584.JPG


I figured since I had it in the garage, I had to put at least one part back on.

IMG_1586.JPG


It will always be a Fiat to me.:italia: (with a little Asian spice ;))
 
Last edited:
Well, I didn’t know if I would ever use my rotisserie again but my ‘79 is getting stripped down to get the rust out of it, once and for all. Just have the front suspension, dash and wiring to go and then it’s off to the body shop in a couple of weeks.
121C6F69-811A-41A6-93CB-14E629061A11.jpeg

Still not sure why I need two X1/9s but that’s what comes from hanging around this forum. It’s definitely an addiction.
 
Back
Top