Fiat 128 Sedan Build for the Bride of Burrito

Steve, would it be too much to post here?

I'm sure there are several of us who would be interested in your tips on how to do improve the front end of a 128.
 
chassis mods

Yes, that would be helpful as I was not aware that the 128 had chassis issues with more powerful motors. My wagon has a 1500 in it. I did have to patch up the frame rail under the battery as it had seriously rusted out like most 128s on the East Coast.

carl
 
I missed an update last week.

We have a roller again!

20151208_204434_zpsdcopqjjh.jpg


I would have taken some pictures, but it was completely uneventful. So, I'm calling the swaybar mounts a success for the time being. I put 2 alignment shims per side back in as a total guess. It had 5 on each side with the old swaybar. I really won't know how far off it is until I take it to get aligned.

In other news, we are almost down to just a good old fashioned carb to MS install.

20151208_204919_zpsrewvg7ud.jpg


It feels good to get back into the swing of things. Hopefully another update Thursday or Friday.
 
Not much fun stuff to report on this end.

The MS Relay Board bracket I made for the Yugo didn't work out on the 128, so I knocked out a new one of those out of the same 16ga I made the last one out of and powder coated it in the black wrinkle I do almost everything in now.

20151214_195725_zpsae9kybby.jpg


It tucks up under the cowl nicely and is sturdier that you might think.

I also tracked down and liberated the wire that heads back to the Fuel Pump. Theoretically the wiring should be very straight forward at this point; it should just need switched 12v, constant 12v, the analog output from the wideband controller, and the fuel pump wire.

Despite my lack of trying, I was unable to get the shorter EFI Yugo belt to work with any tensioner setup, so I lost the 60-2 crank pulley. The car is now wearing a proper 1500 timing belt with an eccentric tensioner from a 1991 SOHC Isuzu Stylus. The tensioner is a hair on the small side, but it should work for now. I'll have to dive back into the MS board and go back to the optoisolator circuit instead of the VR circuit. Not really worried about it since we aren't controlling spark at this point. I'll play around with the 1300 on the bench and see if I can't come up with different pulley arrangement to get the toothed wheel back on at some point in the future.

The Yugo donated it's fuel filter bracket to the cause. It took a little fiddling and some creative bending, but it bolts on the 128 in the factory fuel pump location now. I also added a little hoop for a hose clamp, so it holds the inline Walbro now. Waiting on another M10x1.0->5/16" barb fitting before I can install it.

20151213_171153_zpsnsmyxfkk.jpg


20151213_172513_zpscjfuzsr3.jpg


The IAT bung on the backside of the intake manifold was stripped out and had been "repaired" with some JB Weld at some point in it's life. I drilled it out to 1/2" NPT and threaded in a brass plug, then tapped the brass plug to M12x1.5 (or whatever the sensor was) and called it a day.

20151214_195405_zpsxfprm1yh.jpg


"Honey-do 128 Edition"; is getting shorter by the day!

20151214_195014_zps8ztma2dd.jpg


Oh! A few months back on the Facespace I asked if anybody had any 2 post AM/FM radios kicking around that needed a new home. I've been wanting to see if I could get bluetooth connectivity through one of these for a while now; vintage good looks + modern functionality = perfect for this project. I was expecting a Blaupunkt out of a German built Rabbit or maybe something from a Saab. Then, at a little house party a few week ago, my buddy John handed me this:

20151215_160755_zpskeo5ps2w.jpg


And I am completely over the moon with it. And thanks to modern Science and some foresight from Becker, bluetooth connectivity is going to be extremely simple. That's a project for another time, though.

http://www.mercedeslist.com/becker-mp3.html
 
I couldn't ignore the swaybar


And bolts.

20151207_202900_zpss2b64m9f.jpg


And a motha' truckin' swaybar.

You should make up a few more of those while fresh in the mind. There is a market. Then the sway bars I have been collecting might go up in value. :devil:
 
You should make up a few more of those while fresh in the mind. There is a market. Then the sway bars I have been collecting might go up in value. :devil:

I'm not going to lie, I thought about getting with my buddy over at RyDelFab to see about getting some parts cut out on his CNC Plasma table (and then bent on his CNC press brake). I can't imagine there is a huge calling for these things, though. Something tells me I would be hard pressed to get rid of 10 of the things.

But, for what it's worth, there's likely to be a Burrito Industries SwayBar Bracket 2.0 here in the next few weekmonths. If I end up going the "from scratch" method, I'll have a stack of parts cut out since all the hard work will be done in front of the computer this time around.

Don't hold your breath, though. :thumbsup:
 
Yes, that would be helpful as I was not aware that the 128 had chassis issues with more powerful motors. My wagon has a 1500 in it. carl

Well an EFI USA spec 1500 only has 75hp, just like a European 1300, so that's not really a more powerful motor... I'm talking when you up it to around 90 plus at the wheels...which you can get quite easily.

SteveC
 
Nice workspace

I'm enjoying your writeup on this build. There is something so 'right' about 128s. Great fab skills and an awesome well lit garage is a great combo too! Reminds me of 'Project Binky' on YouTube. Don't know if you've watched it but well worth the time. Is that a Yamaha XS something in there also?
 
Thanks for the mojo boost, motoTrooper. Getting lumped in with the Bad Obsession guys is a heck of a compliment. The bike is a Seca, I believe. It belongs to the guy I split the shop with so I don't know much about it.


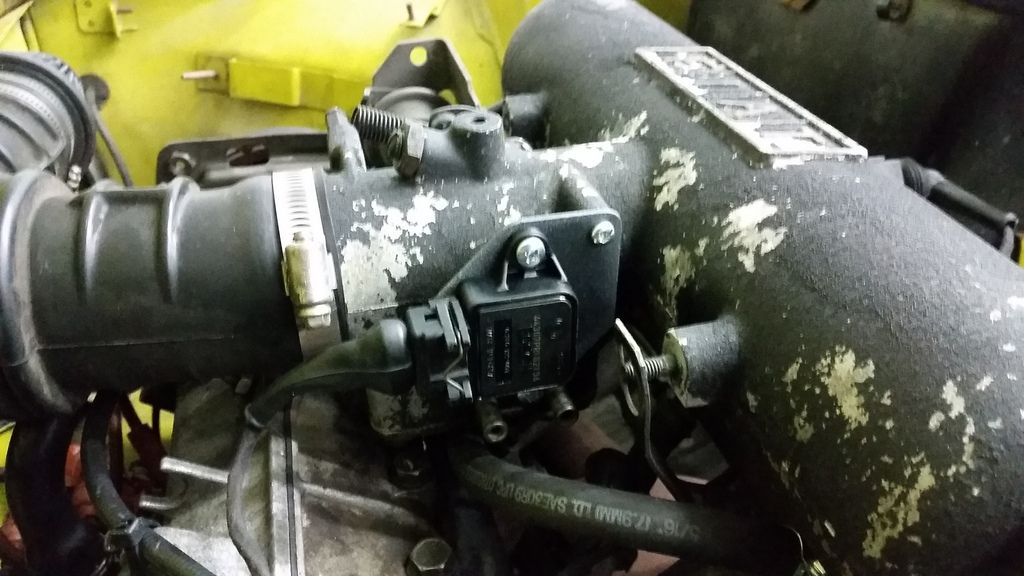
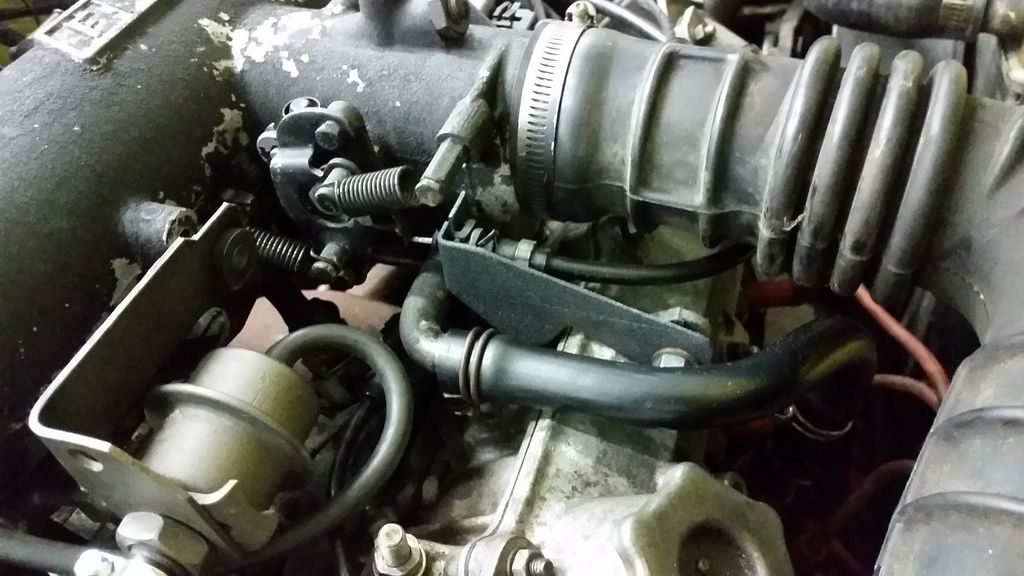
The bracket that held the TPS that PO had made was a giant pile of crap. It put the TPS in enough of a bind for it fail completely. The Bosch part number brought up a Saab and Volvo part, so a new one was easy enough to source and only set us back $30. Who knows, maybe that's the stock Yugo part, too.

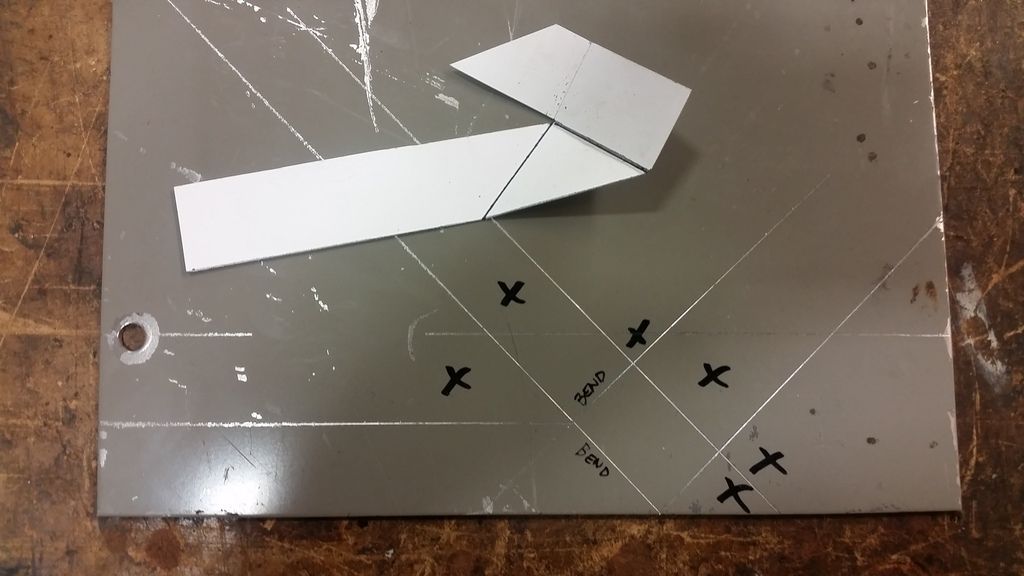
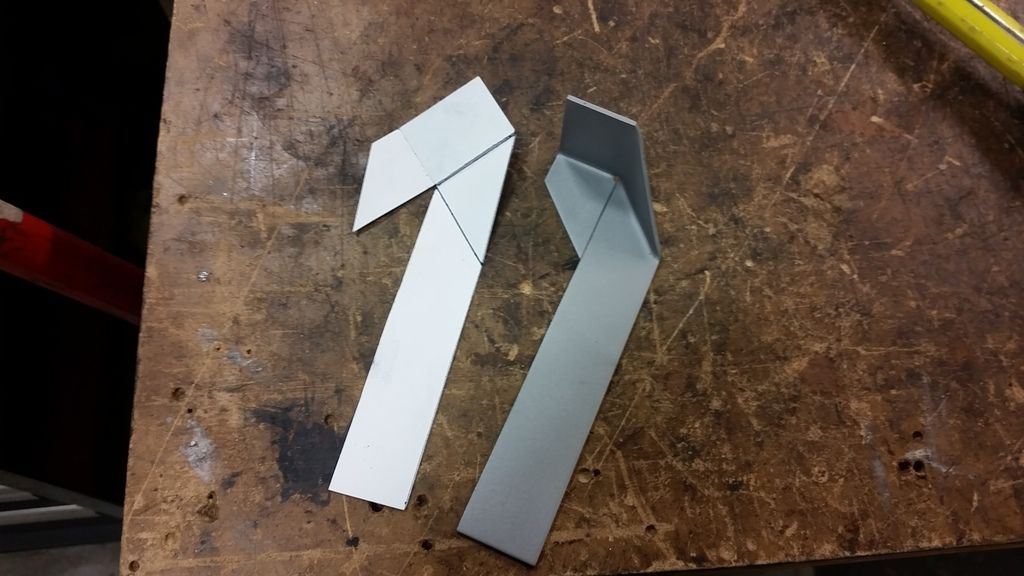
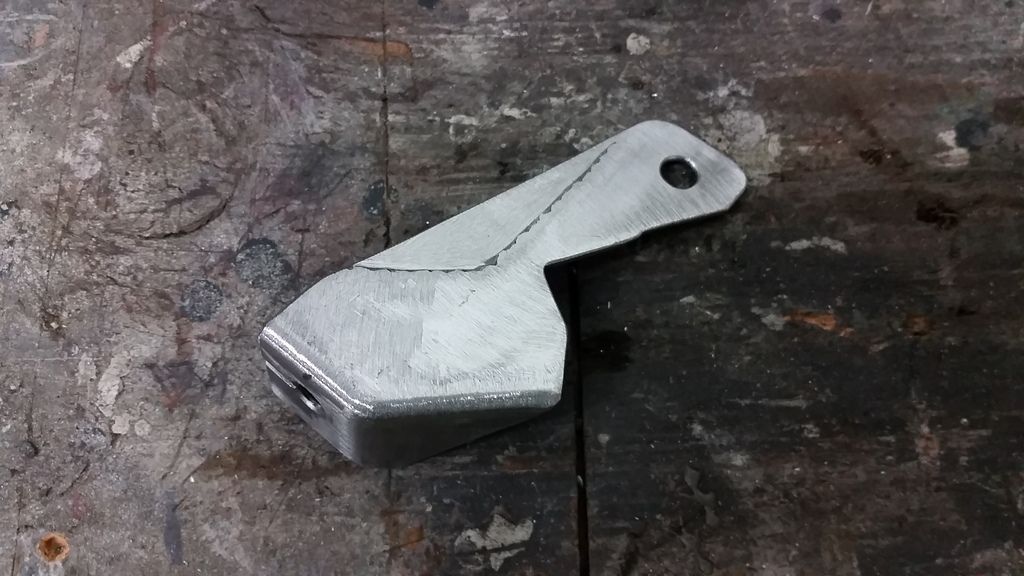
Here's the template and the finished TPS bracket knocked out of some 16ga.

20151223_131329_zpsyoeszzib.jpg


It slipped nicely into place after a trip through the oven with some black wrinkle coat.

20151224_114144_zps6pr84yjz.jpg


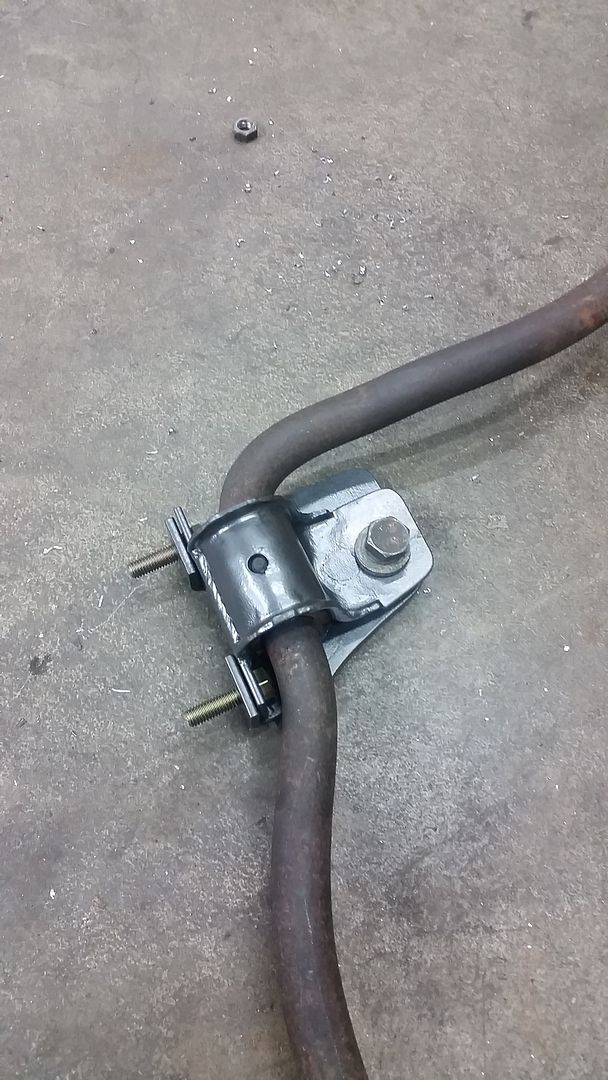
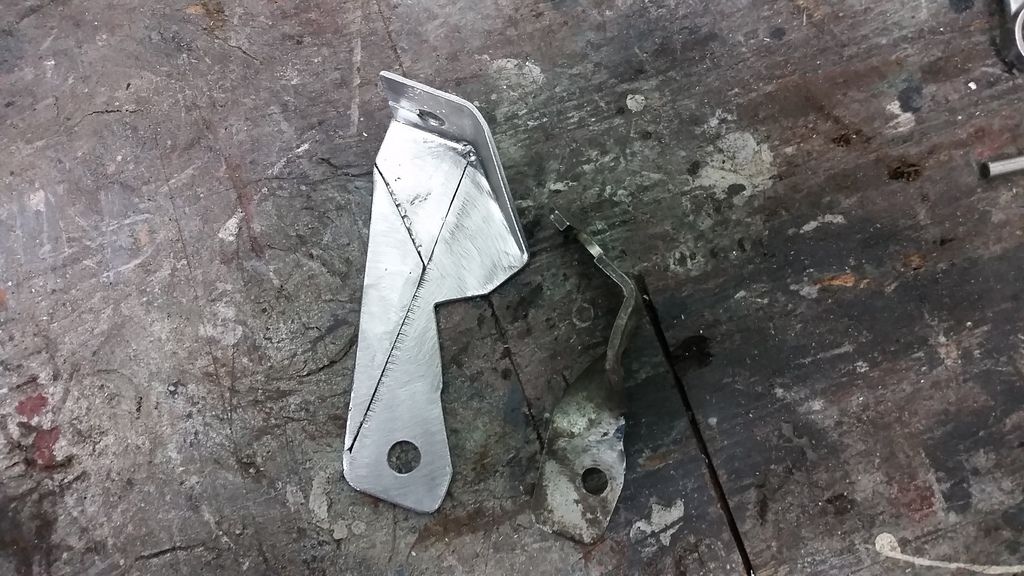
The same loving attention was used to make the old throttle cable bracket. I would have let the old one stay, but since I changed a bunch of stuff on the other end of the cable I needed more adjustment. I had a reaaaaaally slow day at work, so I got started on a new one with out any sort of measurements.

20151223_140437_zpsbwe3u1c1.jpg


20151223_142817_zpshdvvhmyw.jpg


After a fair amount of fiddling I had this (that's the old bracket next to it).

20151223_165712_zpsglvoe2mz.jpg


20151223_165726_zpsifmsvhkz.jpg


Admittedly, I took a bit of a long way 'round on this one, but it is done and does it's job nicely.

20151224_114131_zpspf2teenn.jpg


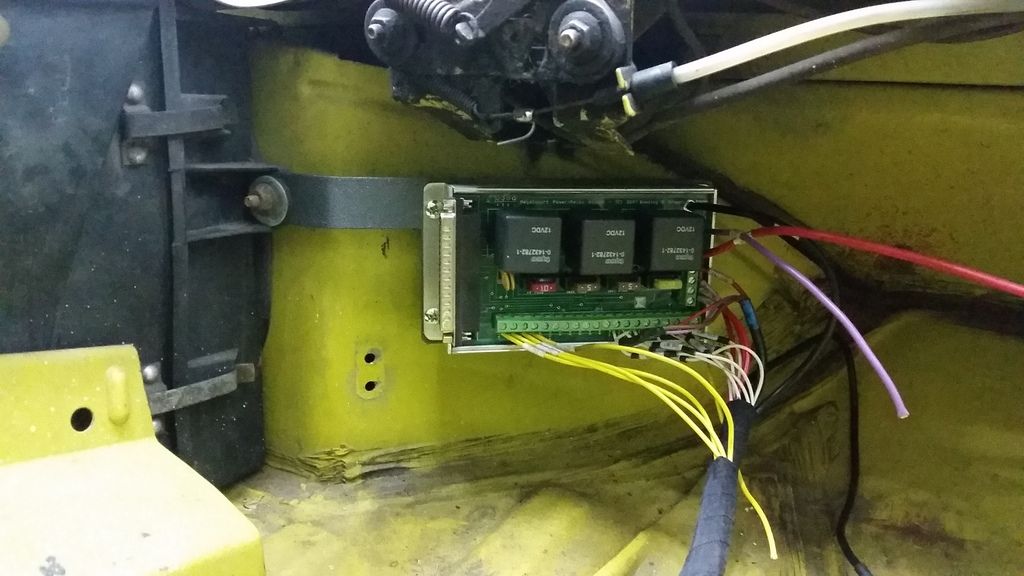
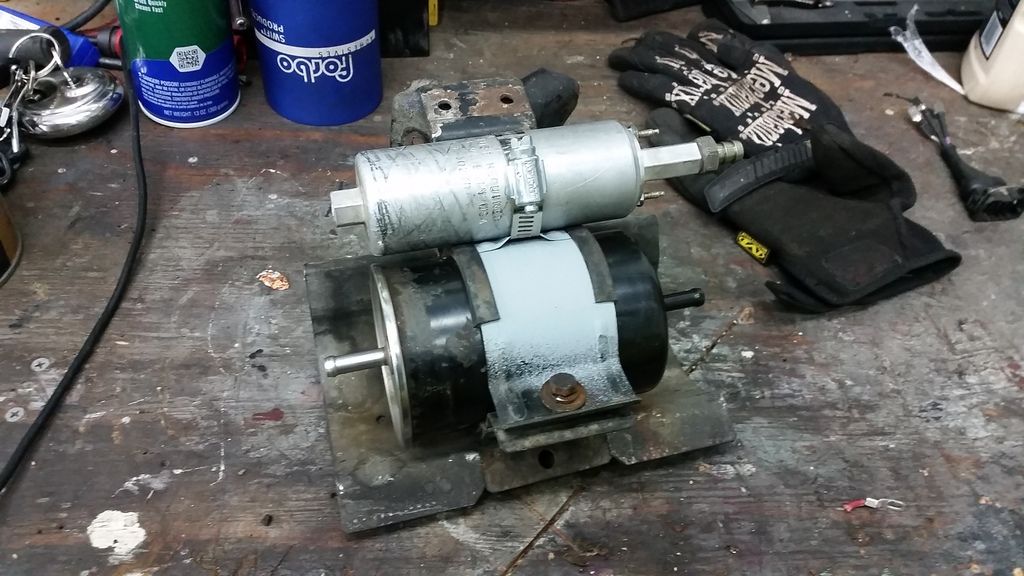
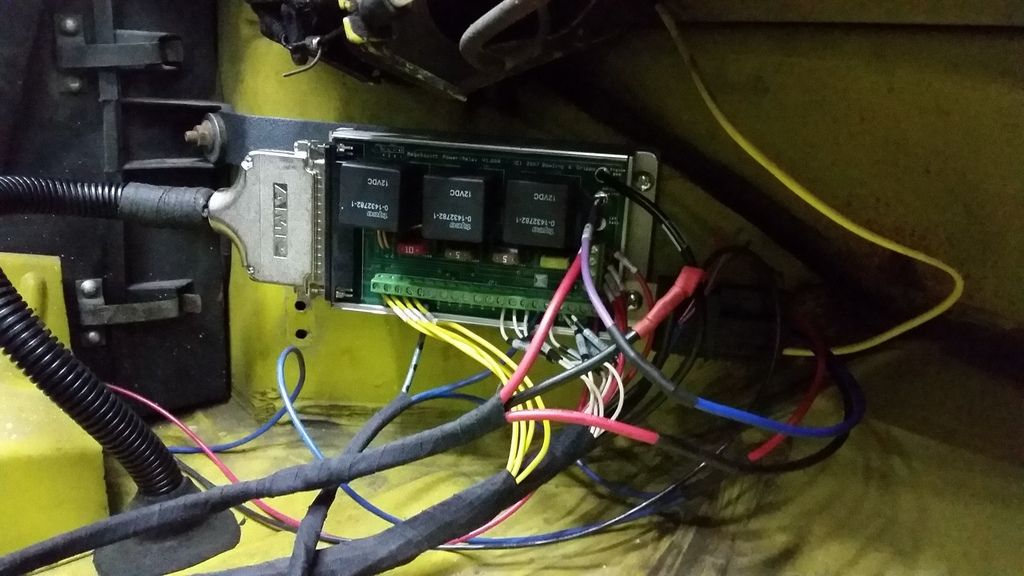
Other than those few things I have just been keeping busy with the tail end of the megasquirt install. The terminations on the relay board have seen better days, but whatever. I will get to cleaning this up in the next week or so. I'm all out of 3m Friction Tape in the meantime.

20151227_165612_zpsq7n1e4ba.jpg


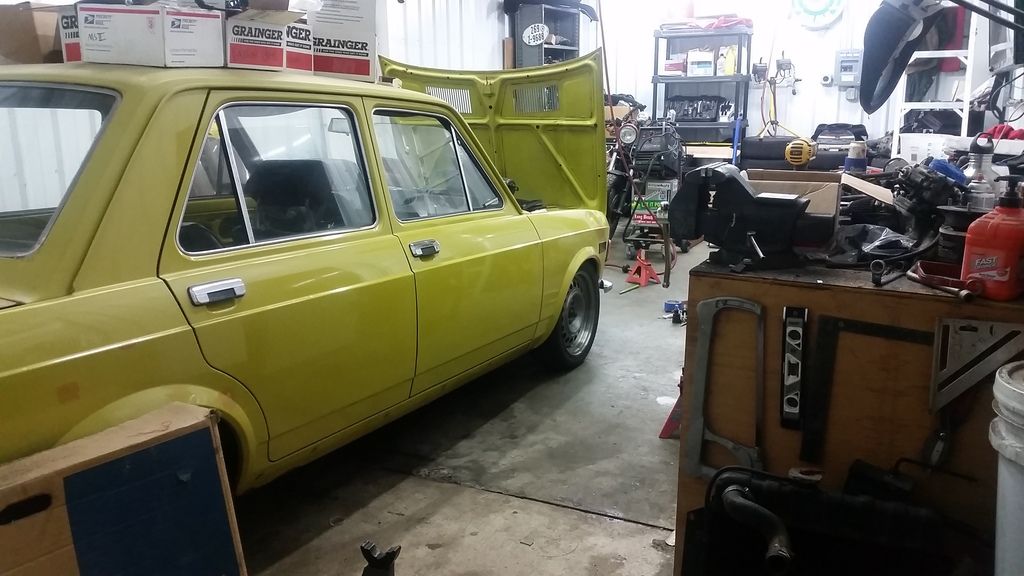
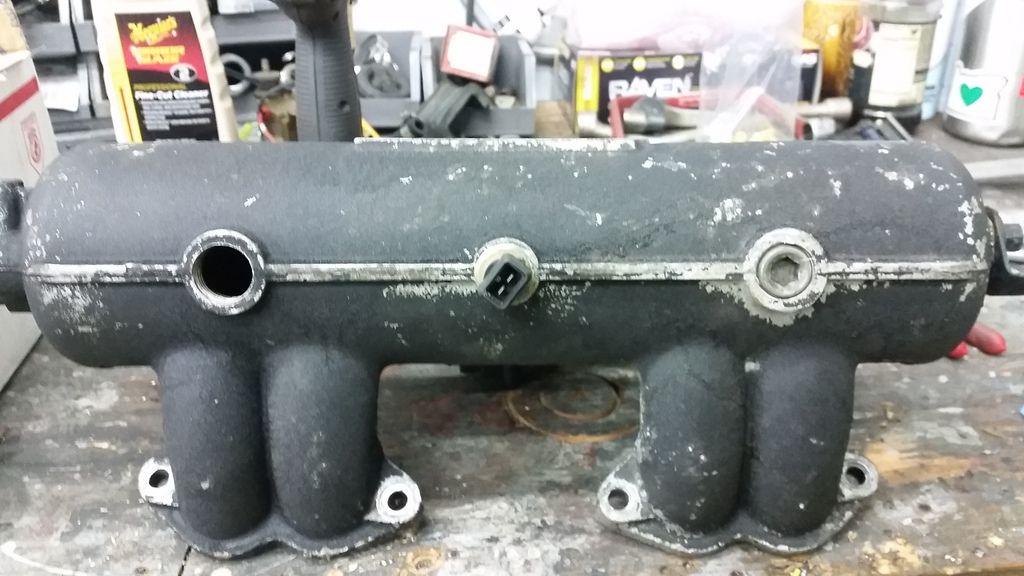
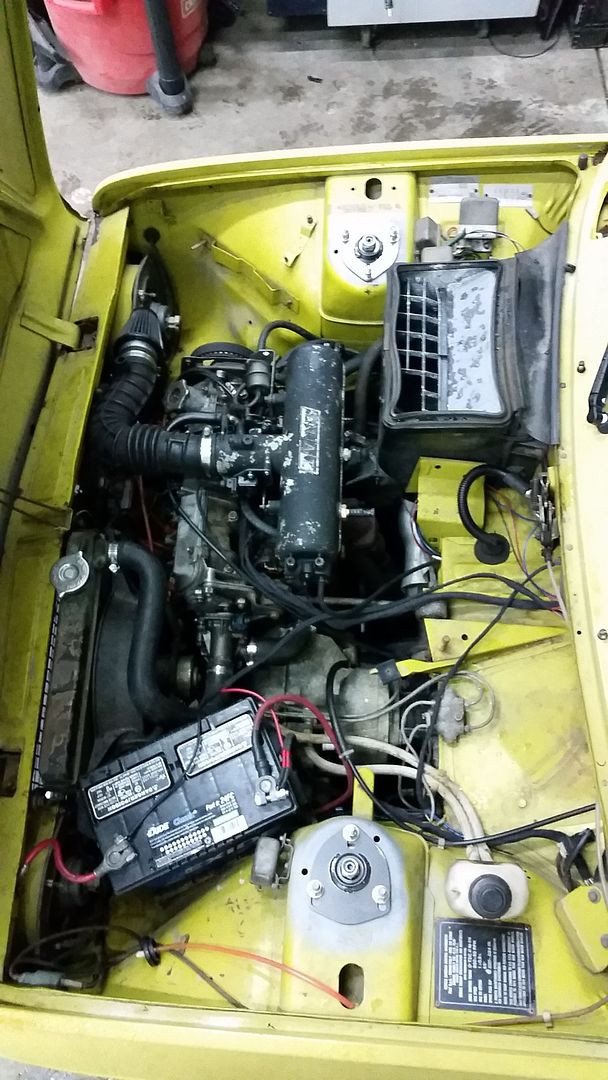
The bay is looking pretty good overall. The ugly intake manifold is really letting things down. I might be powder coating that this week as well.

20151227_165622_zpsf6kfhyia.jpg


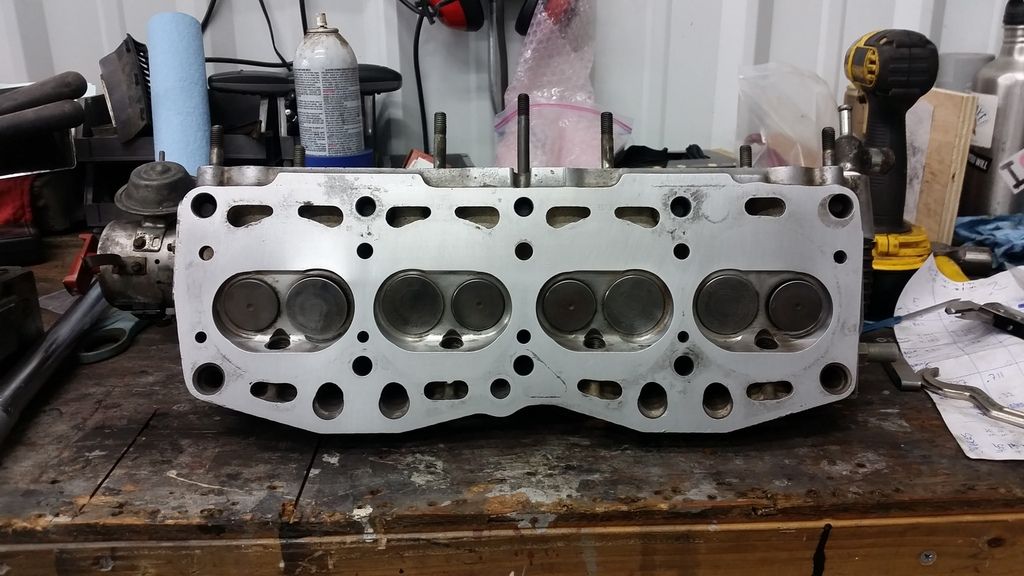
The car is running berkeleying fantastic now after a bit of basic tuning. The laptop I'm using has very limited battery life so I'm just doing what I can to make sure the engine is safe and isn't going to have a meltdown in the meantime. According to some old posts by Guy Croft, if you put a F.I. 1300 Yugo head on a stock 1500 bottom end you end up with roughly 10.6:1. So, as you can imagine, it berkeleying rips on the bottom end. I expect it to fall off pretty hard up top, but the added torque should help with the taller 5 speed ratios. Hopefully once we roll some miles on it, the rings will seat in and it will be even better. I keep forgetting that this bottom end was essentially junk.

20151227_162700_zps36l3fvd1.jpg


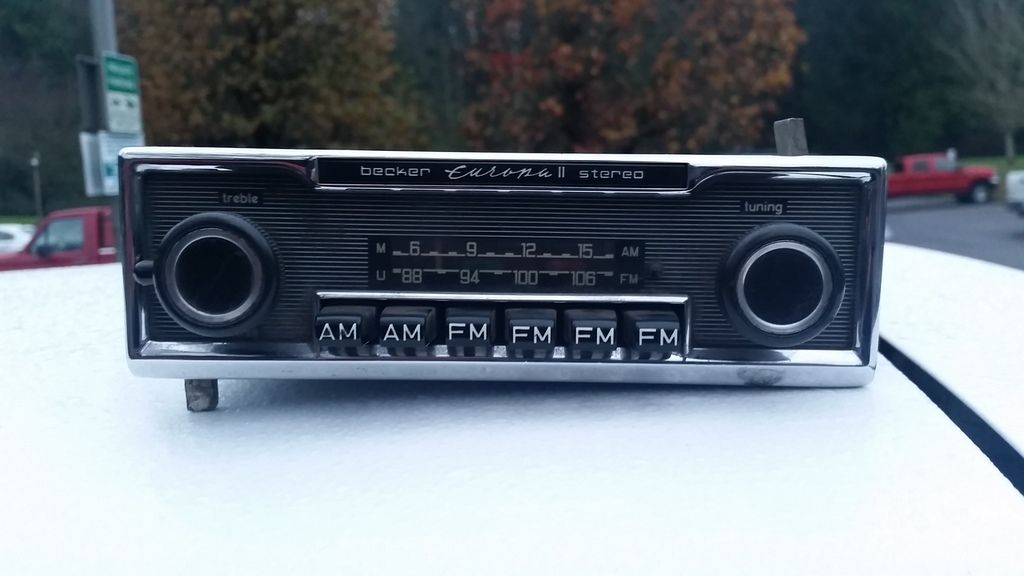
And, since the holidays are now behind us, I can finally share with you guys the little surprise I picked up fory wife.

20151227_171755_zpssur1ca5i.jpg


Hopefully I can get back to updating more frequently now that the boring MS install is done.
 
if you put a F.I. 1300 Yugo head on a stock 1500 bottom end you end up with roughly 10.6:1.

If you remove the USA spec head with full circular decompression recess and fit a head that doesn't have the recess (like a euro 1300/1500 head) then with the large flycut pistons and standard thickness head gasket you actually have 9.2:1 ... if you also install pistons with the small valve flycut and a taller compression height than standard, then you get over 10:1 in a 1500...

SteveC

Ah, well, they don't call it the misinformation superhighway for nothin'. I was merely regurgitating what I had read elsewhere.

What category does the 1300 EFI Yugo head get lumped into? I'm guessing small combustion chambers, but are they roughly the same as the Euro stuff?

Here's the head that is on the car now.

20151019_185716_zpsr5sx8uvw.jpg
 
That Yugo head looks just like a euro 1300/1500 late model (post 1975ish) combustion chamber... 1300/1500 look the same except for exhaust valve size. Biggest difference is the seat throat size of the 1500, ports are just a little bigger on the 1500 too...so yep 9.2:1 with a 1.5mm (crushed) head gasket .. if you have the dual out cast exhaust manifold from the yugo,that static CR, the euro cam (and a carb) it's 85hp, so a bit of a jump from the 55/60 that the single barrel carb/single out exhaust 1100cc engine had...and quite a bit more torque (around 85/90lb/ft)

The 'small' combustion chamber is to suit the 80 / 80.5 mm bore engines (it only measures about 81mm across) whereas all 1300/1500 have a combustion chamber thats approx 86.5mm across, to suit the bigger bore size.

SteveC
 
What category does the 1300 EFI Yugo head get lumped into?

20151019_185716_zpsr5sx8uvw.jpg

Looking at the head a little closer (enlarged the pic for my old eyes) it could be an 1100cc type head, as the remnants of the fire ring mark looks to be quite a way in from the edge of the combustion chamber...

So it might have come off a 1300 yugo, but looks like it's not a 1300 head (at a second closer look)

Does it have any distinguishing marks (cast in at the front of the cam drive end)

If it's the small (narrow) combustion chamber head, then yes you'll be up around 10.5:1,so yes it will have good punch down low, but will run out of puff due to valve shrouding and the small port size at around 5500rpm

SteveC
 
Hopefully I can get back to updating more frequently now that the boring MS install is done.

Documenting a MS install is anything but boring. Additional details would be excellent should per chance you choose to share.

Nice work all around. Nice little fiddly sheetmetal bits :)
 
1100 vs. 1300GVX vs. 1300EFI

The easiest way to verify if this is indeed a Yugo 1300 EFI head is to simply look at the intake ports - they should be factory-notched for the fuel injectors like an X1/9 FI head is. After that, refer to the casting number on the side of the head, just to the left of spark plug #1.

I'd say this looks to be a Yugo 1300 head, due mainly to the noticeably-larger valve deshrouding & the extra "swirl" cut (flow relief) around the intake valve on the short side of the chamber, like on this Yugo 1300 carb (GVX) head I have:


Versus the Yugo 1100 chamber shape where it's a straight line right across the short wall & with tighter valve shrouding clearances:


Yugo 1100 head casting number is: 128A000 4469750


Yugo 1300 carbed (GVX) head casting number is: 01 652 128A6.064


Yugo 1300 EFI head casting number is: ???
 
Yugo heads

What category does the 1300 EFI Yugo head get lumped into? I'm guessing small combustion chambers, but are they roughly the same as the Euro stuff?

The Yugo 1100 head has a small combustion chamber, like the USA Fiat 128 1100, but with no milled decompression recess.

The Yugo 1300 (carb/EFI) chamber is wider, like the USA Fiat 128-X1/9 1300, but with no milled decompression recess.
 
Excellent information!

You folks have a wealth of knowledge. Thanks for taking the time to share it with me and clear up a bit of misinformation I had read elsewhere.

I'll grab the casting number and post it up tonight.
 
So the yugo 1300 efi head has notched inlet ports? Isnt the yugo injector placement different to the x19 though? It's straight above the port and not angled like the Fiat, so is the notch still in tbe same place? Sounds like the efi yugo head would be a poor mans upgrade for any efi x19 ....

Thats some good info (yugo casting numbers) that I can include in my sohc tome...you don't mind if I use your pics Jeff?
SteveC
 
Back
Top