Project Mutant: Resurrection of an 82 FI basket case

(Apr 21, 2018)
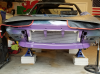
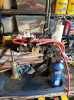
Project Mutant: Completed creation of a closed-loop cooling system without radiator, and without thermostat. The idea is to get clean water running through the system BEFORE I hook it up to the new radiator, refurb heater core, and new coolant tubes. Ran some fresh water into the system. It works. No runs, No Drips, No Errors. Flows water. Put fresh water in, get rusty gnarly water out. Water from the system is REALLY ugly, as I expected.

Done for the day. Will be doing several cooling system flushes tomorrow until the water flows clean, THEN I'll add some cooling system cleaner chemicals, and run THAT until things are clean.

Hooked up the instrument panel I received with the car. I don't think it is the correct one for the car. The tachometer seems like it is reading 500 or more revs to high, the charging meter and temperature meter don't seem to work, and I get no reading for the fuel level. 36 year old problems.

(Apr 22, 2018)
Project Mutant: After 3 fresh water flushes, and 2 chemical flushes, the coolant system in and around
the engine is running CLEAR!

Removed the thermostat housing, and all of the temporary cooling hoses and heater hoses I installed to do the flushes.

Now, back to working on the underbody coolant pipes and heater pipes. Getting closer to completing the cooling system revival, and upgrades. We'll see what the next week brings.

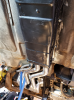
I did find another area of rust through in the drivers footwell. I'll get that done after I get the underbody work done. Then brakes and clutch assembly attachment and bleeding, and it will be ready to sit on its own four wheels again.

(Apr 23, 2018)
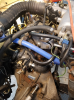
Oh yeah. I also rebuilt the dogbone upper motor mount. The rubber at both ends had perished, the hole in one end had elongated until the engine would wag back and forth at will.

Using the Chevy transmission mounts (#2122). It took quite a bit of sweat and muscle to get the new
bushings in, but TOTALLY worth it. $8 worth of mounts and a little time (less than an hour), and the dogbone is as good or better than new. Especially since the new dogbones I saw (which were all out of stock anyway) were from $40 to $60.

(May 6, 2018)
Project Mutant: Time for an update...

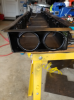
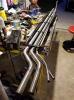
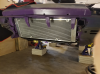
I got an excellent start on getting the box under the car where the coolant lines run nearly complete. Because I am running coolant lines that are slightly larger than stock (and STAINLESS STEEL), I decided to make the box slightly taller.

The larger tubes required more height. So, I extended the box sides 3/8" taller. I then fabbed up a new front end and just need to fab up the rear end, and then I am ready for the new tubes.

I am also running BOTH of the new stainless steel heater lines in the box, rather than running one in the center console.

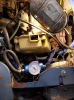
I replaced all of the coolant hoses in the engine compartment. Thanks to Bertie from Canada, I also have an excellent condition coolant tube from the brand new water pump, replacing the one that had holes in the big tube, and the small tube.

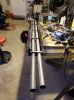
By the end of next week I will either have new stainless coolant tubes welded (all materials are on-hand, the appropriate skill set is not!), or have a new set bent. I decided to NOT bend the front of the tubes.

Makes them easier to work with and I can fabricate something for the front end of the car to the radiator.

(May 13, 2018)
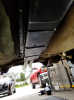
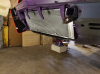
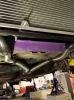
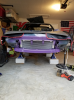
Project Mutant: The coolant tubes and heater tubes are in the box, and after some more 'massaging', the box is ready to go back under the car.

Need to get some body panel adhesive to make sure the box is structurally sound when I mount it to the bottom of the car, and some sealant for the ends of the box to keep the nasty stuff out Then need to get the front tubes cut off where I want them to be. Then, ready to mount everything back up and start finishing the cooling system and heater.

As far as the overall job quality? It is not my best work. But in the words of a wise old woman, spoken with a deep-south drawl, for some reason in Brainerd Minnesota "It ain't gourmet, but it's food."

Also determined today that I have the incorrect speedometer cable. The one that came with the car is for a mid-seventies X1/9, and won't connect to the speedometer. One more thing... :-( Oh well, I wasn't planning on doing any measurable speed any time soon.
 

Attachments

  • 20180506_173158.png
    20180506_173158.png
    726.9 KB · Views: 160
  • 20180506_174031.png
    20180506_174031.png
    942 KB · Views: 153
  • 20180506_174052.png
    20180506_174052.png
    1,006.3 KB · Views: 154
  • 20180513_201502.png
    20180513_201502.png
    931.9 KB · Views: 171
  • 20180513_203136.png
    20180513_203136.png
    972.2 KB · Views: 159
  • 20180513_203140.png
    20180513_203140.png
    949.7 KB · Views: 186
(May 18, 2018)
Project Mutant: Progress is being made. Holes in under-car tray have been filled. Seams for end caps and around pipes have been sealed with automotive seam-sealer. Radiator box has been de-rustified, and primed, and painted a temporary color.

"This isn't even my final form!"

New (correct) speedometer cable arrived.

Tomorrow, have some mikey-do items to attend to, then grind the mounting area for the under-car tray smooth (spot-weld cutter leaves behind flotsam and jetsam), and drill five new holes in the side of the tray for the new speedometer cable mounts.

Then, we clean the mounting surfaces, pre-drill a few dozen holes in the tray flange for pop-rivets to hold everything in place, and lay on the two-part epoxy auto body part adhesive. Then I have 90 minutes to get the tray up where it belongs, and pop-rivet it in place to allow the body adhesive to cure for a day. After that, it is a one-piece with the rest of the car, forever. A day later, and I can hook up the hoses and maybe even get the radiator in place.

(May 20, 2018)
Project Mutant: Minor milestone. The under-car tray with the new stainless steel coolant and heater lines is completed, and is mounted, with the aid of body panel epoxy and a couple dozen self-tapping screws.

4 hours set time, then I can seam-seal all of the little gaps at the corners, attach all four of the hoses in the back, run the new speedometer cable that mounts on the side of the tray, and start reinstalling the heater core in the dash.

Tomorrow evening, I can put the front radiator hoses in place, and start figuring out how to mount the radiator lines and keep them neat and tidy in the front.

BTW - if you are in Jacksonville area, and need some thin stainless tubing TIG welded, I know a guy.
 

Attachments

  • 20180518_192843.png
    20180518_192843.png
    885 KB · Views: 154
  • 20180520_101432.png
    20180520_101432.png
    990.1 KB · Views: 141
  • 20180520_101440.png
    20180520_101440.png
    830.9 KB · Views: 141
And now that we are all up to date...

The rear hoses for the coolant and heater are hooked up.

The drivers side floorboard has been repaired. Decided that rather than weld in a piece (my 20 year unused welding skills were not up to that task, sadly), to flange the car body, and use panel bonding epoxy to hold the new piece in place. Also cleaned some surface rust and did some prep work to get ready to hook up the radiator. Should have the heater core back in place tomorrow morning. Then comes the absolute joy that is filling the coolant and bleeding the air from the system. Yay.

Since the floorboard is repaired, after the heater core is in place, I plan on (Finally) installing the new master cylinders that are already mounted on the refurb'd pedal box, after I bench-bleed the masters. Then comes the absolute joy that is bleeding the clutch slave and the brake calipers. I hope the speed-bleeders live up to their hype.

If you read this far, thanks for stopping by!
 
Last edited:
I haven’t read it all yet, I will.

You might want to remove the speed bleeders until you have some fluid in the system. Or push fluid into the system under light pressure.

Thanks for bringing all this over. A ton of work, quite impressive to say the least.
 
Thanks Karl. Definitely will be using the push method to get fluid from the reservoirs to the master cylinders and out to the peripherals. Will be bench-bleeding the masters to start to make sure they are lubricated well.

I can remove the speed bleeders, although they do seem to flow pretty well when they are loosened enough to allow flow out from the calipers. I'll update in a day or two.
 
(Apr 15, 2018)
Project Mutant: Some things are just too good (bad) not to share.
.

Based on that mess, what are you doing about the t/stat housing and inside the block & head? It is very likely they are in just as bad a shape.

EDIT - missed the post at the beginning of this page - but what did the t/stat and housing look like? The inside of the head when you removed it?
 
Based on that mess, what are you doing about the t/stat housing and inside the block & head? It is very likely they are in just as bad a shape.

EDIT - missed the post at the beginning of this page - but what did the t/stat and housing look like? The inside of the head when you removed it?

Ran a cheap bore scope in where the thermostat housing bolts to the head, and where the water pump is on the block. Did not see too much debris and none of that crystaline cement junk. Actually looked pretty good. With the nearly new thermostat housing, and a brand new water pump, and a nearly new tube that connects the water pump to the thermostat area (in addition to new thermostat, hoses, gaskets, etc), I flushed the block system and chemically flushed the block until things were clear.

It actually looked like things like the heater core, radiator core, and other areas were not affected. Weird. It looked like it mostly affected the 'low flow' areas, like the heater control valve, and that little bottom section on the water pump housing.

So at this point, I'll just have to put it all back together, and closely monitor the condition of the coolant (got a clear filter to do that), and the temperatures under load. I have a feeling that I'll be changing the radiator fluid a few times after I get it on the road.
 
Chaos Car Theory: The longer things take, the more scattered the parts become, and after time, the parts simply fade into non-existence.

I had a container, clearly marked, with all of the clips for the heater box and fan mounts. The container has now vanished. It has either found the best hiding place, or the gremlins came and gobbled it up. So, I can't finish mounting the heater core and box until I have some new clips. Ordered from MWB. I know that as soon as they get here, I will find the container. That is one of those unavoidable Karma things.

There is a bolt that is in the rear of the heater box that passes through to allow a mounting point for a support for the heater core down-tube. That is a bolt. It is not a stud. It is not fastened. If you push against it, it will fall back into the heater box. That has now been bonded in place, after it had been spoken to in a very rude and derogatory manner. I doubt that it will attempt to leave again.

Good chance to head over to my favorite auto parts stores and get the pieces I need to pressure-bleed the brake and clutch.

Then tomorrow I'll get the front of the cooling system and radiator installed. I can at least do something while I wait for the clips. Might even install the pedal box and connect all the hoses, even if it does infringe on working space for the heater box.
 
Chaos Car Theory: The longer things take, the more scattered the parts become, and after time, the parts simply fade into non-existence.

Yeah - that's why I'm leery of dismantling too many systems at the same time. I'd never consider gutting a car to the shell & expect to still have all the parts I removed. Working one system at a time is the process I try to stick to whenever feasible :D
 
Project Mutant: Good times. While waiting for the replacement clips I ordered (that will replace the ones I lost!) to finish re-installing the heater box inside the car, I went ahead and did some more work on the front of the cooling system

Lo and Behold! The Mutant now has a face! A shiny aluminum radiator with dual fans, and stainless steel pipes under the chassis. Someday I will replace the corrugated stainless tubes with fabricated stainless tubing that matches the rest.

But for today, this is a good thing.

Done working for today. Time to watch the Monaco F1 race from the DVR.

Tomorrow maybe I tackle getting the pedals back in.
 

Attachments

  • 20180527_112419.png
    20180527_112419.png
    876.5 KB · Views: 169
  • 20180527_112423.png
    20180527_112423.png
    833.9 KB · Views: 154
  • 20180527_112506.png
    20180527_112506.png
    1 MB · Views: 164
Project Mutant: The little rascal now has a chin to go along with his new face. Installed the front spoiler that had been stripped and primered months ago. BTW - the purple color is NOT the final color. That will be a metalflake deep glossy purple applied by someone who knows what they are doing. The current purple is rattle-can coverup so the primer does not absorb moisture.

Tech tip: On the 82, the spoiler is held on by a bolt that goes into the side of the car, AND has tabs that go on the studs that support the lower radiator support. The spoiler MUST go on FIRST. If you install the radiator, and then install the spoiler, you're gonna have a bad time. BTW 2 - My radiator came from Vicks Autosports. It had some aluminum studs that stick out the front of the lower part of the rad, that interfere with the spoiler, and so they had to go.

Also got the brake master cylinder and clutch master cylinder bench-bled so they won't be running dry seals when I install them in the car. Tomorrow mornings task is to get the pedal box with master cylinders installed. WooHoo!
 

Attachments

  • 20180527_190634.png
    20180527_190634.png
    818.6 KB · Views: 151
  • 20180527_190644.png
    20180527_190644.png
    965.9 KB · Views: 136
  • 20180527_194121.png
    20180527_194121.png
    1 MB · Views: 166
Hey Mechanogeek,

welcome to the forum and congratulations on a nice write-up! I wish I had the patience to document my work in the detail that you do.

Just one suggestion that would make it easier to read the thread: you can post photos inline rather than simple attachments, e.g.:

logo.jpg


Just click on the "full image" button next to the attachment:


Snap 2018-05-28 at 10.53.42.png

Having inline photos gives them more context.

Cheers,
Dom.
 
Interesting color. Where are pics of the whole car so we can see it all together?

Well, here's the thing... The car is still blown apart. The frunk, rear deck and engine covers are along the wall, along with the targa top. The wheels are in a stack in the corner. The seats and carpet are waiting to be installed, and the dashboard wiring still looks like a free-for-all octopus wrestling match. Once I get the mechanicals reasonably sound, and the beasty sits on it's own four wheels and is driveable, even without a windshield, then I planned on posting some photos of the whole car.

However, I decided to take a couple photos this morning to keep things in context. I'll post them here. Resurrecting a car is like battlefield surgery... Right in the middle of the process, nothing is pretty, and there are blood and guts strewn everywhere. Only after it is done do the results start to look acceptable. Also - I work on the premise that a messy workshop is a happy workshop. If I had to share space with someone, it would be different.

The black primer is a rust restorer/preventative. The purple is rattle-can coverup for the primer. The car was originally Medium blue. The white-ish color is some thick primer like substance used by the PO. Before the car gets painted, I will be taking it down to bare metal, as much as possible. Can't afford media blasting.

The car was left out in the elements (in Florida humidity and moisture and rain and heat) for YEARS without cover of any kind. The previous owners dad was going to do a paint job, and ended up taking it apart, doing some sanding and primer, and then had issues and was unable to continue, and wasn't inclined to put the car back together, and so it sat. Trunk lids and engine covers were stacked somewhere 50 yards from the car itself, and frankly I am surprised at how little rust through there actually is. (So far the drivers floorboard is the only place that needed some new metal). Some of that old primer actually has spider-line cracks "crazing" in it due to weathering, and will need to be removed completely anyway.

The rust hole in the drivers floorboard has been repaired, a primer coat applied, and some paint. That will be covered by sound insulation, padding, and carpet when I get around to working on the interior. The pedals should be installed today. The white circles are reminders for the holes in the body that will be filled in and smoothed over. Not that I'm a MN Vikings fan, but I took someones suggestion to go with yellow brakes with a purple car. We'll see how it looks in its final form. There are a couple minor dents that need to be massaged at the front of the car, and I will be completely altering the headlight area. Old headlight buckets, motors, and etc are in a box. The headlight bucket area will be filled in, and a new set of projector beam round HID headlights will be installed below belt line. And no bumpers, so no bumper mounts, no side marker lights or external turn signal lights (will be replaced by LED button lights), and nothing sticking out. I will be using the stock tail lights, as I actually think they enhance the back end styling.

The flag in the background is from Wales, where my ancestors from the 1600's are from, in Gwynedd county.

Dom - I will put the photos inline. I understand your reasoning.

20180528_065437.png
20180528_065506.png
20180528_065550.png
20180528_065627.png
20180528_065642.png
20180528_065722.png
 
Last edited:
Project Mutant: The little rascal now has a chin to go along with his new face. Installed the front spoiler that had been stripped and primered months ago. BTW - the purple color is NOT the final color. That will be a metalflake deep glossy purple applied by someone who knows what they are doing. The current purple is rattle-can coverup so the primer does not absorb moisture.

Tech tip: On the 82, the spoiler is held on by a bolt that goes into the side of the car, AND has tabs that go on the studs that support the lower radiator support. The spoiler MUST go on FIRST. If you install the radiator, and then install the spoiler, you're gonna have a bad time. BTW 2 - My radiator came from Vicks Autosports. It had some aluminum studs that stick out the front of the lower part of the rad, that interfere with the spoiler, and so they had to go.

Also got the brake master cylinder and clutch master cylinder bench-bled so they won't be running dry seals when I install them in the car. Tomorrow mornings task is to get the pedal box with master cylinders installed. WooHoo!

Just as an FYI, the metal studs on the front face of the rad are attachment points for the A/C condenser.

Glad you decided to port your project posts to XWeb, much of the work you have done no doubt will look familiar to many readers!
 
Thanks Dan. That is useful information for the next person who is going to use one of those radiators.

Today I got the pedal box back under the dash, the hoses connected, and the brakes are 'bled'... The fronts seem to work pretty good, the right rear seems OK. The left rear is still not clamping hard, and the brake pedal has way too much movement. More bleeding is in my future, methinks. On the bright side, now the emergency brake seems to work correctly on the right side, and nearly good enough on the left side. The brake piston may not be extended far enough yet on the left rear. We'll try some more when the sun goes down.

I am having a heck of a time getting the clutch line connected to the clutch master cylinder. Gave up on that one for the day, since it is too hot now to work in the garage.

It's too late now, but I think it's in someone's previous lessons learned post regarding the pedal box---install all hard lines and run down the tubing nuts to finger-tight before securing the pedal box in place.
 
Thanks for the pics - always nice to see them in the thread VS thumbnails as Steve pointed out :)

I kinda like that purple more than the rather mundane dark blue - is the final color going to be similar?
 
My last clutch Master swap I did. the end piece on the Master had different threads and would not fix the hard line. (had to swap it from the first "remained" unit that was bad) Still working today (about a year (ish) later)
 
Back
Top