Intro and a bunch of engine/gearbox rebuild questions

B0b

Daily Driver
I am working on my 5th X1/9, a 1974 that si completely stock except for removing the air pump, and which is essentially free of rust. It is currently somewhat dismantled for a refresh of the engine and gearbox, and a thorough inspection. This car is identical to my first X1/9, which I bought new when I graduated from engineering school. That car was the only one n Saskatchewan, and one of 6 west of Ontario, as Fiat had just started importing them.
That car passed on to another member of this board, under whose care it survived a few Toronto winters before eventually turning into a rusted heap in mis parents driveway.
A while later, he found a more or less abandoned X1/9 missing its motor, and we decided to turn it into a autocross car. Stripped it completely, although we didn't cut off the windshield. We convinced Fiat to give us a slightly damaged 1500 that we hotrodded with an Abarth cam, a fairly big DCNF carb, etc. Lowered and stiffened a LOT ( probably too much) and put on slicks. Fun car but not competitive because of the class we wound up in. That car is still around, having gone through several metamorphoses.
My third X1/9 was an exercise in turbocharging, in a pre-electronic age. Built a couple of manifold iterations( pulling through a carburetor) , fooled around with some turbo sizes, and built a distributor that had vacuum advance and pressure retard. I determined the retard curve but trial and error, destroying the bottom end due to high speed detonation. Once sorted, it was a fun car that got passed on to a young man; lost track of it completely./
Fourth was a 1980 1500 FI 5 speed that was a business associates wife's daily driver. He was driving it to work one day when the clutch failed. He was fed up and so I got a great deal as-is, sitting in the work parking lot. Drove it home without a clutch, replaced the failed slave cylinder, and drove it for a few years until kids and other interests intervened.
Other Fiats included a 131 and a Strada, and along the way I was the last president of Fiat Auto Club Canada, ending when Fiat pulled out.
My 5th and current car was bought new by a classmate, daily driven in a non-salt area for a couple of years, then used as a summer car by him and another classmate. Because it is identical to my original car, I thought it would be nice to have and after 10-15 years of chatting, we did a deal over a beer and it arrived in Toronto on a trailer. It has 65,000 miles on it, and was running, although it definitely needed a once-over.
I immediately installed new master cylinders, wheel bearings, and brakes, just to make it safe while I figured out what to do with it. During the last few years, it has been driven a bit - enough to figure out what else is needed, and what I wanted to end up with.
I am going to keep it original, only touching up the cosmetics. I don't want a concours car as I want to drive it without worry. And there is something satisfying about it being sort of a survivor.
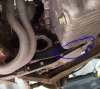
A couple of photos with the engine out:
20191011_152942.jpg

20191006_145021.jpg
 
Now for some questions.
The current project is an engine and gearbox refresh, driven by noticing that the blowby from the crankcase breather was approximately equal to the exhaust.
Took the engine out:
20191006_150456.jpg

took it apart:
20191011_152900.jpg

And found this:
20191008_164947.jpg

Does that 5mm ring gap indicate that maybe the rings are a bit past their best-by date?
SO a major rebuild is in order, and I am working through all of the engine and transmission to decide on a plan of attack. As I proceed I will undoubtedly be looking to the expertise here.
 
Welcome to Xweb and good luck with your project. It looks like a very nice survivor X.
 
Cylinder head:
Both the guides and the valves are in good shape ( valves replaced 1000 miles ago after a timing belt failure)
The valves and seats clean up with a very light lapping.
However, as long as it's out, I am thinking of having the seats remachined to a better shape - they are currently a straight 45 degree cut.
Like this; just not sure if it is worth it on a mild engine. I would change the port shape slightly but no major porting.
I see a euro cam, stock carburetor, and 9.5 or so compression.
Valve seats.PNG
 
Cam Timing and pistons
I have read a lot but cannot find a definitive answer to
  1. How much can the head/block/cam housing be machined before timing belt tension becomes a problem?
  2. How sensitive are these engines to cam timing - will 1 degree make a noticeable difference? 2 degrees?
  3. If I am going to have to buy new pistons, is there any reason not to bore out to 87mm? I know it would preclude another rebore but by the time that is needed it will be my kids problem.
Thanks
 
Now for some questions.
The current project is an engine and gearbox refresh, driven by noticing that the blowby from the crankcase breather was approximately equal to the exhaust.
Took the engine out:
View attachment 26874
took it apart:
View attachment 26875
And found this:
View attachment 26876
Does that 5mm ring gap indicate that maybe the rings are a bit past their best-by date?
SO a major rebuild is in order, and I am working through all of the engine and transmission to decide on a plan of attack. As I proceed I will undoubtedly be looking to the expertise here.
Here is the spectification for the piston ring end gaps. Your gap/s appear to be way out...

upload_2019-11-3_11-48-24.png
 
The ring question was a bit tongue in cheek - I have never seen rings worn to that extent. The bores are also worn, but only about 0.15mm; not enough to explain the ring gap. The width of the ring is about 2/3 of what it should be.
 
Hi Bob, glad you have joined the forum. And thanks for posting about your latest X project, please keep it updated as you go.

As for some of your comments/pictures, here are my thoughts:

First, I like your "cherry picker". I need one of those. I've also seen a forklift often used for this.

Second, regarding the worn cylinders and huge ring gap. I found the same thing before in one of my X's. I have to assume someone that did not know what they were doing tried to rebuild it. Sadly it had brand new pistons, ring gaps like that, but the cylinders had not been refinished so the rings got mangled up and terminally ruined the block (beyond boring) and the new pistons. Check to see what your cylinder diameters are as far as how much you want to bore them. Personally I would NOT automatically go to the largest over bore. For one thing it won't gain anything in terms of noticeable performance, for another it weakens the block, and lastly it does not give you any room for further work if something unexpected should happen to the cylinders soon after.

As for the valves. In my opinion I would not refinish them just to get a different angle on the seat. It really won't gain you anything on a stockish engine, especially not these engines...certainly nothing significant (in my opinion). Plus it opens up the door for lots of other changes in terms of seat regression, stem length/spring bind, etc. If they are good then I'd just lap them and leave it.

A Euro cam and a little compression bump sound great, but definitely NOT the stock carb. Find a better induction arrangement. Lots of options; see the related chapters in this write up:
https://xwebforums.com/forum/index.php?threads/ultimate-sohc-engine.22546/
I think I'd keep the stock '74 manifold but get a better carb for it. Otherwise I really like a single Weber DCNF with matching manifold.

I would not go too extreme on the head milling. Like I said, some increase in compression is good but not too much for a normal street driven 'stockish' car. Your suggested 9.5:1 sounds perfect to me. You will likely be boring the cylinders and getting new (oversized) pistons, so why not get some pistons with the increased compression rather than milling the head too much. I'm not a fan of making the head so thin (enough milling to get high compression out of these US spec heads). Too much risk of head warpage, cracking, and other problems that seem to be fairly common on these engines. I'd just have it surfaced to be true and do the rest with the pistons. This also avoids having to modify things to get the timing belt to fit. That can be easily done on a 1500 engine by using a 1300 belt tension bearing, but it's more involved on your 1300 engine.

Regarding cam timing. I've had these engines come to me with the timing belt improperly installed by 2 or 3 degrees and honestly you could not tell any difference. It runs best around the stock setting (depending on the cam and extent of engine modifications). But if you do the things you describe (9.5:1, Euro cam, stockish head) then I'd leave it at 0 degrees.

These are my take on things, others will have different opinions. I've found that extremely modified engines tend to be too problematic for regular street driving. There just isn't enough to be gained with these engines. If you desire any serious performance from a X1/9 then do a engine/trans swap. Otherwise keep it reliable and usable and save your money.

Hope to see you get it together sooner than any of mine. :D
Jeff
 
Compression ratio/deck height.
I measured the head and found the combustion chamber volume to be 30cc. Making the following allowances:
  • gasket 1.2mm, or 7.1 cc @ 87mm flame ring diameter
  • valve cuts 2.0 cc
  • volume above top ring 0.6 cc
  • bore 86mm
then to arrive at the stock CR of 8.5:1 the piston must be 0.5mm below the head surface.
Does that make sense? I cannot find a spec on the stock deck height. It doesn't seem to be published in the factory manual.

Because if the above is correct, then if I
  • install 87mm pistons with cupression height 0.2mm higher than stock, and
  • machine the head and block by 0.2mm (0.008") each
the CR becomes 9.3:1
 
Thanks, Brian - I have read that info but couldn't find the answers I seek.
Transmission; 3rd and 4th dog rings, synchros, and brake bands show little wear and other than flipping the synchro rings I'll just put them back together.
Reverse is a bit gnarly:
Image00022.jpg
Image00034.jpg
Image00035.jpg


They could stand to be replaced but it looks to me that there is enough engagement that one could do a bit of work to repoint the teeth. Or do nothing.

1st and 2nd are interesting. the synchros seem OK - there is just over 0.060" gap when the ring is pushed hard against the gear.
However, the dog teeth on the gears and the slider have taken some abuse. Funny thing is that it seemed to shift OK.
Opinions?
Image00022.jpg
Image00034.jpg
Image00035.jpg
Image00036.jpg
Image00037.jpg
Image00038.jpg
Image00039.jpg
Image00040.jpg
 
then to arrive at the stock CR of 8.5:1 the piston must be 0.5mm below the head surface
Unfortunately the factory specifications of 8.5:1 CR is incorrect. A few people have done the measurements/calculations and found it is actually more like 8.1:1. So you might need to do a little more verifying of what you have before doing too much.

The transmission issues you see are very common. Likely it has been worked on a couple of times and synchros and/or other components replaced. That might explain why some things look worse than others.
 
Nothing much to add with regard to the engine questions. Lots of good information already posted.

As for the transmission, I am not surprised that a '74 4 speed with 65K miles hasn't been apart. That looks like typical wear for the mileage.

Reverse idler, input shaft and 1/2 slider are normal wear items for reverse and those look typical. The reason I advise people to treat reverse delicately. 1/2 slider and engagement teeth also typical. .060 is a normal gap. The wear on these components is usually due to cold OE Gear Oil (GL1). If you want to do a through refresh, and replace these components with new, you are looking at roughly $1000+ in parts.
 
Thanks for the input.
I am thinking of what to do but since it was shifting OK, and the synchros seem fine, I am likely going to leave it.
If I was adding HP and/or planning on using it aggressively, I'd change them.
Interestingly, the input shaft reverse gear is in decent shape, without nearly as much wear as on the idler and the slider gear.
 
Decided to revive this thread with an update.
A couple of weeks ago I finally got the car on the lift ready for reassembly, after having the rebuilt engine and gearbox sitting for most of the summer. Engine went in easily from the bottom, and during the last while it has gotten plumbed and wired.
Many thanks to Doug for mailing the exhaust gasket I forgot to order, and to Cliff for lending me his bucket of valve shims and a clutch cylinder mounting bracket when mine disappeared temporarily.
Cranked it without plugs until I got oil pressure, then installed plugs, poured in a little fuel and be damned if it didn't fire.
No coolant in it so I didn't run it at all.
In the spring, I will put in water, run a heat cycle, check for leaks, and retorque the head.
Then start the run-in.
I ran into two things I couldn't figure out from photos.
First, the position of the retaining clip on the speedometer cable. I installed a new one; the photo below shows the cable in a natural loop, but I cannot see anything to bracket it to. Easy to invent something but a photo of an early stock cable bracket would be great.
clutch cable.JPG


Second thing is a switch on the bottom of the transmission. There is a extension wire that reaches from a plug near the firewall to the switch.
I can reconnect it but my manual doesn't show it and I wonder what it is for. It connects to a plug with two purple/black and one green/white wire.
 

Attachments

  • Trans switch.JPG
    Trans switch.JPG
    71.9 KB · Views: 60
A bit more detail about the work done while the car is apart:
Some of this was discussed in other threads.
Engine:
  • Euro cam and new aluminum pulleys
  • 1mm overbore with taller pistons, pistons weight matched
  • reworked combustion chambers, with matched volumes, about 10: 1 compression
  • mild porting, mainly matching ports to manifolds, and a bit of cleanup just behind the valves
  • main and rod bearings
  • crank, and flywheel balanced. Flywheel lightened a bit
  • new water pump
  • removed oil gallery plugs, installed tapped plugs after cleaning
  • new water jacket plugs
  • nearly new 32DMTRA carb on loan
Transmission
  • clutch plate and disc
  • seals
  • cleaned up some of the nicked dog ring teeth. It was shifting Ok before I took it apart and so I decided against replacing a bunch of transmission parts. Easy to do later if I misjudged
Other
  • alternator rebuild with new bearings
  • starter rebuild with new bearings
  • Aluminum radiator - old one was leaking a bit
  • redyed carpet
  • speedometer cable
  • dismantled instrument cluster, replaced bulbs and polished face to get rid of scratches
yet to do
  • recover seats, or repair. There was a plan to reuse parts of seats from the car I had in 1974, but there wasn't quite enough useable material.
  • replace a few iffy suspension bushings
  • deal with the paint - its a bit ratty.
  • fit a nicer timing belt cover - it has the original air pump one with the extension cut off. One of my "supervisors", who lent me the carburetor, thinks the cut up cover reflects my farm kid roots too much.
In addition to the above, it got wheel bearings, shock absorbers, brake rotors, brake caliper rebuild, and new master cylinders a little while ago.
 
Back
Top