Wiper motor maintenance, Someone has to know....

79X19

True Classic
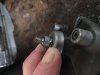
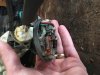
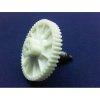
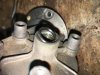
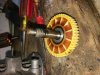
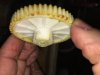
Checked past posts but can't find where anyone has posted info on how to clean up & re lube the drive gear in the wiper motor. I've cleaned every linkage and wiper blade posts and replaced some of the plastic bushings on the linkages from my parts car wiper assembly and now have attacked the motor itself. I have removed the housing and the wound motor to clean the brushes and contact surfaces. I've accessed the gear housing and attempted to turn the gear by hand and its really tough to turn it. I am feeling this should turn freely and not feel like its bound up.
Couple of questions:
1. How should that gear turn? Should it turn freely or is it supposed to be really hard to turn? I would think freely as if its hard to turn it would put undue drag on the motor.
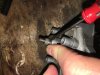
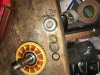
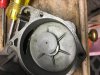
2. How do you get the shaft free on the outside of the housing so I can free the gear and clean it up and re grease it? Do I put a puller on the little bell shaped cover and put force on the shaft like when you pull a steering wheel off? See pic #4877
3. If the gear can be freed and removed what is the procedure to reinstall it and what sort of grease is best for this application?

P.S. I am in the middle of rebuilding the front calipers, redoing the pedal box, redoing the wiper assembly and redoing the cooling system and the brake and clutch reservoirs on and on and on..... I thought i would be able to drive this thing this year but every time i dig into one area of concern it leads me to 5 others that need attention. Good thing the body is sound on this thing!!!

Thank you! Kevin
 

Attachments

  • IMG_4848[1].JPG
    IMG_4848[1].JPG
    314.4 KB · Views: 294
  • IMG_4861[1].JPG
    IMG_4861[1].JPG
    377.1 KB · Views: 297
  • IMG_4874[1].JPG
    IMG_4874[1].JPG
    267.5 KB · Views: 329
  • IMG_4877[1].JPG
    IMG_4877[1].JPG
    261.8 KB · Views: 333
P.S. I am in the middle of rebuilding the front calipers, redoing the pedal box, redoing the wiper assembly and redoing the cooling system and the brake and clutch reservoirs on and on and on..... I thought i would be able to drive this thing this year but every time i dig into one area of concern it leads me to 5 others that need attention. Good thing the body is sound on this thing!!!
I am just beginning down that same road as you. Like you say, one step forward, five backward.

Looks like you have done an excellent job so far. If possible, please take more photos and add some detailed step-by-step instructions as you do this. It will make an invaluable resource for the rest of us (as you found, it doesn't seem to have been documented yet).

Hopefully someone has been there and can say for sure. But I'd be a little hesitant to use a puller or other force on it to try pulling things apart. Seems like it might actually do more harm than good; possible damage to a sealing interface (that may not be replaceable), or to the shaft, or the gears, or bending/distorting something, etc. Kind of feels like one of those situations where experience tells me to back off? Can the gear mechanism be cleaned and lubed while still in place, without pulling it apart more than you already have? As for the resistance to turning the gears, can you tell if it is the mechanical advantage (or dis-advantage in this case) of trying to turn the gears 'against the ratio' that you are feeling - as opposed to actual friction/sticking? There is a surprising amount of force offered by the small gear turning the large one, and therefore the opposite force in resistance if trying to turn them from the other direction (not sure how you are turning it). After cleaning and lubricating everything still in place, connect the motor's drive end to the gear assembly and try turning it again from the motor's side (vs from the wiper's side), do the gears turn smoothly?
 
Dr Jeff,

Yes I will attempt to put together a step by step on this process. Yes I agree and backed off once I couldn't figure out how the darn thing was built. I've been working on cars from American muscle to Japanese and never worked on the Fiat. My parents owned two X1/9s when I was a kid and they were new so nothing major ever needed attention. Now I'm knee deep in it with this one and I'm loving it. As Forest Gump said you never know what you're going to get when you open something or take something apart. I love the puzzle aspect of it.

In terms of your questions I've pulled the electric motor completely out of the housing so the gear should spin on its shaft. I've removed the linkage so its just the small shaft end that I'm putting finger pressure on and it takes quite a bit of force to move the gear. It feels as thorough the then end of the shaft is pushed too hard against the housing thus rubbing and making it difficult to turn. This is purely a guess and maybe its supposed to be hard to turn but that seems a bit counter intuitive. I see on MWB they sell the replacement gear so it has to come off somehow. I'm hoping someone has the answer.

The gear grease is almost 40 years old and is getting gummy which is why I wanted to try and clean it out.

Kevin
 
Thanks Kevin. It might just be the old grease that is making it hard to turn. Try cleaning it as best as possible with things as they are (no further removal) and see how much that changes the resistance. Wish I could offer more detail but I haven't torn one apart.
 
I'm with Jeff. I'd degrease the gear assy. in place, flush & see if it then spins freely. If it does not after cleaning/flushing, then you can consider pressing the shaft out of the casing. What's under that grey outer boot on the spline shaft? Is there a bearing you can see? That would be what's binding if it's not the grease. Not something I've heard anyone ever deal with.
 
Ok I'll decrease in place and see what that gets me. If I have to press it out to see what's what I have my parts car wiper motor as a back up if it goes sideways. Now I'm really curious to discover how this motor is' supposed to work. Maybe I've dug too deep when it wasn't necessary but I keep thinking why would they intentionally design a gear to have that much friction?? Especially on a motor that can't drive the wipers adequately under normal circumstances.

In terms of the question of whats under the bell cap I can't see. I imagine it's a bushing type sleeve bearing. And we all know what happens with a small bit of moisture with that set up.
 
You got me thinking about the performance of the wipers on the X. As with most of the car's electrical system, it usually lacks ample current supply after all these years. Thus the add-on relay / high current wire circuit fix. But if this has a bushing under there, and it commonly gets bound up as you are finding, then this could be part of the issue. The added supply of electrical current will overcome this increased friction but at the cost of added heat from electrical resistance. Just speculating. I'll be interested to hear if a cleaning and re-lube make it move more freely and how that effects the performance of the wiper system. After flushing with solvent, try some penetrating oil around the bushing (under the bell cap).

However, if I'm seeing the mechanism correctly the motor is connected to a small bevel gear, which acts on a large flat gear that's connected to the wiper post. Kind of like the differential in a transmission. If so, then I think a lot of the resistance you are feeling is due to the mechanical disadvantage of the gears; you are turning it from the wiper post side, which is a large gear trying to turn a small gear beyond it. So the leverage advantage of the gear ratio is working against you. Like prying on the short end of a lever. Is it possible to try turning it from the other end..the same way the motor drives it (from the small gear side), to see if it moves easier?
 
I have played around with it more this afternoon trying to figure out how this thing is put together. If I put downward pressure on the Bell cap it appears to be spring loaded which may account for the resistance I am feeling. See the pics of before i put pressure on the cap #4889 and after #4890. You can clearly see a gap develop and it feels springy. You can also see in the replacement gear that MWB sells that there is a channel machined into the shaft which appears to match up with the ring that is holding the bell cap in place. There is no gap in the retaining ring that would enable you to take it off and free the bell cap.

I understand what you're saying with regard to gear ratios but the worm gear on the end of the motor shaft has been completely removed from the housing (as seen in pic #4891) and is not in contact with the drive gear. The drive gear is completely free to move on its own and is pretty hard to finger turn. I'll give a call to Matt at MWB and ask him if he knows how this is supposed to turn and also I want to understand how this ring is holding the bell cap in place. I will confirm if the drive gear is supposed to turn freely (Spin) or with friction.
 

Attachments

  • IMG_4889.JPG
    IMG_4889.JPG
    148.8 KB · Views: 233
  • IMG_4890.JPG
    IMG_4890.JPG
    186.4 KB · Views: 227
  • IMG_4891.JPG
    IMG_4891.JPG
    267.4 KB · Views: 240
  • 492.jpg
    492.jpg
    124.8 KB · Views: 229
the worm gear on the end of the motor shaft has been completely removed from the housing (as seen in pic #4891) and is not in contact with the drive gear.
O.K. now I see what you have, sorry for my confusion. Ya, seems like the gear by itself should turn more freely. And I also see the clip-ring that retains that bell-housing...agree, that would have to come off. Odd that there is no split to allow it to open up (maybe cut the ring? But then replace it with what?). Will wait to hear what you find out. Thanks.
 
I have played around with it more this afternoon trying to figure out how this thing is put together. If I put downward pressure on the Bell cap it appears to be spring loaded which may account for the resistance I am feeling. See the pics of before i put pressure on the cap #4889 and after #4890. You can clearly see a gap develop and it feels springy. You can also see in the replacement gear that MWB sells that there is a channel machined into the shaft which appears to match up with the ring that is holding the bell cap in place. There is no gap in the retaining ring that would enable you to take it off and free the bell cap.

I understand what you're saying with regard to gear ratios but the worm gear on the end of the motor shaft has been completely removed from the housing (as seen in pic #4891) and is not in contact with the drive gear. The drive gear is completely free to move on its own and is pretty hard to finger turn. I'll give a call to Matt at MWB and ask him if he knows how this is supposed to turn and also I want to understand how this ring is holding the bell cap in place. I will confirm if the drive gear is supposed to turn freely (Spin) or with friction.
Just jumping in here. Is it possible that it is threaded into the gear shaft? Possibly left handed thread? Sure will be interesting to see the correct answer

Stoney
 
Looks like a spring clip goes in the groove that holds the hat down onto the nose of the housing.

Can you see a break in the clip?
 
I've checked for a spring clip configuration as that is a logical fastener type for this application. None is evident. I'll look at the possibility of a threaded shaft but don't think so as the picture of the replacement gear doesn't show this.
I spoke to Matt and MWB. He said the gear should turn freely. He doesn't however know how to remove the gear for cleaning and maintenance. So I know that Fiat sold the replacement drive gear as it would crack when it got very cold and the wipers were frozen to the windshield. If they sold the part it has to come off somehow.
I will figure it out and post a reply.
 
Having a back-up unit in the event of screwing this one up, I'd try whatever it takes to get my answer. :D

Perhaps just cut that "clip-ring" off and for reassembly replace it with a suitably sized circlip:
F0289247-01.jpg
 
This is an awful lot like a who dunnit mystery except it is how did they dunnit!!:confused::confused:o_O Can't wait for the next chapter. We will certainly learn something

Stoney
 
This is an awful lot like a who dunnit mystery except it is how did they dunnit!!:confused::confused:o_O Can't wait for the next chapter. We will certainly learn something

Stoney
After looking very close at the gear from MWB, it appears that the shaft end is mall enough to be threaded into the outside top shaft, the one with the ring around it. We can't tell if that shaft is smooth but maybe Matt could tell you that. This is gonna bug me until you find out the answer!!
 
If I'm seeing it correctly, it looks like this:
492.jpg

If so, that ring needs to be removed then the cup will come off and the shaft will slide out from the other side. The shaft seems to ride in a bushing of some sort in the housing. That must be where the resistance is coming from. Thanks to Matt's confirmation that it should turn freely, not getting it back to that condition will add resistance to the wiper motor...only adding more load to an already iffy system. So worth getting it taken care of.
 
If the retainer ring is destroyed in the process of getting it off, generic replacement round "spring clips" are available in various sizes. A large hardware store should have some, or possibly someplace like MacMaster-Carr carries them:
images.jpg


Slides up the tapered portion and snaps into the groove. Use a deep socket to drive it into place.
If you don't find a "spring clip", maybe one of the ring-shaped hose clamps will work:
2017-Hot-Style-Zinc-Plating-Spring-Clip.jpg_220x220.jpg
 
Last edited:
I agree with this assessment. I will remove the ring by any means. I'll take pics of the progress to document.
 
So I've made some progress. Thanks to all who provided input. I was able to remove the clip that holds the bell cap on the shaft. I was then able to remove the the drive gear from the housing. It didn't slide out and I couldn't push it out by hand I had to tap it out with a rubber hammer. I discovered what was causing the gear to bind. It was a combination of the washer that rides on the shoulder of the housing at the base of the shaft where it is molded onto the plastic gear and the rubber O ring under the bell cap had caused corrosion on the shaft. Most of the drag though was at the base of the gear. The grease had congealed over 38 years to a sticky goo and didn't flow between the moving gear and the shoulder of the housing. It was actually devoid of any lubricant and the lube that was nearby had turned black probably full of metal particles. You could see that the washer was wearing away as well as the shoulder. The shoulder had very sharp edges on it and grooved surface due to the metal on metal wear. I took a fine grinding wheel from my Dremel and smoothed out the shoulder and washer by rubbing the flat side of the wheel against the rough surfaces by hand. I have cleaned it all up and will load the housing with Silicone grease, will replace the o-ring with a new one and button it back up. Oh and I cleaned off rust from the motor winding as well as cleaned the contacts where the brushes make contact. Pics for reference included. One other thing to note is that the gear is showing signs of fatigue with stress cracks on the back side opposite the shaft. Matt at MWB suggested applying some epoxy to help strengthen that area which I will do before putting it back together. He noted these replacement gears don't exist any more so keep them together as long as you can.
 

Attachments

  • IMG_4905.JPG
    IMG_4905.JPG
    250.7 KB · Views: 223
  • IMG_4911.JPG
    IMG_4911.JPG
    302.1 KB · Views: 217
  • IMG_4909.JPG
    IMG_4909.JPG
    359.3 KB · Views: 254
  • IMG_4912.JPG
    IMG_4912.JPG
    154.3 KB · Views: 226
  • IMG_4914.JPG
    IMG_4914.JPG
    399.9 KB · Views: 225
  • IMG_4918.JPG
    IMG_4918.JPG
    336.3 KB · Views: 225
  • IMG_4919.JPG
    IMG_4919.JPG
    326.6 KB · Views: 223
  • IMG_4916.JPG
    IMG_4916.JPG
    276.9 KB · Views: 229
Back
Top