128 Rally Gauges

Chris Taunton

True Classic
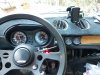
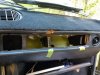
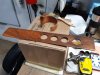
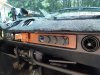
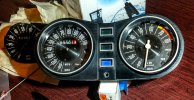
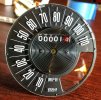
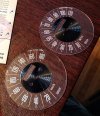
The Rally gauges I got for Gus are now installed and functioning. The wiring changes were not to bad.

I also installed some power outlets. There is now a volt meter, 2 USB ports and 2 auxiliary outlets so I can charge phones and even run a laptop. I have a driving event coming up that will require all this.

I also upgraded Gus' headlight to E-code Cibies with 55/100 bulbs running through relays.

Here are some pictures:
 

Attachments

  • 20201019_172848.jpg
    20201019_172848.jpg
    339.6 KB · Views: 261
  • 20201020_122934.jpg
    20201020_122934.jpg
    364.5 KB · Views: 258
  • 20201021_090334.jpg
    20201021_090334.jpg
    227.4 KB · Views: 258
  • 20201021_113438.jpg
    20201021_113438.jpg
    446.1 KB · Views: 253
Will you document the wiring changes required to install the Rally cluster?

The changes were simple. You can look at the cluster and see the circuit board. I don't have good pictures, but I will try to write something up. I have wiring diagrams for both cars as a starting point.

It is so good to have a tachometer! With a gps speedo app I was able to determine my gear ratios. Sweet!

Chris
 
Also...where did you bought that dash cover?...thanks

The dash cover was on the car when I bought it. It is homemade, not a commercial product. You could easily made a paper pattern and find similar material and cut it out. It is two pieces (dash and instrument cluster pieces are cut out separately and just laid in place).

Chris
 
My latest project is nearing completion! I've spent about a month on this, a 128 Rally Speedometer but calibrated in MPH instead of K/PH + adding an odometer in miles and tenths vs the 5 digit kilo odometer! After generating the conversion artwork in Illustrator,(accurate down to the 10th of a kilometer), my original plan was to polish off the lettering and print on the original rally face but the printer wouldn't accept it to print on because of the raised center portion. Plus, the odometer window wasn't wide enough for the 10ths digits anyway. It had to be printed on a new flat piece of optical clear polycarbonate, then I had to make a new center section on the lathe + a thin spacer for the back. Also, had to make a small stainless zero stop pin and file out the blacked aluminum backing plate to account for the extra 10s. Here are some pics, I think it looks pretty factory! I'm waiting to put the needle back on until I verify with my speedo guy that everything is working properly, then he will calibrate it exactly to account for a final drive swap and 175/50 tire size! Still need to rewire the 2 plugs in the back but I have my super detailed full color wiring diagrams for both Rally and standard so it shouldn't be that hard!😁
 

Attachments

  • IMG_20211221_190827183_HDR~2.jpg
    IMG_20211221_190827183_HDR~2.jpg
    302.5 KB · Views: 139
  • IMG_20211221_184747673~2.jpg
    IMG_20211221_184747673~2.jpg
    348.1 KB · Views: 143
  • IMG_20211220_153321774~3.jpg
    IMG_20211220_153321774~3.jpg
    330.2 KB · Views: 135
Last edited:
Nice job. I always thought the flip from vertical on the lowest numbers to the next increment, your 30-40 jump, as an odd thing but it does work given how we process visual information.

So do you expect to run it over the 100k mark? :)
 
Nice job. I always thought the flip from vertical on the lowest numbers to the next increment, your 30-40 jump, as an odd thing but it does work given how we process visual information.

So do you expect to run it over the 100k mark? :)
I was just mimicking the originals. Both seem to flip at around that part of the sweep... 100k, 200k,.... Probably!😁
 
I should mention that I have 2 extra prints of the MPH dial if anyone is interested. You would still need to machine the center section, but I have those precut also...
 
Back
Top