128SL Coupé winter project

Bjorn Nilson

True Classic
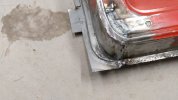
I've found a dry and warm place for the X1/9 to hibernate and thereby created necessary space in the garage to work with the 1974 128SL during the winter. It will be a full restoration project with minor mods with an Abarth-touch. Today I started fixing the doors that have badly done rust repairs with tons of bondo and bad weldings. I also see rust around the front/rear windows, but in general, the car is not as rusty as expected.
I will probably widen the lower parts of the fenders a little bit (with steel) and remove the bumpers. And I will definitely lower the suspension by 80-100mm as there is way too much space between the wheel and fender lip in my opinion. -I prefer a low ride.
The 1300 engine is running well but it is knocking when warm so I will most likely have my spare 1500 instead, but with the angry EU cam from the 1300. The twin Weber 40 will go for injection and modern ECU management. The 4-speed gearbox will need new synchros on all gears, but I have a Ritmo 5-speed box as well and will probably use that one if not too complicated (space, drive shafts etc).
It is nice that many of my X1/9 spares can be used. There's more to come...
IMG_20221025_141235.jpg
 
Right door is in really bad condition. Today I removed 1-1.5 kg bondo from it and started to prepare it for welding. I will replace the lower part of the skin and areas of the frame that are rotten. As usual much more work than expected.
IMG_20221026_221908.jpg
 
I spent much more time than expected on repairing the rotten doors and finally got some results.
There was not much left of the frames...
IMG_20221109_171821.jpg

So corners are now replaced with new sheet metal
IMG_20221126_214008.jpg

Even the inner structure was rusted out...
IMG_20221120_182205.jpg

But I managed to take it out to repair it. The outer skin is also damaged so parts of it will be replaced but involve tricky metal shaping and welding. Many areas cannot be shaped by using a hammer and dolly. I need to fix this issue on the left door as well, but on that door the skin is ok so I will keep it intact if possible.
IMG_20221126_143449.jpg

I noticed many members are using "Rust-oleum" paint with good results so I am going to give it a try inside doors etc. The color RAL3020 (Traffic Red) is very close to the original color 171 Rosso Arancio.
IMG_20221126_223557.jpg
 

Attachments

  • IMG_20221126_214022.jpg
    IMG_20221126_214022.jpg
    264.4 KB · Views: 73
Wow... That's a lot of work! I haven't used that particular product, but in the past I'd found that Rust-Oleum spray paint seemed to never fully dry/cure... I would usually prefer a Krylon or VHT product, and I formed that bias against Rust-Oleum, but to be fair because of that bias it's been several years since I tried any of their products... Paint in general has suffered greatly in the modern age. I've yet to see a water based product that was worth anything.. I've been lucky to still be able to find sources for laquer and 2 part enamels...
 
Rustoleum does take many days to fully dry although the rattle cans seem to take less time than brushing it on. I painted 80% of Fatrat with Sunrise Red rattle can Rustoleum years ago and now presents a nice 20 year old looking patina....but at least the car is all one color.
 
Nice work rebuilding those doors. Looks like a ton of effort was needed.

Regarding Rustoleum colors. I've been looking for a particular shade of red and seem to be having some difficulty finding what I want. @Bjorn Nilson noted "RAL3020 (Traffic Red)" and @carl noted "Sunrise Red". From various pics of both Bjorn's and Carl's cars it appears the traffic red has more of a orange hue and sunrise red has more of a burgundy hue? Note sure if anyone can add some better descriptions to help me visualize those two choices. Or possibly someone has experience with other shades of Rustoleum reds? I'm kind of looking for something in between; red, but not too bright and not to dark....more of a very traditional old school red if that makes any sense.
Bjorn, sorry for going off topic.
 
No problem @Dr.Jeff. From what I've seen Rust-oleum comes with two different shades of red; RAL3000 and RAL3020. I think Hussein used RAL3000 (flame red) on his car and it is very close to his original paint. RAL3000 is a little bit darker than 3020.
 
Doc, why not just get a rattle can of each and try a test spray? My car has the stock red on the front trunk and rear trunk. The rest of the car is Sunrise red which is damn near a perfect match.
 
Finished the inside and the top of the doors today. Painted the inside with Etch Primer and Rust-oleum. I have no experience with Rust-oleum but it seems to be good. It is covering very well, and flats out with an enamel-like glossy surface. The downside is that it takes some time to cure. I hope the doors are dry enough tomorrow so I can mount the skins.
IMG_20221207_185257.jpg
 
I wouldn't count on it .. That was my problem with Rust-Oleum... I've found that even days later you can still dig a fingernail into it, it's a very long cure.. If you can , weather permitting, I find that leaving them out in the sun helps a lot for curing. Not just the heat, but the UV... Also, on an all metal part, I will usually pre-heat it with a mapp gas torch before paint, especially cast iron pieces as it will wick out the stored moisture as well as helping to cure the paint.. Even after it's sprayed, I find that most paints will tolerate a little torching as long as you keep the flame moving and don't get too close. Kind of like baking the part, without having a huge spare oven that you could put a car door in😁

Oops... Sorry, I just remembered you're in Sweden in December..😆 Probably can't leave them outside!🥴 I don't know how far north you are, do you even have daylight now where you are, or just twilight?
 
Last edited:
I'm currently living in a desert where there is zero humidity, extremely high heat most of the year, and off the chart UV. I used Rust-Oleum for the interior surfaces and it took about a day and a half to dry completely. So it definitely has a slow reducer that takes time to evaporate. But it was easy to use and very affordable.
 
I am living in the Gothenburg area so I enjoy daylight for 8 hours per day. But we have freezing temps so bringing the doors outside to cure is not a good idea. Instead I put the 500W heater fan blowing over the doors during the night. The paint is still a little bit soft but it should be possible to finish the work.
 
I got new sheets on the doors. Took me some time to fight an oil can distortion on the right door, as there was no space for a hammer and dolly inside the doors to be used for adjustment. Finally, they are now ready for primer and a thin coat of bondo (the door skin is not completely welded on pic.)
IMG_20221210_193058.jpg


I removed the rear window and windshield today. I got the rear window out in 40 mins., but the windshield took me six hours At least I managed to keep the glass and rubber intact which will save me some money. The rust behind the glass is almost as bad as I thought. -More welding scheduled for the low corners on the front and rear window frames
IMG_20221216_133222.jpg
IMG_20221216_184737.jpg


What I've seen this is the last extensive rust repair I need to do. I hope to continue with more creative work soon. Currently, SSAB (Swedish Steel) is my best friend and I find it much more trustworthy than Putin steel.
 
Removed the dash to be able to weld the windscreen frame safely. I found at least two mouse nests between the dash and the firewall. To remove it I had to also remove the heater to get access to the nuts holding the dash. Both heater and nozzle were in very bad shape and must be replaced. I have an X1/9 heater in spare somewhere in a box. Does anyone know if it will fit in a 128 SL?
IMG_20221218_173142.jpg

I didn't realize the dash was made of steel until I started to remove it. The lower part of it was completely rusted out and it cannot be welded as the front is coated with foam and vinyl. It would be hard to find a new one so I will try to treat it with rust converter and reinforce it with fiberglass. -It will not be visible anyway.
IMG_20221218_203359 (2).jpg
 
I think most 128 and SL dashes are in very rough shape. The metal/plastic composite makes restoration really a pain.
 
The X also has a dash with a metal backing and foam and vinyl cover. And it has no protective finish on the metal. Mine only have surface rust but I can certainly see how they could become very crusty.
 
First phase of rust repair completed. Many days spent with metal fabrication and welding. The most time-consuming job was fixing the right A-pillar and the doors which were badly rusted out.
IMG_20230104_174638.jpg
-toeing
I will now continue with fabricating wide wheel arches. I am going for 7" ET 10 CD66 and 195/60 R13 or eventually 225/45 R13 (unfortunately very expensive 😱) so more space is needed. It looks like the car is tip-toeing (see the first pic in this thread) so I believe setting the correct driving height would help a lot before starting up the wheel arch, and front spoiler fabrication. I noticed there is a brand new thread about lowering the 128 that I will follow with interest.
Today I removed the front springs to get an idea of how low I should go.
Below is the standard strut bottom-out point which is about the new driving height that I am aiming for. I also noticed that much more camber is needed which might be difficult to obtain.
MOMO 5,5" with 185/60 R13 for testing:
IMG_20230104_171544.jpg
 
Great work! 225/45R13 tires will really want 8" wheels though. I had them on 7's but they looked squeezed on, better on an 8"...

Pic on an 8"
IMG_20160813_142919_429.jpg
 
Something I'm much more aware of than I used to be is suspension travel of a lowered car. If you just cut springs or use lower "sport" springs you chew up useful suspension movement if you roads are as crappy as my area.
 
Back
Top