
You are using an out of date browser. It may not display this or other websites correctly.
You should upgrade or use an alternative browser.
You should upgrade or use an alternative browser.
1409 Bodywork & Paint
- Thread starter lanciahf
- Start date
lanciahf
True Classic
December Update
Work performed 12/2/21-12/28/21:
Sand ‘Slick Sand’ primer/filler, scuff edges, details, engine bay, trunk, windshield frame, ¼’s, fenders, door jambs, roof, rear panels, radiator support. Blow off, clean off inside & out. Mask off insides, rockers, wheel wells, roof, jambs. Wipe down & etch prime underside of roof overhang and any break through areas. Apply 2-3 coats of 2k urethane primer exterior of body, guide coat. Sand all primer 320/ 500 wet. Sand buttresses 320/500. Etch prime break throughs and areas in need. Re sand as needed. Unmask door jambs and sand primer edges. Mask off buttresses upper parts and apply epoxy sealer to undersides, followed by basecoat & polyurethane clear coat. Unmask and wet sand paint edges. Mask off undersides, seal, basecoat and clear coat to exterior of buttresses. Mask off and cover car, prep door jambs for paint. Apply gray sealer, basecoat & polyurethane clear. Unmask
+41 Hours
Sanding the Slick Sand spray filler

Sanding and scuffing the primer in front trunk

Sanding the fenders, jambs, windshield frame

Sanding & scuffing in the roof

Masking off for primer


Applying the 2k urethane primer


Primed

Guide coating the primer

Sanding the primer 320


Fine tuning in the body lines

Priming/ sanding the rear roof overhang and window surround


Re-priming some areas

Sanding the primer, flying buttresses

Wet sanding

Ready for paint

Masking off the outsides

Ready for cut in

Sealer, then basecoat

Polyurethane clear coat

Unmasked and wet sanding the edges

Prepping the door jambs for paint

Masking car to paint the jambs


Masking off the undersides of buttresses

Gray epoxy sealer


Red basecoat


Polyurethane clear coat


Unmasking


Work performed 12/2/21-12/28/21:
Sand ‘Slick Sand’ primer/filler, scuff edges, details, engine bay, trunk, windshield frame, ¼’s, fenders, door jambs, roof, rear panels, radiator support. Blow off, clean off inside & out. Mask off insides, rockers, wheel wells, roof, jambs. Wipe down & etch prime underside of roof overhang and any break through areas. Apply 2-3 coats of 2k urethane primer exterior of body, guide coat. Sand all primer 320/ 500 wet. Sand buttresses 320/500. Etch prime break throughs and areas in need. Re sand as needed. Unmask door jambs and sand primer edges. Mask off buttresses upper parts and apply epoxy sealer to undersides, followed by basecoat & polyurethane clear coat. Unmask and wet sand paint edges. Mask off undersides, seal, basecoat and clear coat to exterior of buttresses. Mask off and cover car, prep door jambs for paint. Apply gray sealer, basecoat & polyurethane clear. Unmask
+41 Hours
Sanding the Slick Sand spray filler
Sanding and scuffing the primer in front trunk
Sanding the fenders, jambs, windshield frame
Sanding & scuffing in the roof
Masking off for primer
Applying the 2k urethane primer
Primed
Guide coating the primer
Sanding the primer 320
Fine tuning in the body lines
Priming/ sanding the rear roof overhang and window surround
Re-priming some areas
Sanding the primer, flying buttresses
Wet sanding
Ready for paint
Masking off the outsides
Ready for cut in
Sealer, then basecoat
Polyurethane clear coat
Unmasked and wet sanding the edges
Prepping the door jambs for paint
Masking car to paint the jambs
Masking off the undersides of buttresses
Gray epoxy sealer
Red basecoat
Polyurethane clear coat
Unmasking
lanciahf
True Classic
January 2022 Update
Work performed 12/30/21-1/20/22:
Mask off front trunk, engine bay, clean insides. Mask & seam seal radiator support/ seam. Apply epoxy sealer/ red basecoat/ polyurethane clear. Unmask. Mask engine bay rear crossbar, tail panel & roof jambs. Sand areas, apply epoxy sealer, base & clear. Unmask. Clean off door jamb to rocker, fender quarters, and sand edges. Mask off rocker panels, apply sealer/ Tex-coat gravel guard/ black basecoat & 2 coats polyurethane clear coat, satin. Unmask.
+42 hours
Masking off the front trunk, jamb & radiator support


Cleaning up and prepping engine bay

Masking engine bay


Covering the car and ready to paint inside


Before painting, the radiator support /upper tie bar seam would be seam sealed

Masking for seam sealer

Urethane seam sealer

Grey epoxy sealer


‘Vivid Red’ basecoat


Applying polyurethane clear coat


Unmasked.
Note the rear engine bay upper rear jamb wasn’t painted, since I’d been climbing over it while painting


Next is to cut in the rear engine bay top piece, tail light panel and the roof opening jambs. Masking


Sanding, prepping

Epoxy sealer


Red basecoat


Clear coating


Unmasking


Next step, paint the rocker panels. Sanding and cleaning them up

Black epoxy sealer


Putting on the Tex-coat gravel guard

Applying black basecoat

The PPG clear coat matting agent doesn’t list a mix ratio for satin black, only for flat, eggshell or semi-gloss.
Since satin black is considered flatter than semi-gloss and glossier than eggshell, I just custom mixed it, satin


Work performed 12/30/21-1/20/22:
Mask off front trunk, engine bay, clean insides. Mask & seam seal radiator support/ seam. Apply epoxy sealer/ red basecoat/ polyurethane clear. Unmask. Mask engine bay rear crossbar, tail panel & roof jambs. Sand areas, apply epoxy sealer, base & clear. Unmask. Clean off door jamb to rocker, fender quarters, and sand edges. Mask off rocker panels, apply sealer/ Tex-coat gravel guard/ black basecoat & 2 coats polyurethane clear coat, satin. Unmask.
+42 hours
Masking off the front trunk, jamb & radiator support
Cleaning up and prepping engine bay
Masking engine bay
Covering the car and ready to paint inside
Before painting, the radiator support /upper tie bar seam would be seam sealed
Masking for seam sealer
Urethane seam sealer
Grey epoxy sealer
‘Vivid Red’ basecoat
Applying polyurethane clear coat
Unmasked.
Note the rear engine bay upper rear jamb wasn’t painted, since I’d been climbing over it while painting
Next is to cut in the rear engine bay top piece, tail light panel and the roof opening jambs. Masking
Sanding, prepping
Epoxy sealer
Red basecoat
Clear coating
Unmasking
Next step, paint the rocker panels. Sanding and cleaning them up
Black epoxy sealer
Putting on the Tex-coat gravel guard
Applying black basecoat
The PPG clear coat matting agent doesn’t list a mix ratio for satin black, only for flat, eggshell or semi-gloss.
Since satin black is considered flatter than semi-gloss and glossier than eggshell, I just custom mixed it, satin
Last edited:
lanciahf
True Classic
Plus 46 Hours
Work performed 1/24/22-2/17/22:
Clean and paint parts of undersides/ bare areas/flaking rough areas with POR-15.
Wet sand rear window surround panels, clean and scuff ¼ glass surrounds, moldings.
Mask off around back window panels to go satin black. Glue and repair right rear ¼ glass plastic bezel. Sand, scuff clean & prep 10 loose plastic pieces, moldings, bezels. Apply black epoxy sealer to insides, flip and seal exterior of pieces, black basecoat, semi-gloss polyurethane clearcoat. Store painted parts. Wet sand exterior of doors, edges, clean off and wet sand upper exterior sashes & fuel door pocket, clean, mask and apply sealer, red basecoat & polyurethane clear. Unmask car & doors. Clean & chase all threads in doors, jambs & hinges. Install door hinges, shims, doors, striker & latches, adjust fit. Clean left side sail panel vent pocket, mask, etch prime and paint satin black. Clean up temporary trunk and engine bay weather-strip & wind lace and fit in place. Clean & chase threads for engine lid and hood mounting, hinges. Fit hinges to lid. Flip & wet sand exterior and rib details, 320/ 600. Clean off & install lid & adjust fit. Wet sand hood exterior and edges 320/ 600. Clean off and install hood & adjust fit. Sand remaining parts of car/ primer /paint edges, final wet block all 600, wipe down & cover car.
Car is slated to go to paint soon
The underside beyond the rockers had some bare metal

The underside of the right front frame rail, extension also needed some cleaning up and bare metal

Applying POR-15 on the frame rail undersides

Left front frame rail, extension undersides, before painting

Painted w/ POR-15

Under the rear body panel, a bit crusty


Painted w/ POR-15

Sanding and prepping 10 loose plastic pieces

Masking the rear window surround and areas to be painted satin black


1 of the quarter glass plastic bezels had a crack, which was repaired

Prepping the headlight doors, fender extensions and molding undersides

Black epoxy sealer

Black sealer back sides of plastic parts


Sealer on the exterior


Black basecoat


Applying the custom mixed satin 2k polyurethane clearcoat


Unmasked


Before reinstalling the doors, the window sashes would be painted, the doors wet sanded


Wet sanding 600

Doors cleaned off

Masking the exterior to paint the upper sashes

Masking to paint in the fuel fill pocket

Grey sealer

Red basecoat

Polyurethane clear coat

Sashes and inner sill cut in

Fuel door pocket cut in

Installing the door hinges

Fitting the door

And the door latches

Adjusting the fit

Driver’s door hinges, striker, latches & door fit & adjusted


The sail panel side vent had some bare metal inside

The area was cleaned, masked & etch primed

And some satin black

Fitting the hood hinges & the temporary trunk weatherstrip

Installing the engine lid hinges

Wet sanding the engine lid exterior primer 320/ 600


Cleaned off & ready to install

Lid back in place & adjusted

Before reinstalling the hood, it needed final wet sanding


Hood cleaned off, installed & adjusted

Wet sanding all the edges and final sanding the fenders & quarters


A temporary lightweight, padded prop rod was made to hold lid & hood open when needed

All cleaned off and ready to go to the paint shop


It may be a couple weeks before they’re ready for it at the paint shop, so its all covered up for now.
Meanwhile I’ll continue painting the remaining 6 items that go satin black. Bumpers

And the header, roof pieces and tail panel

Work performed 1/24/22-2/17/22:
Clean and paint parts of undersides/ bare areas/flaking rough areas with POR-15.
Wet sand rear window surround panels, clean and scuff ¼ glass surrounds, moldings.
Mask off around back window panels to go satin black. Glue and repair right rear ¼ glass plastic bezel. Sand, scuff clean & prep 10 loose plastic pieces, moldings, bezels. Apply black epoxy sealer to insides, flip and seal exterior of pieces, black basecoat, semi-gloss polyurethane clearcoat. Store painted parts. Wet sand exterior of doors, edges, clean off and wet sand upper exterior sashes & fuel door pocket, clean, mask and apply sealer, red basecoat & polyurethane clear. Unmask car & doors. Clean & chase all threads in doors, jambs & hinges. Install door hinges, shims, doors, striker & latches, adjust fit. Clean left side sail panel vent pocket, mask, etch prime and paint satin black. Clean up temporary trunk and engine bay weather-strip & wind lace and fit in place. Clean & chase threads for engine lid and hood mounting, hinges. Fit hinges to lid. Flip & wet sand exterior and rib details, 320/ 600. Clean off & install lid & adjust fit. Wet sand hood exterior and edges 320/ 600. Clean off and install hood & adjust fit. Sand remaining parts of car/ primer /paint edges, final wet block all 600, wipe down & cover car.
Car is slated to go to paint soon
The underside beyond the rockers had some bare metal
The underside of the right front frame rail, extension also needed some cleaning up and bare metal
Applying POR-15 on the frame rail undersides
Left front frame rail, extension undersides, before painting
Painted w/ POR-15
Under the rear body panel, a bit crusty
Painted w/ POR-15
Sanding and prepping 10 loose plastic pieces
Masking the rear window surround and areas to be painted satin black
1 of the quarter glass plastic bezels had a crack, which was repaired
Prepping the headlight doors, fender extensions and molding undersides
Black epoxy sealer
Black sealer back sides of plastic parts
Sealer on the exterior
Black basecoat
Applying the custom mixed satin 2k polyurethane clearcoat
Unmasked
Before reinstalling the doors, the window sashes would be painted, the doors wet sanded
Wet sanding 600
Doors cleaned off
Masking the exterior to paint the upper sashes
Masking to paint in the fuel fill pocket
Grey sealer
Red basecoat
Polyurethane clear coat
Sashes and inner sill cut in
Fuel door pocket cut in
Installing the door hinges
Fitting the door
And the door latches
Adjusting the fit
Driver’s door hinges, striker, latches & door fit & adjusted
The sail panel side vent had some bare metal inside
The area was cleaned, masked & etch primed
And some satin black
Fitting the hood hinges & the temporary trunk weatherstrip
Installing the engine lid hinges
Wet sanding the engine lid exterior primer 320/ 600
Cleaned off & ready to install
Lid back in place & adjusted
Before reinstalling the hood, it needed final wet sanding
Hood cleaned off, installed & adjusted
Wet sanding all the edges and final sanding the fenders & quarters
A temporary lightweight, padded prop rod was made to hold lid & hood open when needed
All cleaned off and ready to go to the paint shop
It may be a couple weeks before they’re ready for it at the paint shop, so its all covered up for now.
Meanwhile I’ll continue painting the remaining 6 items that go satin black. Bumpers
And the header, roof pieces and tail panel
lanciahf
True Classic
Feb 2022 Update, getting close!
Work performed 2/21/22-3/2/22:
Wipe down roof panels, bumpers, header & tail panels inside & out. Wet sand parts 320/ 600. Sand out blemishes, pinholes, air pockets & cracks. Repair crack on front roof panel with panel bonding adhesive/ body filler, primer. Epoxy prime parts inside & out. Prep, mask & paint 6 body panels, black acrylic basecoat, 2 coats satin polyurethane clear coat. Store parts.
Underside of the main roof panel

Found a hairline crack at the front edge, middle of the panel

V-ing out the crack on both sides in order to repair

Following the crack to both ends and sanding around it

Applying panel bonding adhesive

Wet sanding the front bumper

Wet sanding the edges & cleaning inside

Wet sanded 320/ 600, cleaned off

In the corner of the lower scoop of front bumper, a problem area was noticed, edge flaking and pinholes

The area was sanded until the lifting areas were feathered

Re-primed

Rear bumper before wet sanding

Wet sanding 320/600

Another problem area along top edge of rear bumper. Gel coat air pockets?

The area was sanded and feathered out

Re-primed

Sanding the panel bonding adhesive, roof underside/ edge

Primer


Rear bumper cleaned off & ready for paint

Wet sanding rear roof panel

Header panel


Scuffing the tail panel inside

Scuffing and sanding the details, tail panel ext.

Cleaned off & ready for paint

Cleaning up the insides

Black epoxy sealer, insides/ edges rear bumper, tail & header panels

Parts flipped over & cleaned off, setting up for paint

Black epoxy sealer

Black basecoat

Applying the satin, polyurethane clear coat


Insides of the front bumper & roof panels

Black sealer


Flipped over, prepping for paint

Sealer


Black basecoat


Applying the satin, polyurethane clear


Work performed 2/21/22-3/2/22:
Wipe down roof panels, bumpers, header & tail panels inside & out. Wet sand parts 320/ 600. Sand out blemishes, pinholes, air pockets & cracks. Repair crack on front roof panel with panel bonding adhesive/ body filler, primer. Epoxy prime parts inside & out. Prep, mask & paint 6 body panels, black acrylic basecoat, 2 coats satin polyurethane clear coat. Store parts.
Underside of the main roof panel
Found a hairline crack at the front edge, middle of the panel
V-ing out the crack on both sides in order to repair
Following the crack to both ends and sanding around it
Applying panel bonding adhesive
Wet sanding the front bumper
Wet sanding the edges & cleaning inside
Wet sanded 320/ 600, cleaned off
In the corner of the lower scoop of front bumper, a problem area was noticed, edge flaking and pinholes
The area was sanded until the lifting areas were feathered
Re-primed
Rear bumper before wet sanding
Wet sanding 320/600
Another problem area along top edge of rear bumper. Gel coat air pockets?
The area was sanded and feathered out
Re-primed
Sanding the panel bonding adhesive, roof underside/ edge
Primer
Rear bumper cleaned off & ready for paint
Wet sanding rear roof panel
Header panel
Scuffing the tail panel inside
Scuffing and sanding the details, tail panel ext.
Cleaned off & ready for paint
Cleaning up the insides
Black epoxy sealer, insides/ edges rear bumper, tail & header panels
Parts flipped over & cleaned off, setting up for paint
Black epoxy sealer
Black basecoat
Applying the satin, polyurethane clear coat
Insides of the front bumper & roof panels
Black sealer
Flipped over, prepping for paint
Sealer
Black basecoat
Applying the satin, polyurethane clear
motoTrooper
True Classic
This amount of prep and care is mind blowing
NigelProdrive
True Classic
I am so jealous. My last remaining Scorpion had been done awhile now and it’s boring no longer having a project. Wish there was digital photography back when restored mine.
Looks great. Do you have new lower rubber clips for the 77 buttress glass?
Looks great. Do you have new lower rubber clips for the 77 buttress glass?
lanciahf
True Classic
Glass is not going back, holes Have been filled. Going for the Maserati Merak lookI am so jealous. My last remaining Scorpion had been done awhile now and it’s boring no longer having a project. Wish there was digital photography back when restored mine.
Looks great. Do you have new lower rubber clips for the 77 buttress glass?
Last edited:
NigelProdrive
True Classic
Good call. That’s where I was going.

lanciahf
True Classic
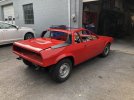
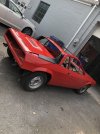
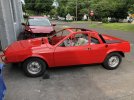
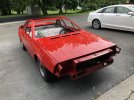
Car has been painted. Next order is to take it to the upholstery shop. He is backed up so it will be coming home for a bit. I guess I can start adding parts back on. Wiring harness, coolant tubes etc
Attachments

Last edited:
NigelProdrive
True Classic
"Everyone wants it done fast and cheap.' - Sue on Gas Monkey GarageNext order is to take it to the upholstery shop. He is backed up so it will be coming home for a bit.