1500 or 1600 new build

Sounds like a very nice engine build. And your machinist seems to know what he is doing. Sadly where I live there are lots of machine shops but most (all?) do not know a thing about import engines - let alone Fiats. I haven't found one that I trust. Glad that you have a better option. Is he close enough to Thunderhill to do lots of race engine work? Or are you too far from there?

I'd be curious to know what the trick valve seats are.

Regarding replacement of the freeze plugs. I've found all of the ones I've replaced on these engines were a bugger to get out. The "punch in, twist and pull out" approach has never worked for me. That seems to just drive them inside before they can be twisted. And even if they do not drop inside, they are almost impossible to get out after you've twisted them (they are very strong steel, not pliable brass). What works very well for me every time is to drill a small hole in the plug (a bit off to one side), thread a tight sheet-metal screw into that hole, and use a slide-hammer to pull the plug directly out. No punching in or twisting.

While I agree about not using synthetic oil for engine break-in, I do not agree about Rotella. At least not any more. Shell has been forced to reformulate it without the high zinc content to meet stricter federal regulations (including diesel engines). Do some research on it. It is no longer the affordable high zinc option it once was. I'd recommend buying a specific "engine break-in" oil. Or at the very least use a ZDDP additive. But I realize everyone has opinions about oils.
Fortunate to have an excellent, experienced machinist. He bought the shop from the former owner, his former mentor on how to do everything correctly. They do everything from vintage to motorcycles to American V8s but certainly many foreign engines, which is no surprise in the SF Bay Area. Not a race shop as far as I observe.

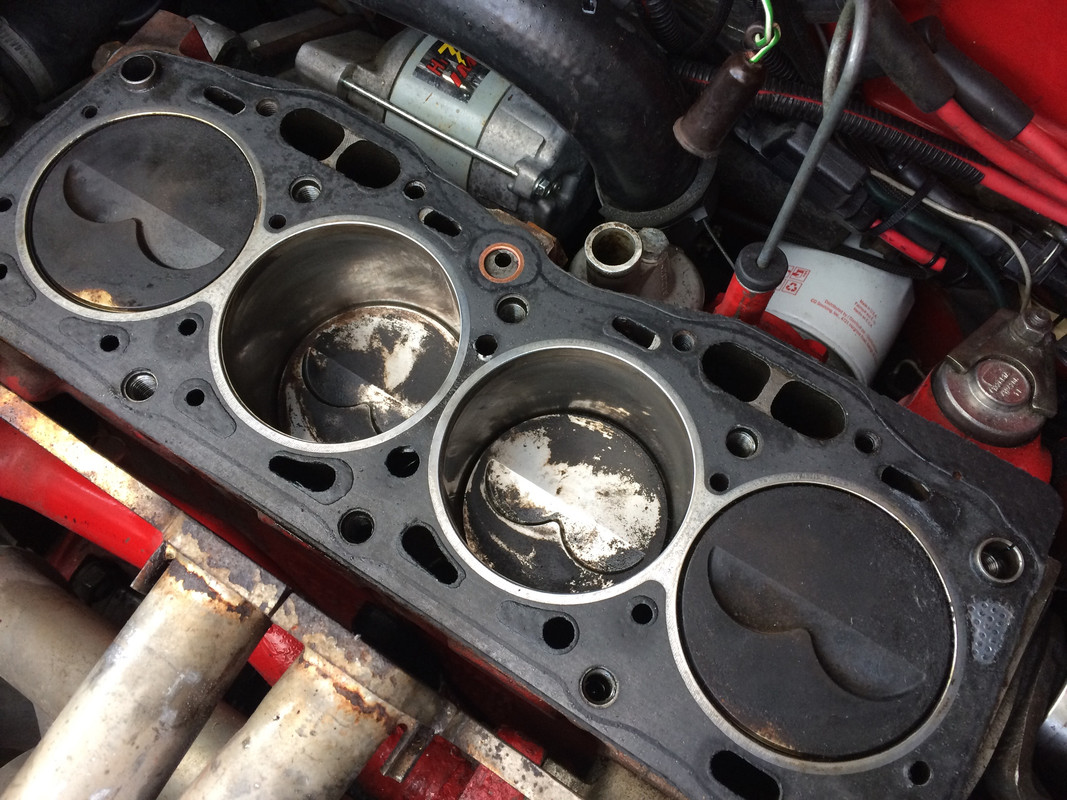
Just ordered freeze plugs, additional M8 manifold studs (including longer studs to accommodate phenolic risers for the DCNF's on an old Alquati), and an NOS oil pump after conferring with the machinist. He recommends a new oil pump, unless they're unobtainium or crazy expensive.

My oil pan had incredible sludge and varnish, so will return to the shop to put it in the jet washer.

To your question and comment:

Re: valve seats, see the part number referenced above in the build sheet. I did a quick internet search and could see the likely supplier. I'll ask the machinist to verify this week, then we can study the product.

Re: Zinc additive. I will definitely acquire and add. Having read about the options, there seems to be little difference among products so a low cost solution will happen.
 
Next step, measuring piston to valve clearance. I am tasked with performing the clay method, as we speculate the 39.5mm larger than stock inlet valve may require increasing the piston intake flycut. Studying how to do this:

 
To perform the clay method, need to have the valve train in place. Tensioner bearing requisition in order, it just arrived with and NOS OE Fiat oil pump, and manifold studs. Also received the new freeze plugs.

oil pump.jpg
 
New tensioner bearing installed. Really nice bearing, and on sale from MWB. The old one was seized on the mount hardware, requiring persuasion to remove. Front and rear water jacket covers installed. Aux drive shaft, housing and pulley installed. Front crank carrier and seal installed, TDC identified, validated and point referenced. Plastina clay applied to the piston flycuts. All ready to install the head and check valve to piston clearance and discovered the Euro head came from an engine with M10 head studs and bolts. My US block had M12, so back to the machine shop to enlarge the head stud/bolt holes on the Bridgeport. For the good of the order and nod to Matt Brannon from Midwest Bayless, here are the various head bolt and stud dimensions for X1/9 engines by year:

"There were three types of cylinder heads with used on Fiat X19 SOHC engines:

10-bolt 12mm - 1973-80)
10-bolt 10mm - 1980-85)
14-bolt (Ten 10mm + Four 8mm) – 1986-88

Yes, you will need to enlarge the 10mm holes to 12mm in order to use."

clay.jpg
 
I used a 10mm head on a 12mm block. The machine shops around here weren't interested in boring out the holes (as I've said before they are not great shops). I was told to just use a drill and do it my self because that's all they would do. I decided to set it up on my large drill press, making sure everything was square and straight. Then drill the bores out with an appropraite size bit. Worked great, but having your shop do it on a proper machine is best.

Note the orientation of the head gasket before you install the head. There is a oil port that needs to correspond between the gasket and block. The gasket can be flipped over to get it right.
 
Head holes successfully enlarged at the machine shop, retrieved, along with freshly cleaned oil sump from the jet washer. That washer is remarkable, didn't even need to remove the windage tray and it came back pristine. Placed the head/cambox on the block, torqued in the correct sequence to 15 ft/lb. Installed belt guard back, cam pulley, and tensioner. TDC was verified yesterday with newly acquired dial indicator. Started with the pistons at mid travel, slowly brought #1 piston to TDC, then placed the valvetrain belt. Time for the acid test: slowly and steadily rotated the crank to check for interference. Didn't seem like the valves were hitting the pistons, completed a few rotations then took the head back off. The #3 piston clay appeared to reveal a flattened section from the combustion chamber, but little evidence of valve contact. Sent the photo to the machinist and called the shop. We agreed there is no need for piston relief. Next steps: install oil pump, dipstick tube, sump. Then will perform dead stop to compare TDC vs. dial indicator. Then head back on, then install all peripherals. Plan to install vernier cam wheel - I asked the machinist how much material was removed from the head (.010") and block (.005") + .015" total. We think it will be good to advance the cam +4 degrees to compensate for a -2 degree loss from shaving.
Clay2.jpg
 
OE NOS Oil pump & original drip tube installed. Re-verified TDC with dial indicator, set OE refurbished (though it looked new) crank pulley timing pointer, which allows for several degrees of play. Scribed pointer to mount for future reference. Installed cylinder head, torqued sequentially to spec. Installed timing belt guard, the one located next to the tensioner bearing, sharing its mounts. Installed upper belt guard mount with integrated cam pulley pointer. Installed new vernier cam pulley. Compared markings on new cam pulley to stock part. This MWB lightweight pulley has a dot marker left relative to the stock unit, and an "X" marker to the right of the dot marker that lands 1/2 tooth ahead of the stock unit's dot. Installed timing belt with the "X" marker at the pointer with crank at TDC. Next step will be to degree the cam, create a cam card, and verify initial cam timing.

vernier.jpg
 
Jim is it just camera angle, or did you have the HG on backwards here? Can't see the oil feed port in the block beneath the gasket ring---

Screen Shot 2020-06-22 at 12.27.22 PM.png


Oil feed in block is on the driver's side of center...

X19-HG2017-00028.jpg
 
Jim is it just camera angle, or did you have the HG on backwards here? Can't see the oil feed port in the block beneath the gasket ring---

View attachment 33611

Oil feed in block is on the driver's side of center...

X19-HG2017-00028.jpg
Hussein-

Good eye. Both you and Dr. Jeff identified that from my 6/5 post. Corrected that thanks to you both.

This morning, installed freeze plugs, breather and dipstick mount.
 
The beauty of the machine shop's jet cleaner. Now installed.
oil pan.jpg

Removed crank pulley nut. Cleaned thoroughly and scuffed with 180 grit, same treatment for a large slightly cupped washer, M12, and a crown nut. Fresh metal JB weld. This is intended to mount an 11" Moroso degree wheel to accurately degree the cam. We'll see if the mount holds up to rotation force.

crank mount.jpg
 
The beauty of the machine shop's jet cleaner. Now installed.View attachment 33854
Removed crank pulley nut. Cleaned thoroughly and scuffed with 180 grit, same treatment for a large slightly cupped washer, M12, and a crown nut. Fresh metal JB weld. This is intended to mount an 11" Moroso degree wheel to accurately degree the cam. We'll see if the mount holds up to rotation force.

View attachment 33855
Used this several times in the past Jim. Its as strong as steel if the surfaces were prepped and cleaned well. You can sand it, seal it and even submerse it in water (when sealed that is) and I've used it many times on properly prepped aluminum that's had the anodizing removed as a way to get primer and paint to adhere. You'll be fine with this stuff
 
Back
Top