2nd Radiator Fan Wiring

JNewm

True Classic
Hi all--

Yesterday, I installed a second radiator fan on my '81 non-AC X. Both fans are "stock"-style. They both work, but I'm not entirely convinced I have enough power running to them, given the way I installed the second fan. Pre-install, it seemed like the single fan was super-loud. Post-second-fan-install, both fans *seem* quieter. I didn't give it a back-to-back listen while I had it up on the lift yesterday, but based on my recollection, it feels like I may not be running enough power.

So I'm hoping y'all might be able to shed some light on a couple of questions, keeping in mind that I'm pretty ignorant when it comes to all things electrical.

First, is it a bad idea to run both fans off the same wire lead that used to just run the one fan? Did Fiat do it that way for the AC cars? Is it possible/likely I'm not getting enough power to these two fans using this setup?

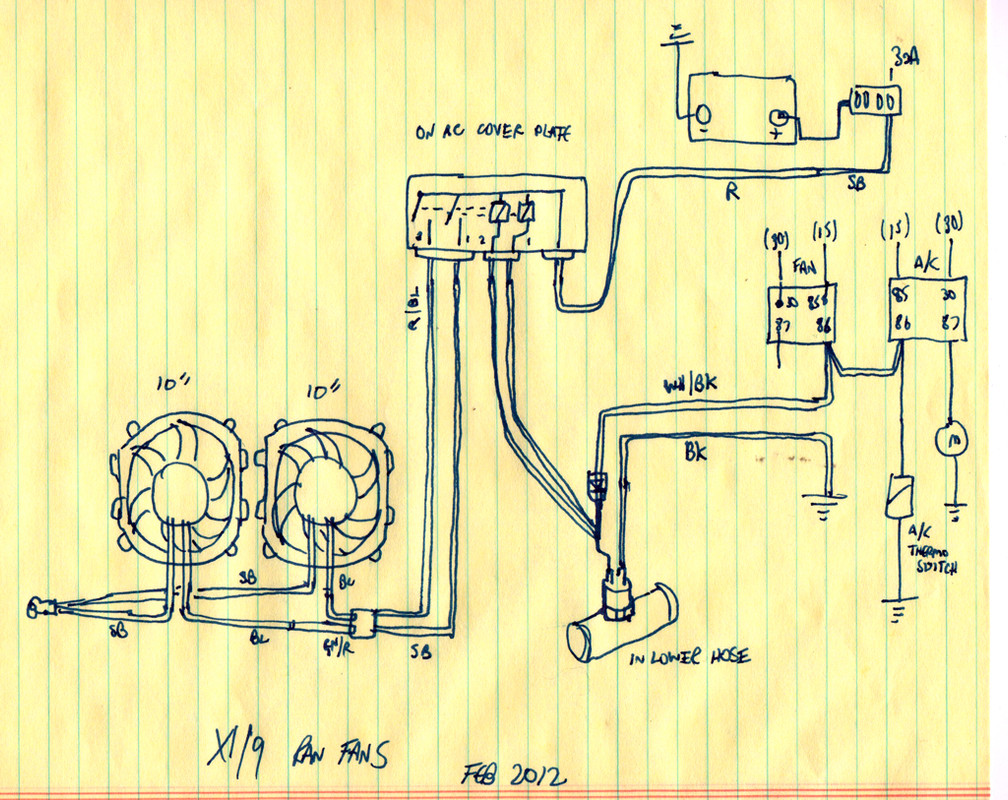
Second, if I do need to get more power to the fan(s), what would be the best way to do so? I've doctored up the wiring diagram to show what I've done thus far below. Basically the second fan is just daisy-chained off the first. (I also disconnected the thermostat switch and ran an interruptor to the cabin, to the extent that's relevant.)

fiatxradfandiagram.png
 
2nd relay, with it's own power supply. add ground via thermoswitch, or via existing relay ground wire.

EDIT: ignore relay on left - the two on the right would be the way to wire it. 15 = switched 30 = constant

X19-0706.jpg
 
Last edited:
In my opinion there might be a couple of things I'd do differently from what you explained in the original post.

First I'd follow what the guys have said. I'd use the existing factory wiring ONLY for the trigger to a pair of new (heavy duty) relays. Then add a new (separate) power feed with a sufficient gage to handle the load (fans draw a LOT of current). That will assure you are getting enough power to properly run two fans. I suspect you currently are not. Appropriate fuses also added.

Second I would NOT eliminate the thermo (temp) switch. The fans should not run when the coolant temp is below the threshold. And they should continue to run as long as that temp is above the threshold. That's the purpose of the rad thermo switch. More on this below. Also I've never been a fan (no pun) of using a manually controlled dash switch for the fans. But if you must have one, I'd have it wired so it operates in addition to the thermo switch.

Third I'd replace the radiator thermo switch from the stock style to a dual temp one. These have separate wires to activate the two fans independently, at different temps. When the coolant reaches the first temp level then the first fan comes on. As the coolant temp rises to the second temp level then the second fan comes on in addition to the first one. And vise-versa as the coolant cools down.
 
By your drawing, it looks like you're running the fans serially. If so that would explain the lack of power out of each fan. Running a separate power wire would be best, but at a minimum run the fans in parallel to ensure both recieve the full 12 volts.
 
Thanks so much for the responses--super helpful! A substantial overhaul, including aluminum radiator and 10" aftermarket fans i/o the small + heavy stock units, is in my future.

Sort of a complicated story on why I didn't just replace the old, broken thermoswitch. The slider bar for the heater seems to be stuck, and it's slid all the way to the cold (or "not hot") side (to the right). Without the ability to turn on or run the heater I'm not 100% confident I could properly flush/refill the radiator fluid. As a result, I was leery of replacing the thermoswitch, despite the fact that the system very likely could use a flush and new fluid, as the car just sat for ~10 years.

Suppose I wanted a quick-and-dirty fix for now, with @Dr.Jeff's recommended method to be done down the road. Is this how I'd do it? (Again, apologies for the dumb questions--I've been a tinkerer/bolt-on type guy for awhile, but am finally trying to expand my knowledge and skillset at least a little bit.)

EDIT: I am running them serially (what I've been thinking of as "daisy-chained". @JDExSquid, that makes total sense. And it would potentially be the "quick-and-dirty fix for now." Thanks!
fiatxradfandiagram.png
 

Attachments

  • fiatxradfandiagram.png
    fiatxradfandiagram.png
    348.5 KB · Views: 145
Last edited:
The slider bar for the heater seems to be stuck, and it's slid all the way to the cold (or "not hot") side (to the right). Without the ability to turn on or run the heater I'm not 100% confident I could properly flush/refill the radiator fluid.

You need a new heater valve. Don't try to force the lever to free the valve, the lever is no match for the force you will apply in the effort. There are lots of snapped levers to prove this point. :(

Replace the valve when you replace the radiator. Since you need to drain the system for both jobs, you might as well combine the tasks into one project. The heater valve is not all that hard, it is very trying though. It is in the upper left corner of the passenger foot well on US models. Be sure to order the heater valve gasket too.
 
I wouldn’t run the fan set up as you have it at the moment, at least not for long.

Adding a second relay is not that big a deal, it is wires but some of them are already in place as your car was setup with wiring from the factory to have AC. There is also a place for the relay in your fuse/relay box as the AC system used a relay to run the fan. You should find the wiring under the plastic cover on the right side of the front trunk.

If you don’t mind a bit of mess you can replace the thermo switch and then readd coolant and bleed the system. It would be a good safety thing to do. You just need to be prepared with the new part to quickly put back in the hole :)

If you use the VW three post version of the coolant switch the low temp side will run the one fan and if the temp gets to the second high point the second fan will come on.

3056B46F-0CFD-4281-8752-A1DA30F88D06.jpeg
 
Last edited:
Thanks so much, @JimD! I was thinking maybe the cable was frozen or something, but a stuck control valve makes more sense.

@kmead, I like that idea of quick-swapping thermoswitches! Seems like I could do it regardless of whether the heater is working or stuck shut. (In fact, it occurs to me that if you're never going to use the heater--hey, Miami never gets colder than ~70F--a guy could probably flush and bleed the system without worrying about running the heater.) At any rate, that would also allow wiring the thermoswitch to one of the fans and the manual cabin switch to the other as a secondary.

A few more questions:

I have to confess I have no idea what I'm looking at in that diagram, @kmead. My non-AC car doesn't have *all* that wiring; right? Is there a particular set of extra wires I should be looking for that would make a good basis for wiring in a second fan circuit?

Second, does anyone have the technical specs on the stock radiator fans--how much amperage do they draw, how many CFM of air do they push? Are aftermarket fans worth the investment even if the stock fans work?

Thanks again!!
 
a guy could probably flush and bleed the system without worrying about running the heater


The way the dual-action thermostat and coolant flow works in the X, coolant is allowed to travel thru the heater circuit immediately, well before the t-stat ever opens to allow coolant to flow to the radiator. So if you empty and refill the system with a stuck heater valve, you may be creating an air pocket that will be hard to bleed out. Plus, the heater is your secondary radiator in an emergency. :)

If you really don't want to mess with the valve, you could try running a loop of hose between the in.out heater taps in the engine bay. I have never tried this, so I have no idea of the results. I am telling myself it is no different than running with the heater on all the time from a flow perspective, but since the core is bypassed there is no heat loss in the flow. Not sure if that retained heat is meaningful when it loops back.

If it were my car, I would replace the valve. I have replaced the valve in 3 Xs I have owned. It is not an uncommon thing to find the valve stuck on an X. Once replaced, it is a good idea to exercise it occasionally to avoid a repeat.
 
Makes sense--yeah, I'll replace the valve. My biggest limiting factor nowadays (besides my own lack of expertise, of course!) is that I only have access to a *real* garage via a local business that rents out lift time to amateurs by the hour. So I'm forced to try to think about doing jobs in bite-size chunks, rather than as more comprehensive overhauls. (Hence my inclination to scheme out a way to replace the thermostat switch without replacing the valve yet.)

I guess I could also just pay somebody to do all this, but where's the fun in that? :)
 
Somewhere in the distant past I recall reading something about looping the heater in/out ports on the engine. It said that due to the much reduced back pressure you could be recirculating much of the pumped water through the loop instead of the engine. It recommended plugging up the loop to force more water through the engine. I actually did that while replacing my heater pipes. Since the car was not on the road, I can't say whether or not the loop is an issue, plugged or not.
 
Somewhere in the distant past I recall reading something about looping the heater in/out ports on the engine. It said that due to the much reduced back pressure you could be recirculating much of the pumped water through the loop instead of the engine. It recommended plugging up the loop to force more water through the engine. I actually did that while replacing my heater pipes. Since the car was not on the road, I can't say whether or not the loop is an issue, plugged or not.


Hmmm, I knew there was some issue mentioned with this loop idea previously. What if you make the loop in the bay, then cut the loop somewhere convenient and insert a ball valve? No heater, but you would be able to open and close the ball valve to simulate a heater circuit for bleeding and still shut off the circular flow like the heater valve normally does.
 
Makes sense--yeah, I'll replace the valve. My biggest limiting factor nowadays (besides my own lack of expertise, of course!) is that I only have access to a *real* garage via a local business that rents out lift time to amateurs by the hour. So I'm forced to try to think about doing jobs in bite-size chunks, rather than as more comprehensive overhauls. (Hence my inclination to scheme out a way to replace the thermostat switch without replacing the valve yet.)

I guess I could also just pay somebody to do all this, but where's the fun in that? :)

The radiator temp switch is "easy" if you don't mind getting wet. ;) All you need is a large adjustable wrench to pull the switch, some ramps to make access a little easier, a receptacle to catch the coolant. Are there any self wash, outdoor car washes near you? Sounds like an ideal spot to swap out that switch. Catch what you can when the coolant comes out and the rest can be washed away quickly. You may get some odd or dirty looks from folks, but just claim you are cleaning the bugs out of the rad. 🕷🦗🦟

I just put a new rad in my 86 a few weeks ago and the temp switch was leaking after I finished the fill/bleed. :mad: Trust me, all of the coolant will try to come out when you pull that switch. The engine block, heater, and coolant reservoir are all above the switch and all the coolant heads for the hole. :)
 
Hmmm, I knew there was some issue mentioned with this loop idea previously. What if you make the loop in the bay, then cut the loop somewhere convenient and insert a ball valve? No heater, but you would be able to open and close the ball valve to simulate a heater circuit for bleeding and still shut off the circular flow like the heater valve normally does.
I just jammed a rubber plug in the loop hose I used.
 
If I'm reading @JNewm correctly, the system currently has coolant that's more than 10 years old! Regardless of what you do now vs later, dump it and use fresh coolant. Just draining and refilling is something of a "flush" of sorts, and offers the chemical and thermal protection that the old coolant no longer has. Even if you later do a 'proper' flush and replace the coolant again, it's cheap insurance.
 
Changing the fluid is definitely on my to-do list! Along with replacing the thermoswitch. But to do either of those, it sounds like I'll have to replace the heater control valve at the same time, so I can properly bleed the system. Just ordered the valve plus a gasket from VAS. As I'm taking a look at the service-manual diagram, though, I'm wondering--will this require two gaskets?

fiatheaterctrlvalve.png
 
Make sure you are looking at the right valve for your car - with or without AC is different. I believe the non-AC valve (pictured) uses two gaskets and a O-ring as shown. Sorry, all of mine are the AC type valve, which doesn't use any. Others can confirm.
 
Looks like the non-AC X uses one gasket and one "O-ring". I kept the old valve from one of my cars and there is still an o-ring on the #27 fits to the valve. I have a little bag with two valve gaskets in it, but you only need two if you are replacing the heater core too. I don't even know why these extras are here, but I have lots of little parts around that I don't know where they came from. When you have purchased eight X1/9s you end up with lots of parts the previous owners had on hand. :)

You can see the o-ring isn't round, it has a flat side against the valve and an angled side facing #27. I do not recall ordering one of these little rings, but I must have or it would not still be on this old valve. I will say it has been in a parts box for a few years and installed in the car for who knows how long before that. If I had to reuse it, I would. It is still a little flexible and not nicked up. So check your old ring if you need one.

Quick update: Here is the o-ring at ChrisO's website. Perhaps it is just a real o-ring and its current shape reflects the area it was squished into for years?
IMG_2060.JPG
 
Last edited:
Perhaps it is just a real o-ring and its current shape reflects the area it was squished into for years?
I'm sure that is the case. They will conform to the shape of the surface they interface with and eventually retain that contour permanently. Even if the "official" O-ring had a contour, a regular O-ring would work fine.
 
Back
Top