air box solutions for twin Weber DCNFs on Alquati manifold

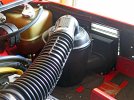
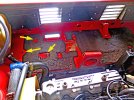
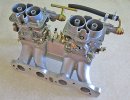
Thanks for your reply. I am referring to the swivelling arm that connects to both the accelerator cable end and the rod going to the carbs.
Pic shows my original bell crank (arm).

IMG_7470.JPG
 
IMG_0728.jpg
IMG_0729.jpg
IMG_0730.jpg
IMG_0733.jpg
IMG_0734.jpg
IMG_0736.jpg

here are 2 setups, I checked 2 more and these are the way they came in all 6 of my scorpions. I included a picture of the linkage for the dual carbs as well
 
I'm going to be attempting to mount a Monte Hospital DCNF airbox soon. For those who have installed one, how did you secure the top of the airbox to the base? There's no hardware included and no instructions.
 
I am also in the process of fitting the Monte Hospital airbox to my S2 Monte. The airbox as supplied will not fit my car. Even after milling off c 5mm from the manifold/carb base, the airbox will not go under the rear shelf behind the rear window. I have redesigned a new lower top cover for it (see pic) which I will get made GRP to match the rest. I also removed about 4mm from the upper edge of the lower half. On the original top there are three molded "bosses" where you can install screws to hold the two halves together. I found M6 furniture screws were just the ticket.
Hope this is of help.


TMH final prototype  (1).JPGTMH final prototype  (5).JPGTMH airbox modifications  (4).JPG
 
I am also in the process of fitting the Monte Hospital airbox to my S2 Monte. The airbox as supplied will not fit my car. Even after milling off c 5mm from the manifold/carb base, the airbox will not go under the rear shelf behind the rear window. I have redesigned a new lower top cover for it (see pic) which I will get made GRP to match the rest. I also removed about 4mm from the upper edge of the lower half. On the original top there are three molded "bosses" where you can install screws to hold the two halves together. I found M6 furniture screws were just the ticket.
Hope this is of help.
Very interesting, thanks for sharing your experience. Are you also running an Alquati Beta MC intake manifold? Those furniture screws look perfect and the female threaded bases can probably be epoxied into the airbox for a secure fit.
 
Very interesting, thanks for sharing your experience. Are you also running an Alquati Beta MC intake manifold? Those furniture screws look perfect and the female threaded bases can probably be epoxied into the airbox for a secure fit.
Sex bolts, not furniture screws :)
 
Yes, I have an Alquati Beta MC manifold and 40 DCNF Webers ready to go in.
 

Attachments

  • final test fitting Nov 2020  (5).JPG
    final test fitting Nov 2020 (5).JPG
    430.6 KB · Views: 139
I'm finally getting back to this TMH airbox install and as others have found, I have clearance issues at the rear shelf -- more like the rear drip rail near the firewall.

It occurs to me that there are three possible solutions:

  • I could try shaving down the Alquati manifold (requiring removing the whole setup from the car again), but I'm not certain I'll be able to get enough space.
  • Have a fiberglass guy modify the airbox for greater clearance at the rear
  • OR just trim into that drip rail about half an inch deep for the length of the airbox. This is just a lip that overhangs the engine bay and wouldn't intrude into the rear shelf or window mounting at all.
In particular, what would be the harm in trimming that rail? Maybe a little water intrusion when the car is washed? It's not driven in the rain.

At this point, running without an airbox isn't a consideration for me. Besides the benefits of cold vs warm air, the car is just too darn loud with open K&Ns behind the cabin.
 
Trim it. Maybe go further and trim entire length. The small amount of water from mostly carwashing isn't going to hurt anything entering there. Paint any bare metal you expose.

I cut out the bracket that held the engine compartment light, fast idle push button and engine compartment prop rod slot. Don't need the small light when you have cellphones that all you have to do is say 'Flashlight on" and you should have already removed the fast idle push button and the electrovalve which were for the emissions laden carb you no longer have. Then cut a slot further towards the center of car to insert prop rod and that will allow you to have it open higher allowing better access.
 
Last edited:
Trim it. Maybe go further and trim entire length. The small amount of water from mostly carwashing isn't going to hurt anything entering there. Paint any bare metal you expose.

I cut out the bracket that held the engine compartment light, fast idle push button and engine compartment prop rod slot. Don't need the small light when you have cellphones that all you have to do is say 'Flashlight on" and you should have already removed the fast idle push button and the electrovalve which were for the emissions laden carb you no longer have. Then cut a slot further towards the center of car to insert prop rod and that will allow you to have it open higher allowing better access.
I think you're right. Maybe I'll start by removing the light bracket, since that's interfering anyway (and my light has never worked -- possibly just a bad bulb). I'll see how things are looking from there and maybe post some pics.
 
After much fiddling around I now have my DCNFs up and running. I ended up getting a fibreglass specialist to trim down the base of the Monte Hospital airbox and modifying the inlet snout to take the S2 Monte air hose. Some pics of what I did attached. I could have left a bit more on it but the carb tuning guy said the airflow is OK as is. And, it runs well.

airbox primed  (9).JPGCompleted DCNF instln  (2).JPGDCNF Webers installed Mar 2022  (3).JPGMH airbox mod completed  (3).JPGMH airbox mod completed  (4).JPG
 
After much fiddling around I now have my DCNFs up and running. I ended up getting a fibreglass specialist to trim down the base of the Monte Hospital airbox and modifying the inlet snout to take the S2 Monte air hose. Some pics of what I did attached. I could have left a bit more on it but the carb tuning guy said the airflow is OK as is. And, it runs well.

View attachment 59693View attachment 59694View attachment 59695View attachment 59696View attachment 59697
So you did get it to fit. I'm still with an air cleaner that would come in from the side.
Can you tell or show how your air cleaner sits on the shelf? Is it held by bolts or something?

 
I'm now considering having a fiberglass shop move the inlet to the passenger end of the airbox. Cleaner routing that way for the hose to the air filter. Also, the standard airbox inlet doesn't clear my plug wires where they enter the distributor cap.
 
icr, mine is for a Series 2 Montecarlo. The air filter cannister is held by three 10mm nuts on "captive bolts" on the rear shelf right next to the coolant reservoir. A little snout protrudes out towards the rear plastic louvres into a small airbox. I'll dig out some pics shortly.
 
icr, mine is for a Series 2 Montecarlo. The air filter cannister is held by three 10mm nuts on "captive bolts" on the rear shelf right next to the coolant reservoir. A little snout protrudes out towards the rear plastic louvres into a small airbox. I'll dig out some pics shortly.
Thank you.
 
Here's the promised pics. I made an error in my last post - there are only two mounting bolts for the external legs on the air filter cannister. There is a similar bolt with a wide flat nut which is located inside the base of the cannister under the filter. The little "snout" goes into the metal box with a movable flap inside it. This directs warmer air from the exhaust during winter running (not needed here) and closes of the hole for summer running. You can see the hole in the shelf which the box is mounted via 4 bolts/nuts. Yellow arrows indicate mounting bolts for the air filter cannister. Hope this helps!
 

Attachments

  • air filter can  (2).JPG
    air filter can (2).JPG
    434.3 KB · Views: 109
  • Air filter hsg + vent 2.JPG
    Air filter hsg + vent 2.JPG
    1.1 MB · Views: 119
  • engine bay 8 Nov 2018  (4).JPG
    engine bay 8 Nov 2018 (4).JPG
    643.3 KB · Views: 119
  • hot air valve 24-11-2018.JPG
    hot air valve 24-11-2018.JPG
    451.7 KB · Views: 108
Back
Top