Andrew's X19 restoration

Man after my own heart!!!

DCP_1822.jpg
 
Good to see it's coming together Andrew.
By the way, Have you worked out what pistons, cam, valves, C/R you are going to use? I have just been doing some research on whats available for my new project (Bertone body from Phil), and was wondering what you are using.
 
Paul - I do love the sheer 70's-ness of it, I mean where else can you find lime green and tan in the one car!

Greg - good to see you on Xweb! I havnt really looked closely at engine specifications yet, although I have a basic idea. I'm probably going to get a 1500 head and warm it over a bit, and maybe go for some larger valves if money permits at the time. Matt at Midwest sells a pretty decent head, and John Black in Melbourne is also happy to help out with some specs that he developed for his race car. I'm not sure of what exact cam I want to run, however I'd like something that will work well with the twin 40 carbies. As for the exhaust I managed to pick up a PBS extractor. Either way, a lot of the engine will be paid for by Mr KRudd and his stimulus package! Hows your new project coming along?


I finally managed to get the front suspension in the car, only a few days after Easter. The first part was easy, and was simply a matter of putting back the old parts I took out and a few new ones that I managed to track down. The new zinc plated stuff looks pretty good as well.

Installing the coilovers was a little more complicated, but it wasnt too bad as they came with complete step by step instructions. First, we needed to drill out the top mounting holes to 8mm to fit the bigger bolts, then determine the correct spacing of washers to ensure clearance of the camber plates under the bonnet. All that was needed was to then bolt everything in.

IMGP3941.jpg


The brakes went on pretty easily as well, and thankfully they fit inside the 13" track wheels I picked up second hand from a friend.

IMGP3961.jpg

IMGP3966.jpg


The next project is to tackle the cooling pipes, radiator, front hoses, grille and spoiler!
 
Hi Andrew, Not much to show on my project yet, still stripping bits off. I've been in touch with John Black too, and Peter Bartold, both very helpfull. I've pretty much decided on a Piper BP300 cam after seeing what's around, and reading (web site) and emailing Guy Croft in the UK. It seems to be his most recommended one, better that some other brand 40,80 cams. Some other grinds may be better if going for a full house racing engine with forged pistons and very high compression. Cheers
 
I have been trying myself to have the guts to do the same. I can see that the rust here and there will never let my car be all it can be, and it is early enough that it could be done, and the car is complete. All my friends say it is the best candidate because the size makes it easier to handle (vs larger cars).

Your effort and dedication is quite inspirational. :) And the pictures let many of us who haven't seen the "inside" of our cars bare take a look at what is in there. Please take pics of the engine work, I've only seen mine from above and bellow. :p
 
Well, another update of the longest X19 restoration in history. For my final year Industrial Design project I am designing and building the bodywork of a Formula SAE racecar, so Ive got a good excuse as to why the X is taking so long :)

The next thing to do was to flush the coolant pipes out. We had these replaced with new ones a few years back and they'll still be ok to use now, however the engine internals seemed a little rusty so I decided it would be best to flush the pipes as well. I was supprised that a fair bit of rusty water came out, but by the end the water was crystal clear so I'm confident it will be ok.

IMGP4003.jpg


We had also completely rebuilt the steering rack a few years back, so I decided that it wasnt worth totally pulling it apart. It was pretty oilly, so I decided to partially pull it apart and re-fix the boots a little better. The seal where the steering rod goes in was also leaking a little, so I decided to replace it. I then discovered that you cant actually buy them as a Fiat part, luckily a local bearing distributor had an almost identical seal that did the job. I put new tie-rod ends onto it and filled it with clean new oil. I wasnt sure what oil to use as you cant buy the type that the workshop manual recomends anymore, but someone in the Fiat club told me to use the best manual transmission oil I could buy. Mr. Motul saved the day!

IMGP4032.jpg


I'm a little concerned with heat soak and overheating, so I decided to improve the cooling fan situation. These little suckers are used to cool and air-con radiators in an Alfa 33 16V and theyre perfect for the job. Theyre a proper SPAL fan and the volume they blow is a lot greater than the standard X19 fan (theyre a fair deal lighter too). I'm planning on running an electric water pump, so it will be good to be able to keep the water circulating once we stop the engine after a track session. And the best part about them is they were free (I found them in Dads shed and stole them, but a few days later I got another set free from a self serve wrecker as they were hidden under some other X19 parts hehe)

IMGP4036.jpg


I made up a simple aluminium bracket and then wired them into the stock thermo fan loom.

IMGP4045.jpg


Now, I'm going to make public the biggest and stupidest mistake Ive made so far. I built the front suspension and wondered why the hub was low, but figured thats just the way it was. Then I noticed that the travel of the shock was way too long, and that the only thing limiting maximum droop was the steering tie rod hitting the bodywork. I spent days trying to work out what was wrong, and came up with nothing. Finally in desperation I emailed some photos to Jim Susko (G Force Engineering) asking him what was wrong. I thank him eternally for not making me feel like a fool in his email, but he nicely informed me that I had installed the rear shocks in the front. Mustve been hard for him to stop laughing long enough to type! Either way, I swapped them around and now the front is much better. Its going to be very very low with these new shocks. With the car on jack stands, there is now less distance between the tire and guard at maximum droop than there used to be with the car sitting normally on the road. Might have to get the guards rolled I think....

IMGP4150.jpg


I went today and purchased new front and rear boot seals and fitted them this afternoon. Its amazing how the car looks a little more complete with just the seals!

IMGP4151.jpg


IMGP4153.jpg


I finished stipping the block back, and tomorow I am going to take it to TW Engineering to be dipped so we can paint it and build it again. Just thought I'd post a 'before' pic :)

IMGP4157.jpg
 
Don't stop Andrew

for once you finish the resto we will loose one of the best stories on the forum.
I enjoy following your work, thanks
 
Great job!

You definitely aren't the first to swap the struts. I have seen pics of an X on its wheels with the struts swapped - very entertaining.

The fans look like they fit perfectly. Just to make sure: do they blow the correct direction, i.e. suck air through the radiator?
Also, the setup would be perfected if there was no space between fan shroud and radiator. Your aluminum bar mounts are spacing the fan away from the core, making the fans less effective.

You definitely need to get the fender lips rolled if your will be running the car low.
Even with 185/60 tires, you will get into trouble if you don't. (I forgot what you have planned for rims and tires.
Roll both front and rear.

Keep up the good work, Ulix
 
Great compilation Andrew

You're an inspiration.
I'm in the process of "renewing" my 86 X1/9... Taking lots of photos so I don't make any mistakes.
Mine has AC and I don't have a lot of references to go by.

Thanks for sharing!
 
Well, exams are over so after about a month of not looking at the car work begins again in ernest!

Nothing is ever simple, particularly with this car. And so it is with the pistons and trying to get some new ones. As it turns out the block must have been bored a few times, meaning the bore size is just a tiny bit larger than the biggest oversize pistons you can buy. So the two main options are to either sleeve the block and use my current pistons (which we only bought about 20,000km ago yet the gap is strangely too big) or to get some forged pistons from Matt in the correct size. Decisions, decisions.

We were doing some work on my friends Honda the other day, and just for a joke we put one of his 17" wheels on the X. I think it looks feintly ridiculous, but it was worth it for a laugh!

bigwheels.jpg


Today I decided to look into the shift mechanism and getting that back into the car. By the way, apologies if I'm going into too much detail, let me know if I am :)

As it turns out 1300 and 1500 shift levers are actually different. I know its weird, but for sentimental reasons I decided I wanted to use the original shift lever I got with the car. Not only is it chromed and looks much better, the shift lever and knob are the first thing I noticed when I first saw the car. So it has to stay! Heres a shot showing the differences between the 1300 lever (chrome) and 1500 (old rusty metal)

IMGP4301.jpg


Luckily, I was able to mix and match the different parts to get something that will (hopefully) work. Here is the 1300 lever (pre grease, of course) attatched to the 1500 shift rod.

IMGP4303.jpg


And another shot of the completed unit assembled in the car:

IMGP4307.jpg
 
Excellent work as usual, Andrew...

I wonder if the ratio has changed significantly and wheterh or not you'll actually have a SHORTER throw, if the distance from the pivot ball is indeed longer???

Secondly, while I didn't do anything as thoughtful as you... I did cut down my 1500 shifter about 2 inches off the top and used an aftermarket leather grip. I love ther feel and notchiness, plus the faster more precise (feeling) shifts.

If you can get over this "originality" crisis you're having, especially since yur modding the engine and considering 17" tires and wheels (hahaha), you may wanna consider this little mod also!

As always, my best...
 
Post it all Andrew

Every last detail you care to mention. This thread is as much for your satisfaction as the rest of us. I enjoy following along and think of all the things you will find in archive searches in twenty years time. You will see this thread and remember details you had forgotten 10 years earlier. ;)
 
Well, after what seems like ages not working on the car, Ive finally got the time to start on it again. University simply got too busy, and I didnt even have time to think about the poor little X for a good 4 or 5 months. However, that is all over as of yesterday so tomorow work will begin once more. Updates will come rolling again :)
 
looks good andrew

Is anyone helping you are you attempting to get it ready for the nationals or not. Perhaps aidin and i could be convinced to road trip it over and give you a hand.

Lol i probably have more of an idea of where things go than you do memory is a bitch lol. Whats it been 3years since you pulled it all down two x heads has to be better than one.
 
Cheers, thanks a lot Lachy. Unfortunatly Ive kinda realised that its not gonna happen in time for the nationals which kinda sucks.

We usually build our own engines but this time Ive decided to have the engine built by someone (because of the pistons and the head theres some real tricky measuring to do which I dont feel comfortable doing - the pistons actually go above the bores and into the head a little bit and this needs to be done properly). I dropped off the engine and all the bits yesterday and the engine isnt going to be finished until mid Janurary. Theres still a lot of work to do when we get it back (like fitting electronic ignition etc) so its probably better to take our time and do it properly.

Luckily Dad has decided to take the gap between Christmas and New Years off work so he can work on the X19 for me :D :D :D

But thanks a lot for the offer anyway... I think Aidan is coming over for New Years anyway :)
 
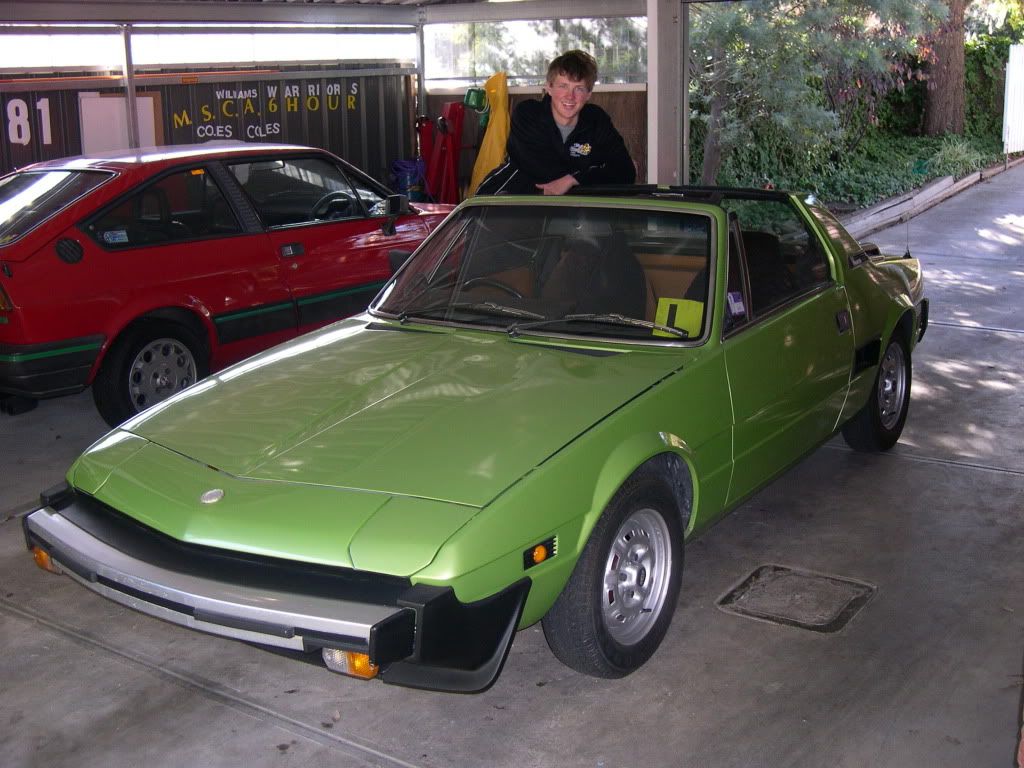
Just to kick things off again, I found this picture the other day. Its a 16 year old me the day after I first bought this X19 as my first car. Ive lost all the photos I took before I modified the car, so I was pretty happy to find this one. Little did that smiling boy know that in the following 6 months the entire cooling system would need to be replaced, that shiny new paint work is hiding bad rust that would be fixed by a dodgy repairer (who's work we've since re-done), the electrics would need to be overhauled, the clutch and brakes would need to be overhauled and then the head gasket would finally blow, showering the car I was passing in steam. Ah memories.

DSCN0103.jpg


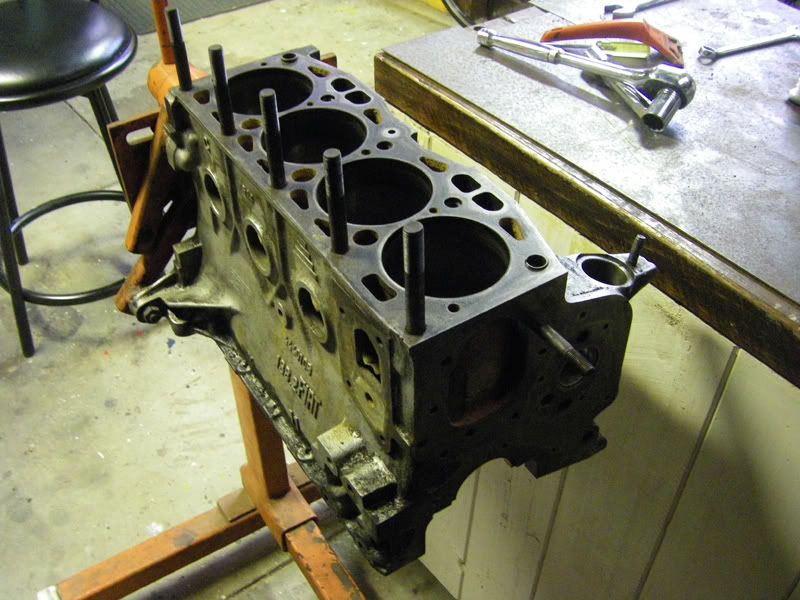
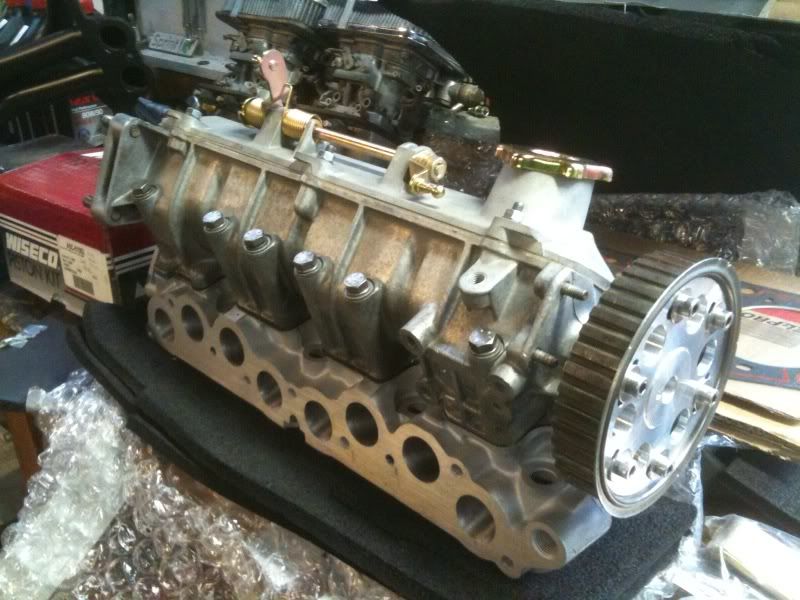
The lessons continued to be learnt once the block was at the engine builder. After the block had been hot tanked and honed, we realised that the block had been bored a few times, to the point that the bores were slightly larger than the largest oversized pistons I could buy. Problem.

My two choices were to buy another 1500 block and have the work done again, paying for the block, new standard pistons and twice for the work, or to go to our good friend Matt and get some of his nice Wiseco forged pistons that came in a large enough size to fit my block. After a quick cost analysis it worked out far cheaper to get the nice pistons from Matt and be done with it. mmm high compression goodness!

A few weeks later I also purchased one of Matt's high performance heads. Believe it or not, shipping included it worked out cheaper to buy it from Matt than to individually buy the parts and have it done locally. And I must thank Matt for the excellent packaging, the head arrived all the way from the US without a scratch.

head.jpg


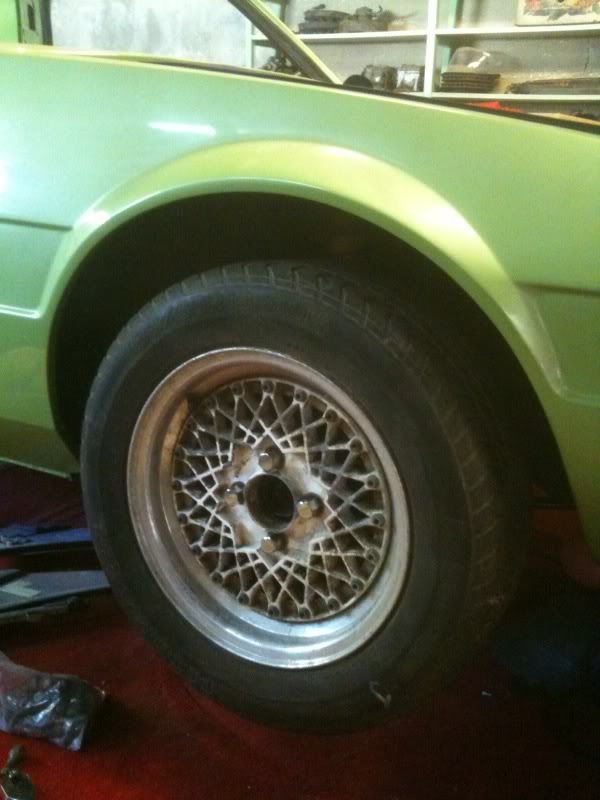
During the Christmas/ New Year break I was around at the home of Peter Taylor, a friend from the local Fiat club. Peter is the authority on Fiat's in Adelaide, and his collection of parts is mind boggling. I was looking through a stack of wheels when I stumbled on these - a set of 3 piece Rays Engineering racing wheels. My eyes lit up, as I had been searching for some 'nice' wheels to use as road wheels. I wanted something interesting and possibly Japanese, but nothing too rice. These fit the bill perfectly.

Peter was planning to use them on his 128, however he realised that I was going to restore them back to perfect condition (which he was never going to do) and it would be better for them to go on my car - I couldnt believe my ears when he said he was willing to let them go. I ended up swapping them for some other X19 parts that Peter needed.

wheeloncar.jpg


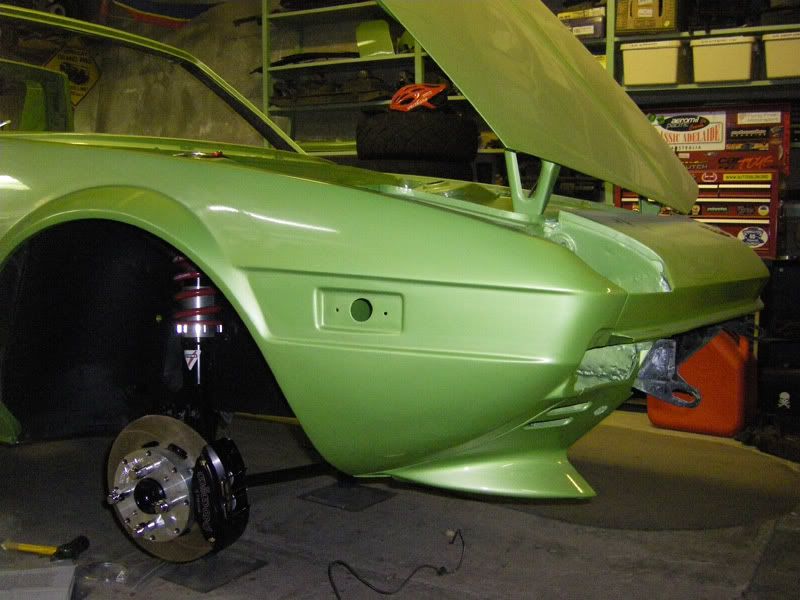
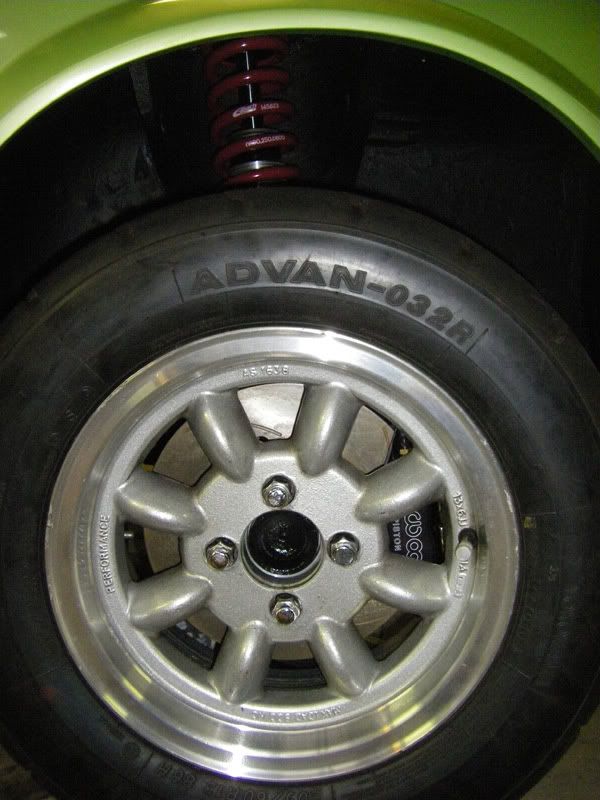
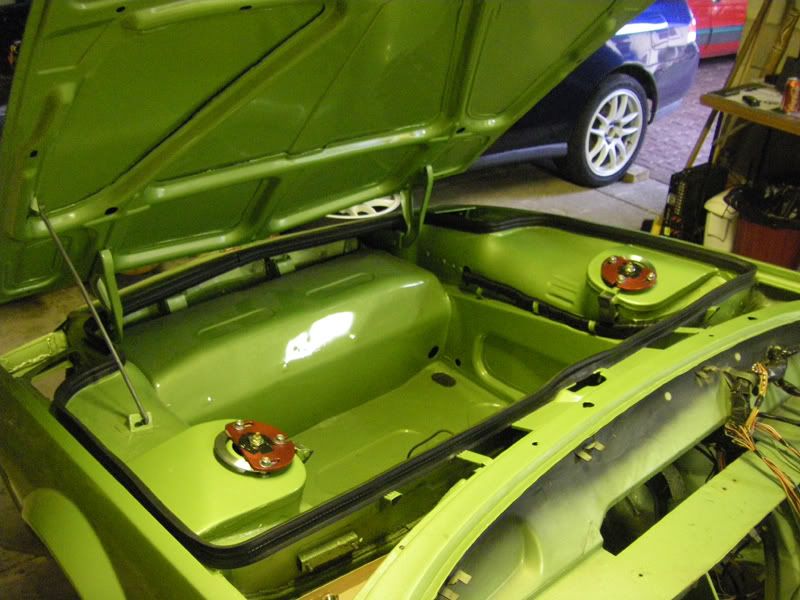
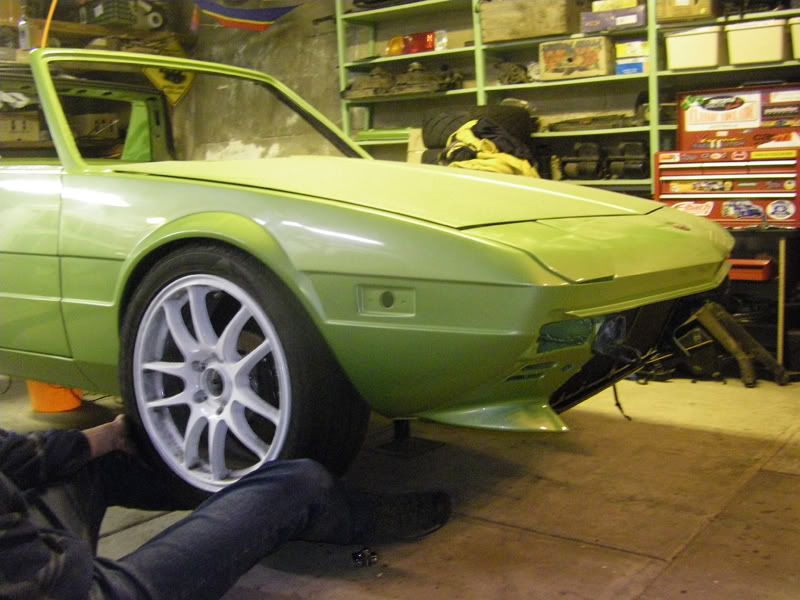
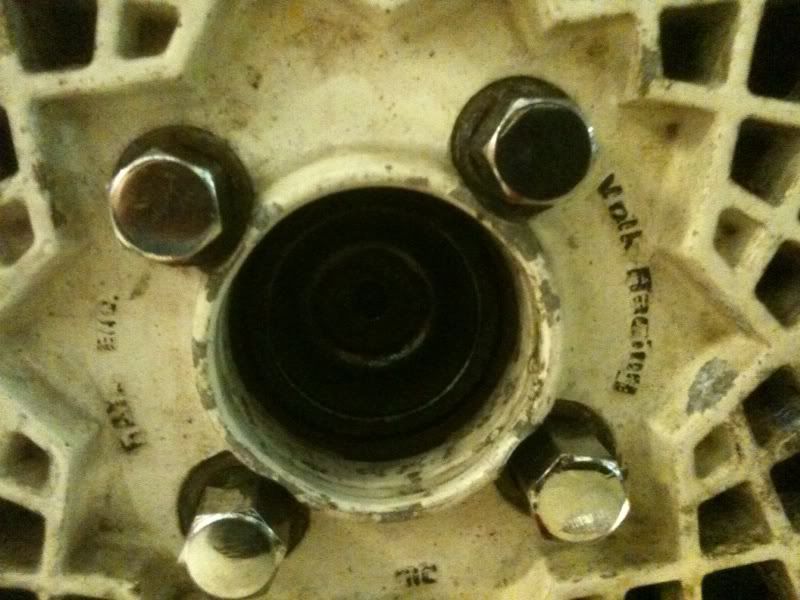
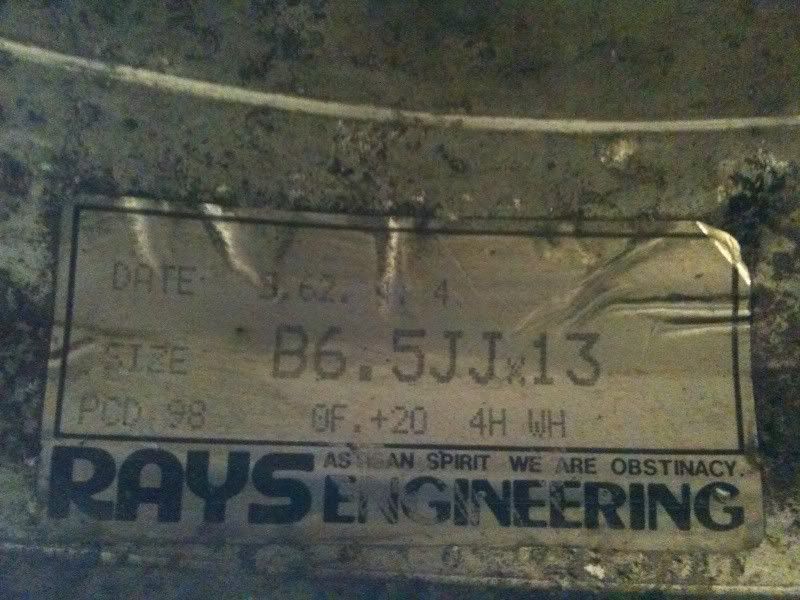
They are a Rays Volk Racing 3 piece wheel, in sizes 13x5.5 front and 13x6.0 rear with a 98mm PCD. They are a Japanese wheel, and I dont know how old they are but I'm guessing probably 70's or 80's - perfect period for the car. Theyre damn light, and I think they look pretty good on the car. Also remembering that in the above picture the suspension is at maximum droop, so they should tuck nicely into the guards.

wheelcenter.jpg


I've already pulled them apart and am about to take the rims to Adelaide wheel and tire services to have a few scratches and kerb marks fixed, as well as to get the rims properly polished. I'm taking the wheel centres into Uni to sandblast them, and I'll get them painted a nice hue thats somewhere between silver and gunmetal, shadow I think its called.

These are the stickers that are on the inside of them rim, I wish I could save them. You just gotta love the Engrish!

rayssticker.jpg


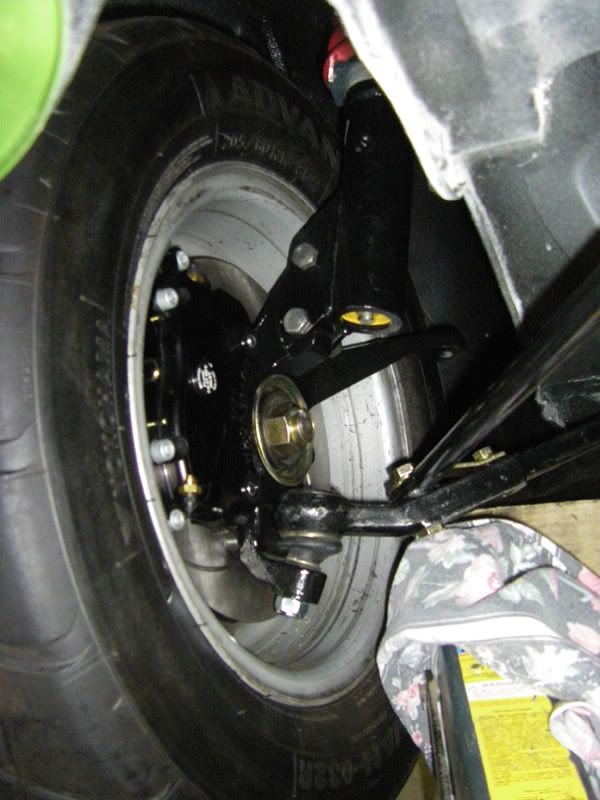
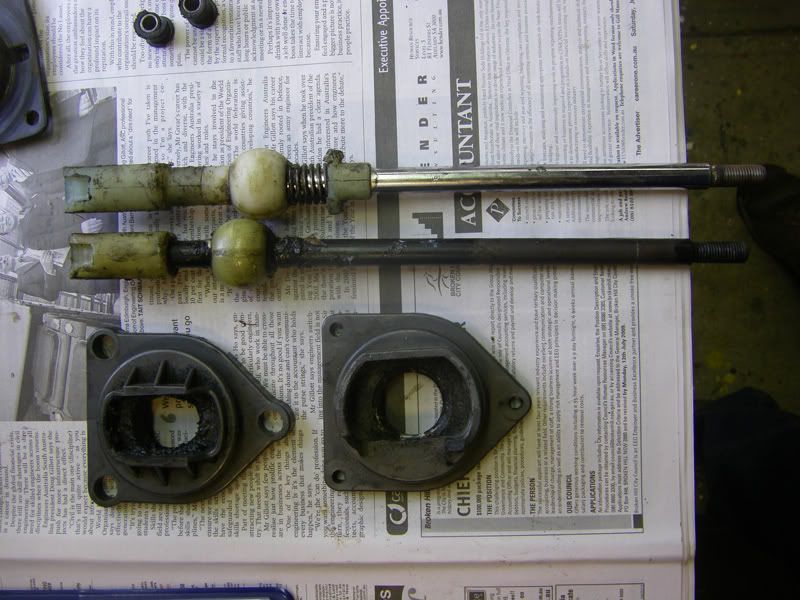
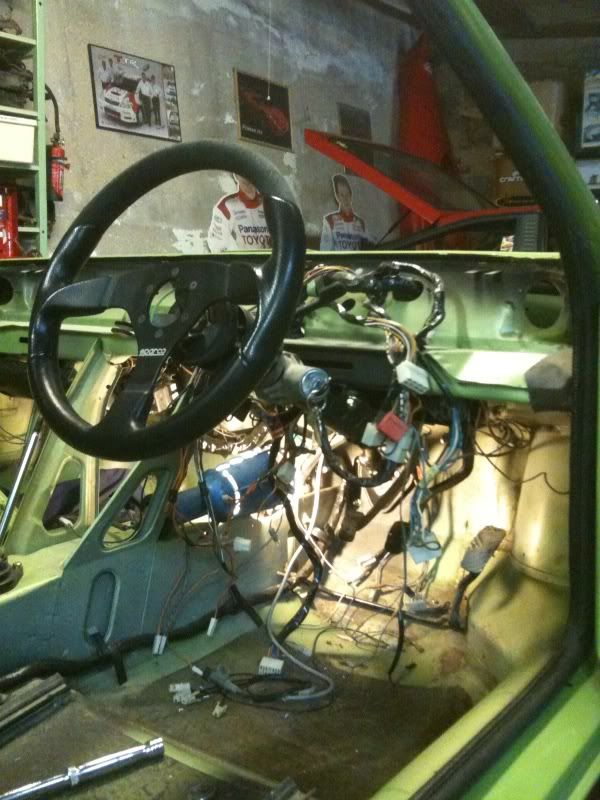
Over the past week or so Ive been rebuilding the pedal box with new master cylinders and new brake lines that link the master cylinders. Last night I put the pedal box and steering column back in - I now have working steering! That wheel is the old Sparco wheel that I was running in the car, I probably wont use it again as it doesnt really suit the period of the car - its too modern. I'm thinking a Momo Prototipo will go nicely.

interior1.jpg


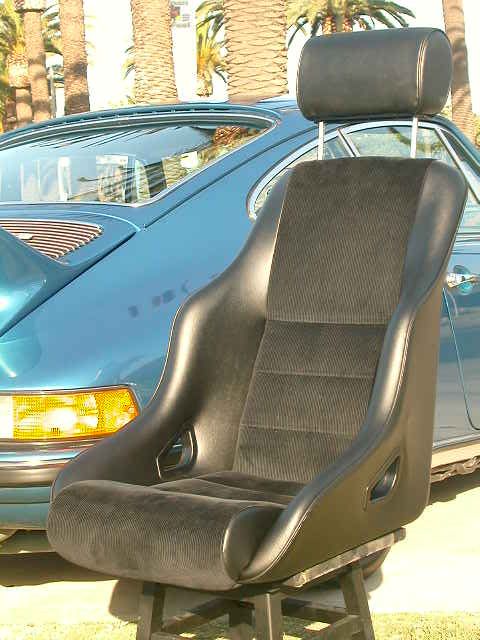
This has also got me thinking about the interior of the car, more specifically seats. I was planning on getting a pair of modern fibreglass shell racing seats, as these will be the best for motorsport and fast street use. However, they don't really suit the period of the car and because the seat's are so big they would tend to stand out in such a small car, particularly with the roof off. I'm sure you've all seen racing prepared Mini's with two huge race seats inside - they dominate the car.

I've really nailed down the look I'm trying to acheive with this car - the 70's and 80's race look. I don't know if anyone is aware of the R Gruppe Porsche club, but they promote period modification of early Porsche 911's - this is exactly what I'm aiming for, except with the X19. So for the interior I'm taking my inspiration from the Abarth Prototipo's.

I found these seats available and I think they would go well in the car. They cost about the same as modern racing seats do and the one's pictured here come with holes for a 5 point harness, something I will be running. What do you all think about them? By the way, if anyone thinks they would be awful please tell me - I'd rather know now!

det_Rallye_ST_900.jpg


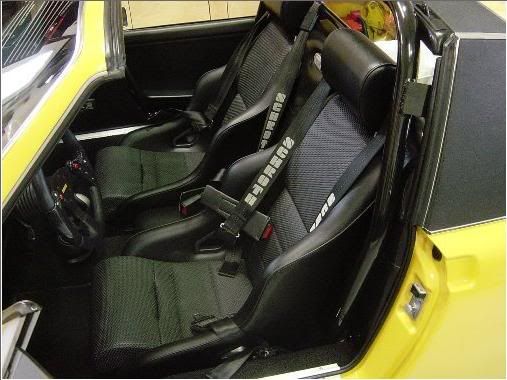
And here's these seats in a Porsche 914, kinda similar to the X19 I guess :)

914.jpg


Have a good one!
 
Wow, great history

And that vintage photo of you standing at your new-found X1/9 is surely a classic. :nod:
Hope your progress continues swiftly.
Thanks for sharing Andrew!
 
Doesn't it just pi$$ ya off...

SIXTEEN!!!

Geez - Loueez...

The kid has a great future ahead of him will his tenacity and skillset...

God, I feel old...

Here's me at 16 or so...

55Pickup.jpg
 
Back
Top