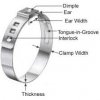
Any tips on removing fuel injection compression ring hose clamps?

aarpcard

True Classic
I searched around on the forum and didn't really find an answer in previous threads.

Does anyone have any tips for easily removing the compression ring style hose clamps fitted to the stock fuel injection lines?

I spent about 2 hours cutting away at one of the hoses in order to remove the ring intact.

The next few rings I cut off with a Dremel, but it is very difficult to not nick the anything other than the ring. I still have 6 rings to remove - there has to be an easier way to get these off.
 
Just do away with them & use Oetiker clamps. The collars over the tip of the hose are not needed with replacement solid outer layer hose. Diagonal cut through the collar & hose with a dremel, pry/twist off injector or rail barb, done in 2 min tops :D
 
Try cutting the rings with your Dremel as you are, but stop before you get all the way through. This avoids nicking the barb area under them, and the remaining bit of the un-cut ring can be snapped easily with a screwdriver wedged into the cut (with a little back-and-forth twisting). Once the ring is split, it can be bent away from the injector.

Either the FI style hose clamps or Oetiker clamps will work. Oetiker's may take a little practice on a couple first to get the hang of it, and using an appropriate tool (not side-cutters) is necessary. They can be found on-line.
Otherwise the FI clamps work great (used them many times on much higher fuel pressure systems with no leaks).
 
In the thread DaveR posted, someone mentioned using a heat gun. Going to try that on the clips still attached to the rail and see how it goes. If it works I'll scrounge around for a tip so I can use that for the remaining injectors.

If not, I guess it's back to using the Dremel.
 
I searched around on the forum and didn't really find an answer in previous threads.

Does anyone have any tips for easily removing the compression ring style hose clamps fitted to the stock fuel injection lines?

I spent about 2 hours cutting away at one of the hoses in order to remove the ring intact.

The next few rings I cut off with a Dremel, but it is very difficult to not nick the anything other than the ring. I still have 6 rings to remove - there has to be an easier way to get these off.


Hi, Tyler,

On the hi-pressure side of the FI system, the original fuel injection hose installation from the factory was accomplished with the correct 7.5mm FI hose pushed onto very sharp-edged hose barbs. The fabric weave inside the hose provides much of the "grip strength" the hose exerts on the barb to create and maintain a leak-free pressure seal. The collars that rest between the shoulder of the hose barb and the end of the hose itself are not clamps per se. They function as a positive stop for pushing the hose onto the barb to ensure the pre-cut length of hose is correctly positioned on the barb, neither pushed too far or not far enough; and they function to "contain" the cut end of the hose.

After some trial and error, here is what worked well for me. Assumption: all of the pieces you are working on are removed from the car and are on a suitable workbench type surface.

Using good quality diagonal wire cutters, cut the hose completely thru.

A. On the longer hose from the hard line to the fuel rail, cut about 1" downstream (direction of fuel flow) from the hard line fitting, and then cut about 1" upstream from where the hose fits to the left side of the fuel rail.
B. On the hoses that go from the fuel rail to the injectors, make one cut about halfway.
C. On the hose that joins the two halves of the fuel rail, make one cut in the middle.

Go to the hardware store and buy a #2 Xacto knife and a 5-pack of the super-pointy, super sharp Z-series blades, either the #2 or #11. Don't handicap yourself by trying to use razor blades, box cutters, or any thing similar. Like a surgeon, you need the right tool and blade for the job :)

Next, let's take an injector as an example and start surgery.

From the cut you made with the diagonal cutter above, with the Xacto knife, make an incision along and with the length of the hose, from the cut edge to the point where the blade contacts the collar, to a depth of about 1/3 the thickness of the hose. You should have sliced deep enough to have gone thru the top rubber layer and exposed the fabric weave. Repeat the incision, cutting into and just deeper than the fabric weave. Repeat the incision once more, slicing thru the full depth of the hose, UNTIL you get to the tip of the injector barb. Ease up on the pressure and go for a depth of about halfway into the inner rubber of the hose. You absolutely, positively DO NOT want to contact the injector barb, or any other barb, with the Xacto knife blade.

Next, get a good pair of pliers preferably with rubberized grip handles. At the cut end of the hose, spread the hose at the cut and grip the hose with the pliers so that one grip surface of the pliers is on the inner surface of the hose and the other grip surface of the pliers is on the outer surface of the hose. Now position the pliers, hose and injector in your hands like you were trying to snap a twig (see linked video) and "peel back" the hose off of the injector. The force of your hands will peel the rest of the hose off of the injector and now the collar will be free to drop off.
 
So Dr. Jeff mentioned Oetiker clamps. Here is a youtube video on it. Skip to about 5:07 for the good stuff.

Apparently they have both a screw type and a crimp type.
 
Actually I was echoing the reference Huss made to them, so credit goes to him.

Disclosure, I have not reviewed the video to see if this is covered:
There are single and double ear ones (I believe both types are considered Oetiker). As the name implies, the double ear version has crimping tabs on two sides, opposite one another. They do not overlap when crimped (like the single ear), but simply compress a void where the crimps are made (to both sides). The same type tool can be used for both. Although I've used both styles I can't really say if one works better than the other. Personally I think the double ear ones look cleaner. Both have been used by various automobile manufacturers and both are reliable clamps (if crimped properly). The crimping tool is very basic, however it can be a bit expensive (shop around, I've seen very affordable versions). Its tempting to use "side-cutters" but you should not as they cut into the band and significantly weaken it. I still use the screw type fuel injection clamps most of the time for car applications, as they are simple, quick and a lot easier to remove if needed. And I use Oetikers for motorcycle applications with smaller hose sizes.

I will also reiterate another comment by Huss. If non-fabric braided hose is used, then I prefer not to use the stock style collars, but use clamps instead. Just personal preference (sorry Dan, no offense to the factory's design :) ). I use fabric covered hose for most locations except on the fuel rail.
download.jpg download (1).jpg download (2).jpg download.png

And here is the difference between the proper crimping tool and regular "cutters". Where the jaws on typical cutters are sharp to enable cutting, the jaws on the crimpers are dull so they don't cut. And they meet parallel to one another to give a straight flat crimp across the entire width:
Ring-clamp crimpers.jpg
 
Last edited:
Actually I was echoing the reference Huss made to them, so credit goes to him.

Disclosure, I have not reviewed the video to see if this is covered:
There are single and double ear ones (I believe both types are considered Oetiker). As the name implies, the double ear version has crimping tabs on two sides, opposite one another. They do not overlap when crimped (like the single ear), but simply compress a void where the crimps are made (to both sides). The same type tool can be used for both. Although I've used both styles I can't really say if one works better than the other. Personally I think the double ear ones look cleaner. Both have been used by various automobile manufacturers and both are reliable clamps (if crimped properly). The crimping tool is very basic, however it can be a bit expensive (shop around, I've seen very affordable versions). Its tempting to use "side-cutters" but you should not as they cut into the band and significantly weaken it. I still use the screw type fuel injection clamps most of the time for car applications, as they are simple, quick and a lot easier to remove if needed. And I use Oetikers for motorcycle applications with smaller hose sizes.

I will also reiterate another comment by Huss. If non-fabric braided hose is used, then I prefer not to use the stock style collars, but use clamps instead. Just personal preference (sorry Dan, no offense to the factory's design :) ). I use fabric covered hose for most locations except on the fuel rail.
View attachment 8444 View attachment 8445 View attachment 8446 View attachment 8447

And here is the difference between the proper crimping tool and regular "cutters". Where the jaws on typical cutters are sharp to enable cutting, the jaws on the crimpers are dull so they don't cut. And they meet parallel to one another to give a straight flat crimp across the entire width:
View attachment 8450

PEX plumbing 'cinch rings' appear to be identical to the single ear Oetikers. I would think you could utilize one of the PEX cinch tools to compress the ears. The idea is the same but the tool has a stop built in to ensure you don't go too far with it. They are not necessarily cheaper but definitely easy to find and they have one-hand racheting options. This is a good example of the tool I have for PEX: https://www.pexuniverse.com/one-hand-pex-cinch-clamp-tool

~Jon
 
Back when I replumbed the RV I use for race weekends, I did it with PEX (seems to be the standard for RV's). I purchased the PEX tool and PEX crimp rings to do it. The rings do appear to be like the newer Oetiker rings for the most part and I'm sure either can be used. The tool for PEX was WAY more expensive than the one for Oetikers. It has a very different feel to it in use. The stop feature on the PEX tool is an adjustment, so it needs to be tested and set first. Not sure if either one is better, just more of a personal preference I guess.

Originally Oetiker rings did not have the PEX style (overlapping) locking mechanism, only the open-space cinch style (like the double-ear one pictured above, but with only one ear). You can still buy the original type rings and to me they look much cleaner if you are using them on something of a show vehicle or you are going for more of a "period" look. I'm not sure if the newer "locking" type are any better, but they might be easier to use. The "open" type require a bit of a "feel" to know how far to crimp; too little and they don't hold well, too tight and they distort...and both conditions can lead to leaks. But practice on a couple and you will see the limits in either direction, then its easy to do it correctly. The PEX tool requires the same initial practice to set the stop limiter correctly, but after that its easy. However if you change to a much different size of ring (diameter) or different type of base material (e.g. fuel hose vs PEX tube), then the stop setting needs to be changed.
 
Back
Top