
You are using an out of date browser. It may not display this or other websites correctly.
You should upgrade or use an alternative browser.
You should upgrade or use an alternative browser.
Breathing Life Into a Neglected '75
- Thread starter jimmyx
- Start date
jimmyx
True Classic
Finally got a little time to start attacking the last of the tin worm. Removed the lower valance panel which was rotted along the bottom edge. Cut out both rear valance corners. The exhaust side had significant issues. The left side was not as bad but both sides were weak so may as well do it all. Sourced all 3 panels from Eurosport. The lower valance is a bolt in and will be installed as is. As in most cases I've had to repair I have never installed a complete panel. I find it easier to cut away only what is needed and make the needed patch from the new panel. This repair is a little more difficult than most. Each side patch needs to be fitted then the lower valance is clamped to both patches and clamped to the car. Final piece of the puzzle is to install the rear grill before finally tacking the sides in. If I try and do this one step at a time the chances it will all line up as the factory intended is zero.


jimmyx
True Classic
Getting ready to drop this lump out for a rebuild. Car sat idle for about 20 years and looks to have some ham-handed repairs in the past. I could have taken a shortcut or two and just gotten it running, but don't see the point. I enjoy the work, but only the first time. I detest having to do something twice, so for me it's best to just do it once and do it right. Engine room needs to be repainted anyway and plenty of hard to see wiring insulation problems need to be addressed. Cost is a little more upfront, but I think worth it compared to constantly chasing gremlins, leaks and who knows what. Once it's on the stand I can fab the proper bracket to mount a GM alternator too. I'll take reliability over originality, and I don't want to follow @tvmaster down the alternator rabbit hole. ")


tvmaster
True Classic
It’s a dark and spooky hole for sure. I mean seriously, it’s a freakin’ alternator - and being installed by the self-professed most knowledgeable X19 mechanics/racers in Southern California. How hard can it be? Were the Bosch/Marelli alternators the true Achilles Heal of the FIAT empire?
SuperTopo
True Classic
It’s a dark and spooky hole for sure. I mean seriously, it’s a freakin’ alternator - and being installed by the self-professed most knowledgeable X19 mechanics/racers in Southern California. How hard can it be? Were the Bosch/Marelli alternators the true Achilles Heal of the FIAT empire?
Maybe your mechanic is great at mechanical stuff, not so much at electrical....
tvmaster
True Classic
or sourcing reliable parts....Maybe your mechanic is great at mechanical stuff, not so much at electrical....
Sorry to respond to such an old post, but I don't believe I read this in the rest of the thread. What do you use to coat the inside of a patch panel like this before you weld it in? Something like this where the backside will not be accessible after its welded in.Cut the cap, but still need to fit assembly and grind the taper before welding it in. The pic shows somewhat what I'm going for.
View attachment 42634
jimmyx
True Classic
After primer I hit it with any rattle can I have handy. Some is going to burn off or peel so actual coverage is not perfect by any stretch. The key is to make sure the reason the rust occurred initially is remediated. Without the moisture source you'll get some light surface rust, but it usually won't get much beyond that for many years. Your mileage may vary in your neck of the woods - in So-Cal rust creep is not as much a concern as it moves very slowly in this climate. Living in the upper Midwest, I be tempted to try and find a way to get a small hole behind it and hit it with some internal frame coating.Sorry to respond to such an old post, but I don't believe I read this in the rest of the thread. What do you use to coat the inside of a patch panel like this before you weld it in? Something like this where the backside will not be accessible after its welded in.
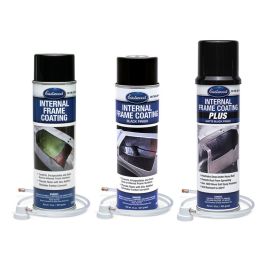
Eastwood Internal Frame Coating Rust Prevention Aerosol
Destroys rust hiding inside the chassis, rocker panels and pillars so it won't rust through
 www.eastwood.com
Thanks, thats a perfect idea! It would be easy enough to drill a hole just big enough for the nozzle and fill it with seam sealer later. Your detailed pictures are helping me feel a lot better about tackling the rust on my fiat. I have some experience patching rust from my first mr2, but I definitely did not do everything correctly on that car.After primer I hit it with any rattle can I have handy. Some is going to burn off or peel so actual coverage is not perfect by any stretch. The key is to make sure the reason the rust occurred initially is remediated. Without the moisture source you'll get some light surface rust, but it usually won't get much beyond that for many years. Your mileage may vary in your neck of the woods - in So-Cal rust creep is not as much a concern as it moves very slowly in this climate. Living in the upper Midwest, I be tempted to try and find a way to get a small hole behind it and hit it with some internal frame coating.
Eastwood Internal Frame Coating Rust Prevention Aerosol
Destroys rust hiding inside the chassis, rocker panels and pillars so it won't rust through
jimmyx
True Classic
I wanted to start cleaning up the panels so I can get the patches welded in, but in typical fashion the X knows no limit to mission creep. I kept thinking what's behind all that attic insulation? I can see surface rust on the rear cross member and a few other places, so what the heck, just bite the bullet and get it over with. Nothing terminal, but better to clean up and treat the areas that need attention and replace that insulation mess with 1750 degree boom mat. I kept the main aluminum panel so it will make a good template when cutting the new heat shield. I may weld in a cross member reinforcement (a'la K20 conversion) if I feel ambitious, but then again, maybe not ..........


..........jimmyx
True Classic
Fairly pleased with the way this is turning out. I bought this one as a parts car, but I was amazed at the shape it was in when it landed so I decided to invest the time and $$$ into it. As you well know, one can't have enough smog exempt cars here, so not being constrained when building the power train for this is a huge plus. Finding '74 &'75s is not as easy or cheap as it was just a few years ago, so making this into a decent driver is probably the right move.Dam, your X1/9 will be a great one when you are done. Great work!
jimmyx
True Classic
Been on the hunt for some exhaust hanger brackets with no luck yet, so I figured I may as well try and salvage the set I have just in case. First soaked the brackets in EvapoRust (amazing stuff) and, just spot welded some stock to the outside edge, cut off the excess and finished with a flap disc. Drilled the 1/4" holes and cut the slot with a cut-off wheel. Off for primer and paint and should be good to go if a good set doesn't turn up.


jimmyx
True Classic
Started on fitting the patch panels for both sides. Eurosport says their panels are hand formed. The fit and finish is amazing. I'm not sure who makes these panels, but if they ever stop we'll all be in for a world of hurt. If I had money to burn I'd buy out their entire inventory just in case.

jimmyx
True Classic
As great as the Eurosport panels are they are not always plug 'n play. Right side is almost there but it took about 2.5+ hours of fitting. Left side will probably take a little more. It looks like the lower valance will take some fitting as well. Some of the flatter panels like rocker sections are fairly easy. This repair for anyone facing it is about an 8-9 on a 10-scale in difficulty. It requires a full compliment of body tools including a Porta-Power ram, so it's certainly not one I would recommend as a 1st project!

jimmyx
True Classic
The GM alternator that is in common use is not exactly modern, but I use it on most every classic build regardless of vehicle brand simply because it is virtually bulletproof. It is not prone to overheating, has good tolerance for high belt tension, and rarely if ever wipes out bearings. If you want something reliable and modern, Denso makes some very nice stuff too. There may well be something else that bolts on to an X without modification, but I've never had the interest in researching it, so I can't help you there. The upper bracket and heim joint support the GM swap requires takes a few minutes to fab up (it's basically just an "L" bracket with three drilled holes) but it is FAR easier to get the belt alignment spot on with the engine out of the car. The problem with doing it in tight quarters is that belt alignment might look okay, but put the laser to it and it will be dumb luck if it is. It can certainly be done in the car, but it takes a lot more trial and error work. If my engine wasn't coming out I would just bolt in a replacement that is the same as the X was born with and be done with it.Regarding your GM alternator plan… are there no modern, reliable alternators that fit the bolt-on pattern of an exxe? If it’s not Marelli or Bosch, will every brand need welding mods?
jimmyx
True Classic
Almost have it nailed on the left side. Hopefully will get these tacked in tomorrow. The left side panel was supplied approximately 1/4" too wide. The only edge to work with is the seam side to narrow it. The right side panel was about 3/8" to narrow near the very bottom edge. That gap will have to be filled with lead and I'll have to use a cut-off wheel to score a simulated panel seam for the bottom 1 1/2" of the panel. Very hard area to see, but won't take too much to get it looking right. The upside is once the left side was narrowed, the lower valance connector slides right into place so nothing there needs modification. The Eurosport panels are hand formed and factoring in manufacturing tolerance variations they are not perfect, but they beat having to try and create panels like these from scratch and are still an invaluable starting point.
