Breathing Life Into a Neglected '75

In the mid 70’s when catalytic converters were just starting to being used for emission control, most cars were carbureted and it was difficult to keep the fuel-air ratio correct. That’s the reason for the warning light.
Well now I'm sad I don't have either on my carbed '74. Flashing, blinking lights make cars go faster
 
I hooked mine up to an on/off switch that my wife can use if she thinks I'm driving too fast.

Actually that's not true since I don't have the light and my wife won't go within ten feet of the fatrat.
 
The pedal box looks to be in amazing condition from what I can see. I thought I had it made when all 3 brake line nuts came loose easily with just a line wrench. Then....got to the clutch nut. I soaked it in penetrating oil for days before I started. It took an Irwin Vice-Grip locking nut wrench with some additional, non conventional leverage assistance to break it loose. Got it done without any damage to the nut, and there was no evidence of thread corrosion, so I have to think Hercules installed the last clutch master? All the lines are free and I'll pull down the box tomorrow. Have to break this job into several sessions to avoid ending up in traction. I've done more than one of these and it's not that the job itself is difficult, it's the working environment, or lack thereof that is ridiculous.
 
Able to drop this out with too much drama. Every pedal box I've ever done were in cars that had the column already removed. On this one I dropped it down but didn't remove it. I found that while working on the clutch side, the best access was with the column "bungee'd" across the console. On the brake side, I ran the bungee from the wheel over and down to the bottom of the left door. The column has quite a bit of "swing" in both directions and there is tons more access just putting it where it interferes least . The pedal box was in pretty good shape. The bushing was pristine and the only wear was a hair on the clutch pedal pin. Not worth doing anything with it as it is hardly measurable. Have it all stripped down to refinish it while I wait for the parts care package to arrive. I found both reservoirs cracked and the feed hoses have turned to dust. Replacing everything including all the caliper flex lines and then I'll see what needs to be done to the calipers. I suspect that in the end, all the hydraulic components will be replaced except the hard lines. It's not only a safety issue, but it's such a PITA job it's not worth scrimping on anything. If you have never done one of these, but it's in your future, do yourself a favor and only break the 3 brake master lines on the cylinder itself. Leave the lines intact on the junction blocks. If they weren't leaking before, it is better not to tempt fate. Bubble and double flares have a very limited assembly/disassembly tolerance, and a leak of any kind on top of the box means you are flat on your back again.

IMG_3328.jpg
 
Able to drop this out with too much drama. Every pedal box I've ever done were in cars that had the column already removed. On this one I dropped it down but didn't remove it. I found that while working on the clutch side, the best access was with the column "bungee'd" across the console. On the brake side, I ran the bungee from the wheel over and down to the bottom of the left door. The column has quite a bit of "swing" in both directions and there is tons more access just putting it where it interferes least . The pedal box was in pretty good shape. The bushing was pristine and the only wear was a hair on the clutch pedal pin. Not worth doing anything with it as it is hardly measurable. Have it all stripped down to refinish it while I wait for the parts care package to arrive. I found both reservoirs cracked and the feed hoses have turned to dust. Replacing everything including all the caliper flex lines and then I'll see what needs to be done to the calipers. I suspect that in the end, all the hydraulic components will be replaced except the hard lines. It's not only a safety issue, but it's such a PITA job it's not worth scrimping on anything. If you have never done one of these, but it's in your future, do yourself a favor and only break the 3 brake master lines on the cylinder itself. Leave the lines intact on the junction blocks. If they weren't leaking before, it is better not to tempt fate. Bubble and double flares have a very limited assembly/disassembly tolerance, and a leak of any kind on top of the box means you are flat on your back again.

View attachment 44227
Those are nice old masters. I would get a rebuild kit for each and send them out to get sleeved. The guts of OE calipers are better than the modern ones which are proving to be less than ideal from the responses we have been seeing of late.

Just a suggestion.

Karl
 
Last edited:
Thanks. So you cut the three hose lines midway and there you go. Can’t wait to see the clean-up re-do. Fire retardant cloth on the tank?
 
Thanks. So you cut the three hose lines midway and there you go. Can’t wait to see the clean-up re-do. Fire retardant cloth on the tank?
The tank back is lined with boom mat, but the purpose is insulate the tank from the rear firewall - it's to prevent metal to metal contact (noise control).
 
The tank back is lined with boom mat, but the purpose is insulate the tank from the rear firewall - it's to prevent metal to metal contact (noise control).

The factory batting on mine was stripped - only the 'tar' paper skin was left - it was all inside the crossmember next to the base of the tank, where a critter had made a nest. Thankfully I realized that before I started welding the rail for the K24 install....

sample....
IMG-20190821-094504-1.jpg
 
The factory batting on mine was stripped - only the 'tar' paper skin was left - it was all inside the crossmember next to the base of the tank, where a critter had made a nest. Thankfully I realized that before I started welding the rail for the K24 install....

sample....
IMG-20190821-094504-1.jpg
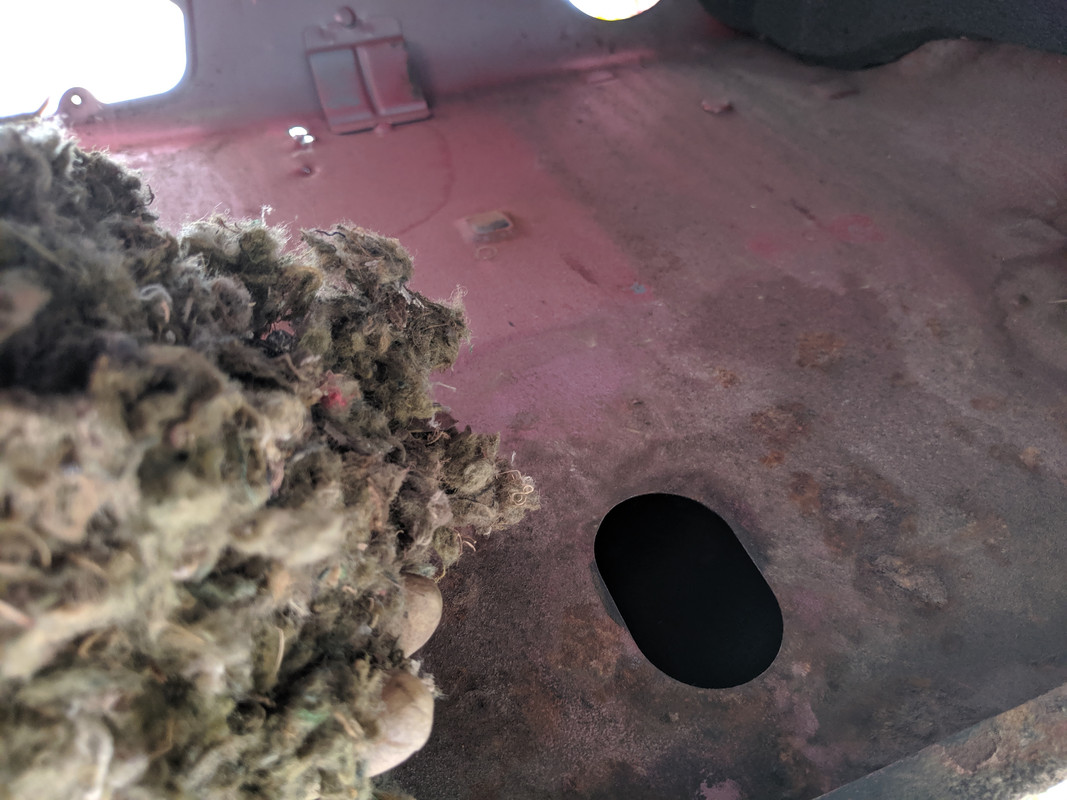
I remember when you posted this originally. Double checking everything before welding has been indelibly imprinted in my brain because of it! The most unlikely things can be waiting to bite you in the rear sometimes....
 
Tank found it's way back home. While positioning the filler neck going back in, I found the water ingress point that caused the damage to the left lower quarter. Hard to photograph, but that's what happens when you neglect the drains. Not a spot that lends itself to welding, so I'll have to fab up a patch, epoxy it in and cover it with seam filler. Haven't pulled the other side cover yet, but I'd bet I'll find similar......

IMG_3336.jpg
IMG_3337.jpg
 
This is ready to go back in. Yes, I had considered having the originals re-sleeved, but with the cost of that coupled with powder coating, bronze bushing, etc. I'd rather spend the extra money and put in Tilton pedals like I have in my '74 K20. The Tilton's are already powder coated, bushed properly, have adjustable bias, adjustable pedals, and a wide selection of decent quality master cylinders in various bore sizes. I don't doubt there is a quality difference between the OEM masters and the aftermarket stuff being sold now, but I'm not completely convinced that many of the reported early failures are necessarily due to part quality though. In reading the endless threads on this topic, there are numerous reasons that an early failure was predictable. Many of the projects out there are multi-year endeavors; some spanning a decade or more. Purchasing the hydraulics so you have them when you get to that part of the project is great, but not so good if it happens to be 5 years after you bought the parts! Once parts have been installed, the number of cases where there is zero flow from the reservoir to cylinder because of a kinked hose is fairly common. Enthusiastic pedal pumping on a dry cylinder is a whole lot of not good, especially for hours and days on end. Another group has no problems surface for the first 2 or 3 years and now the drip is back on the shoes. Many of our cars see very limited use - some only averaging hundreds of miles per year. Few things are more damaging to vehicle than lack of use, and that includes seals, gaskets, stuck caliper wedges, everything hydraulic, and on and on. So I'll see how it goes with the MWB cylinders, worst case is there is a shiny new set of Tiltons in my future.

As far as doing this job, it's just an R&R. One step I've found helpful is to mount your lines and blocks before you bolt the cylinders to the box. It is FAR easier to get the lines started correctly and tightened without the box sides limiting your access to the tube nuts. If the mounting holes are a hair off when you're done, it's easily tweaked back into position when you're done. If you take the box apart to clean and paint it, make sure the pushrod for the brake master is mounted to the pedal before you reinstall the pedal - not going on if you forget without taking it all apart again. Also helps to snap a picture of the box hose routing when you take it out - you won't remember how it goes 5 minutes after you disassemble everything. The final thing is to check that the hose clamp bolts have zero interference with the cylinder body. If they do, it can cause the hose connector to lift up from the grommet and you'll be chasing a problem you don't want to chase. When it's all together, just check that the connectors are sitting flat on the cylinder grommets and you'll be good to go.

IMG_3351.jpg


IMG_3352.jpg


IMG_3353.jpg


IMG_3354.jpg


IMG_3355.jpg
 
Nice work! So very clean. I agree regarding taking a pic before the hoses are removed from the pedal assy. I used oetiker clamps on the lines, I found it easier than dealing with line clamps.
 
Just a quick pic to prove this piece of engineering malpractice will go back in .... eventually. The serviceability engineering team must have been on vacation when some new grad signed off on this.

IMG_3356.jpg
 
Back
Top