DIY coilovers

Doug,

Thank you very much for the latest updates with this project. I appreciate learning from your exhaustive research and continued development. Great job! If at all possible, a few photos of these latest details would be much appreciated as well (when time permits).
Regarding the limits of lowering the vehicle with these struts, do I recall that the VW struts are actually a bit longer than the stock Fiat units? If so, it seems that the added length is kinda working against you in that regard. But I think the possibility of finding a donor strut assembly from some other vehicle (that is shorter and could be modified similarly) would be the old needle in a hay-stack. Another option might be to shorten the shaft at the top of the strut (saw another thread about this: http://xwebforums.com/wiki/index.php?title=LoweringFrontEnd), allowing the spring to be set lower and not be loose on full extension.
Please be sure to let us know what else you come up with, and thanks again.
 
Last edited by a moderator:
Very cool work.

I'd like to see pics of the revised mod - did you take any process pics?

I'm a visual learner - I can read something ten times & still not "get it' without a pic for reference :sigh:
 
Hi Doug,

Your timing to update your thread is great as I decided to start the same DYI soon (gathering bits this week).

Looking forward to some pics!
 
Wild thoughts

Just for the sake of discussion, while reviewing past Xweb discussions about X1/9 strut modifications I came across a couple of comments that got me thinking (that alone is unusual :)). One post stated that the Mitsubishi 3000GT front struts were thought to be very close in dimension to the X's, and another said the same about the 3rd generation Toyota MR2 struts. So I Google'd both to see images and purely from a visual glance they are very similar looking. While I do realize that does not mean much, it did provoke further interest. Based on Doug's idea of modifying a complete strut assembly from another vehicle (VW Rabbit in his case) to fit the X1/9, could there indeed be yet another candidate to use as a donor strut that comes even closer to the desired outcome? Some things of interest might be: finding one that has lower carrier mounts close enough to the Fiat's to allow modification to fit rather than complete replacement, an overall length that is shorter than the X's to allow lowering the ride height without loss of travel, and something that has lots of insert options available? The decision to convert them to coil-overs might even be independent to this, because if a good fit was found it could allow the use of 'stock' type springs while still providing the above mentioned benefits, or it could be modified to allow coil-overs as Doug as done.
Naturally the only way to find out if such units could be used for a project of this type would be to take a bunch of measurements and compare them (as Doug did with the Rabbit struts). Is anyone out there in a position to look through optional strut fitments; like someone that works at a parts supplier or manufacturer, etc? We already have all of the needed data for the X's dimensions, thanks to Doug. So a few quick checks of some others would be all thats needed to rule them in or out. Maybe some of you Xweb members have thoughts of other possible applications that might work as a donor for this as well?
Thanks to everyone for getting me to think a little for a change. :dunce: And just to be clear, I am in no way questioning or criticizing Doug's choice of the VW strut for the project, nor am I suggesting that his do not work in any way. I am merely taking his idea and considering some options. The Rabbit may very well be the ultimate choice, and without his work these thoughts would never have come up, so thanks again Doug for your excellent accomplishments!
 
Front upper perches and mounts

Hi folks. Sorry that it has been so long since I updated. Been busy with work and making the euro bumper brackets.

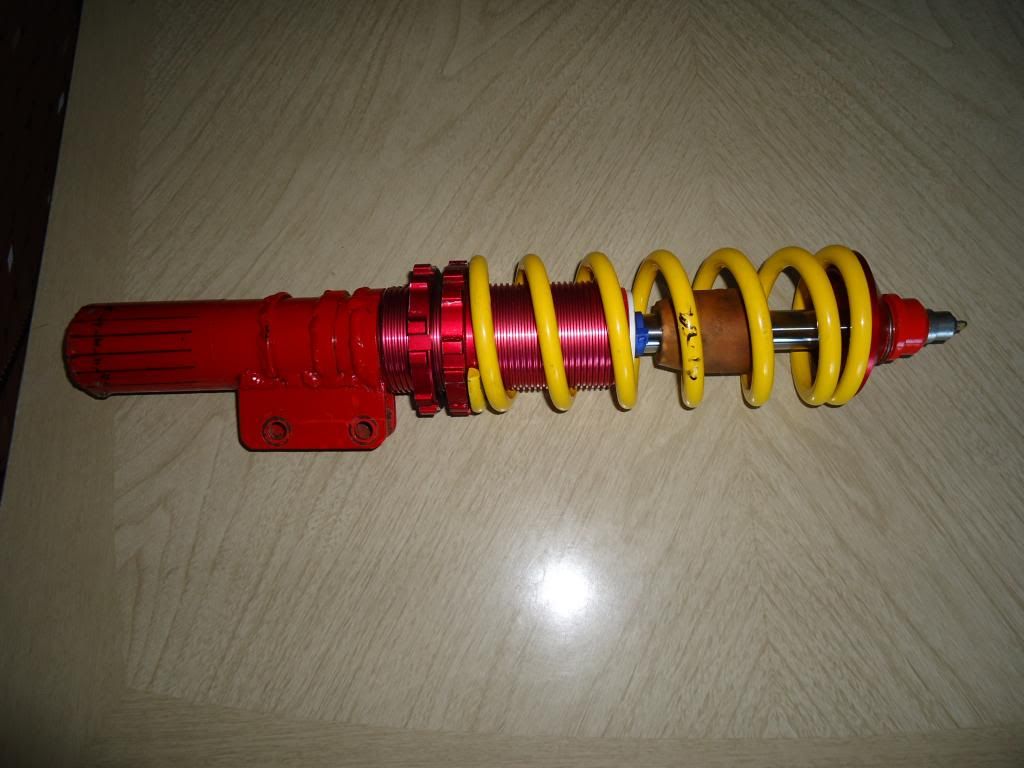
Anyway, back one step to the upper spring perches. I had difficulty finding a proper sized tube, so I simply just laid down 4 beads of weld on the cut off stub and ground them till the spring was a nice fit. Not really necessary as the spring doesn't locate anything but it seemed like the right thing to do.


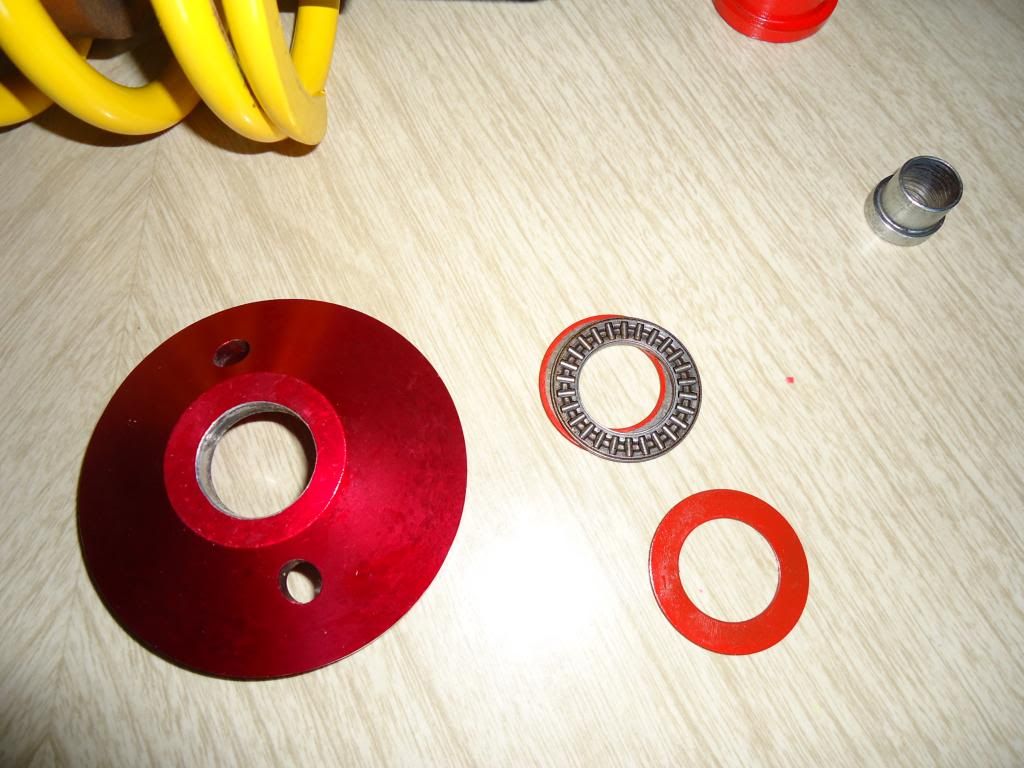
Continuing, above the front bearing (or Plaia pivot) there is a thin metal washer and then an aluminum cone. You could use them as is. BUT, to achieve the maximum possible lowering and/or stiffening, we will modify them very cleverly as follows.

Enlarge the centre of the washer to 20mm ID and counterbore the cone (from the bottom) to 20mm ID, 10mm deep. This simple - well almost simple - mod will lower the car about 1/2" all by itself. By the way, this mod would even work on a totally stock suspension !

Now you would think that counterboring is for sure a lathe job, and indeed you could have it done at a machine shop, but I promised you we could do all this with no lathe or mill, so believe it or not, you can buy a "metric cap screw counterbore" bit with a 14mm pilot and a 20mm cutter with a 1/2" shank.Available at any machine shop supply place. I got mine at www.kbctools.com Locations thoughout Canada and U.S. Part # 5-614-012

http://www.kbctools.com/can/Navigation/NavPDF.cfm?PDFPage=0064

About $25. Now I realize that you probably don't possess one of these and after using it here you probably will never use it again. Maybe split the cost with another local Xweb member or sell yours here after you've used it, or simply mail me your washer and cone with a little folding money and I'll bore them and mail them back to you.Even at worst, lowering the front of your X about 1/2" for only $25 isn't too bad.

I found it easiest to just clamp the washer to the cone with a couple sets of vise grips as shown, hold it in a vise, and bore them both together. The washer is pretty thin to try to drill out on its own. Carefully drill through the washer and counterbore the cone ONLY to a depth of 10 to 11mm. The cone is aluminum so it bores pretty easily.


Before and after


On top of that simply use a stock X1/9 rubber mount. Unmodified.
If yours are original, they are probably hard and distorted and worn. New ones are still easily available from your favorite Fiat parts supplier. Luckily for us, www.fiatplus.com recently developed a nice heavy duty reproduction with somewhat firmer rubber. Ideal for our purposes. But watch out, he sells a set of 4 cheaper than 4 individually, under a different part # http://www.fiatplus.com/set-of-four-4337710-pr-301797.html.

Now some people use a solid upper mount with a spherical bearing instead of the rubber one. But certainly - for street use - I think the rubber one is best. It adds some compliance and isolation.

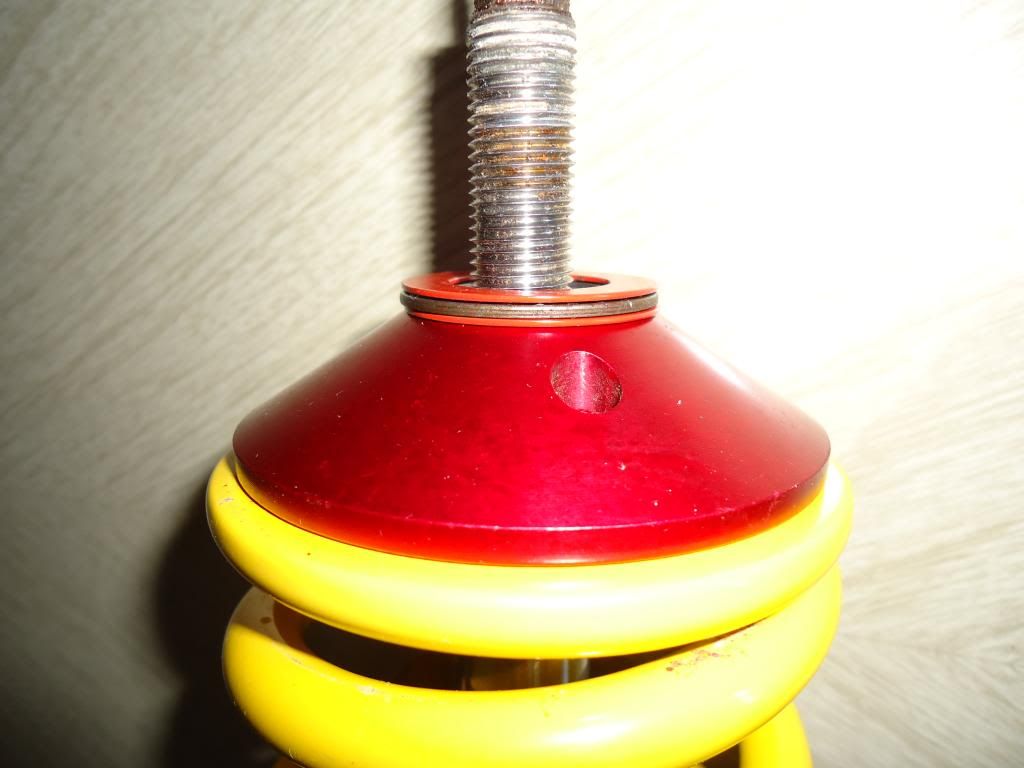
On top of the rubber mount is a cupped washer. The stock one has a 12mm slotted hole. But this part of the VW insert needs a 14mm round hole, so drill out the stock one to 14mm (or 9/16"). Strangely enough, I found this aspect of the project to be much more difficult than it appears. Fiat must have made this part out of kryponite or something. In fact I think it is just case hardened from the stamping process. I ended up grinding and drilling to enlarge the hole.

Note that, strangely enough, on the used struts I obtained, that the front and rear cupped washers were slightly different. The rears had an extra washer spot welded onto the inside of it. Look carefully at yours.

Now after enlarging the cupped washer and trial fitting everything, you will notice 2 problems. The top nut for the VW insert is 14mm thread with a 22mm wrench size. This nut is too large to seat inside the cupped washer. In addition, you will notice that even if it did, the threaded portion of the VW shaft is not long enough. Part of the unthreaded portion of the shaft extends taller than the seat portion of the cupped washer.

These 2 problems can be solved with 1 simple step. You have 3 options :
1) Find some washers 14mm ID 22mm OD (9/16"-7/8") and stack them about 1/2" high. Simple but too mickey mouse for me.
2) Buy a standard 7/16" bearing collar. This should measure 7/16" ID, 7/8" OD, 7/16" thick. Available from KBC Tools and Princess Auto up here. Should be found at Harbour Freight or most hardware stores. If you live in a metric land a 12mm collar should work fine.
You WILL have to drill out the inside to 14mm (or 9/16"). Remove and discard the set screw. Then install with the chamfer down.


Pic shows drilled out 7/16" collar on left and chamferred 9/16" collar on right.

3) Buy a 9/16" bearing collar. Should be 9/16" ID, 1" OD, 7/16" thick. This has the right ID but the OD is too large to fit inside the the cupped washer. You WILL have to enlarge the chamfer considerably so that it will seat. Maybe use the set screw to secure it to a 9/16" rod or bolt and enlarge the chamfer on a bench grinder until it seats properly. The ground chamfer will not be visible when installed so your grinding job doesn't have to be perfect.

On top of that goes a 14mm x 1.5mm nyloc. Your new VW insert should come with a new one.

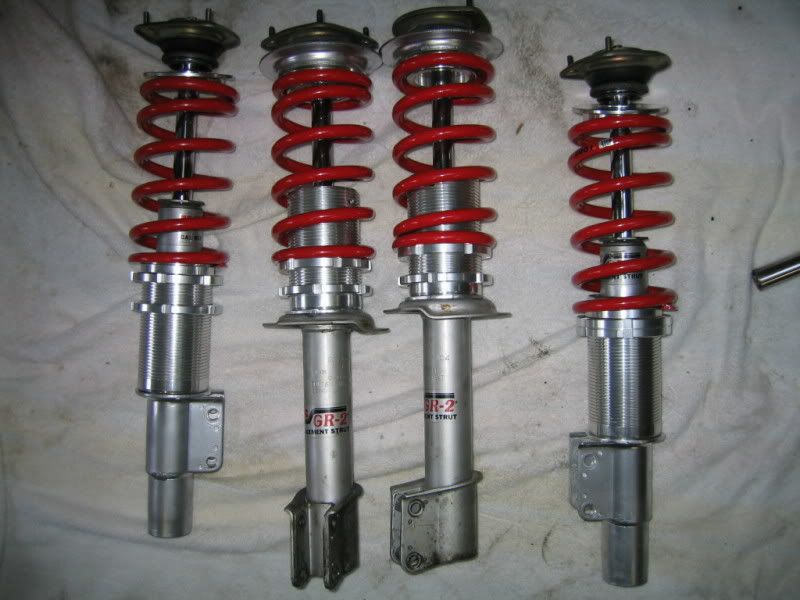
Pics of front upper mounts in order


Now there are only 2 things missing, but both are very important.

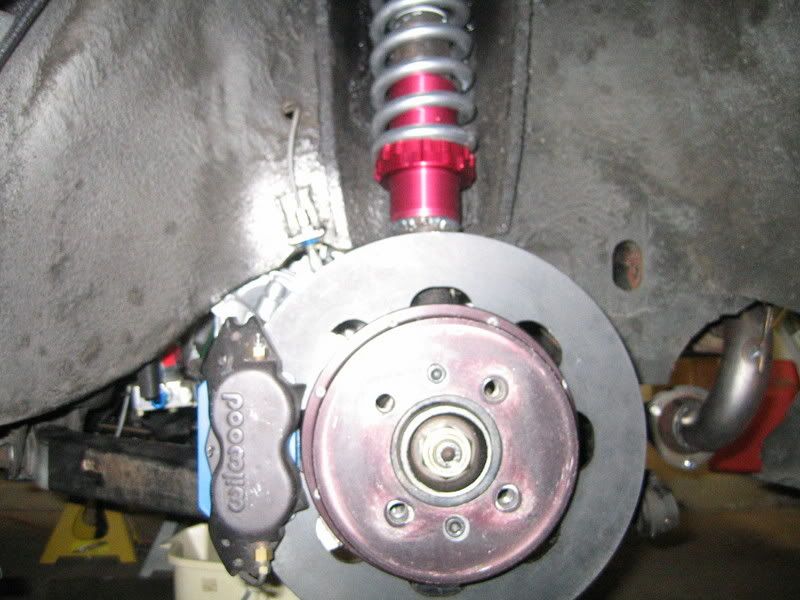
First, we need a bump stop. You will have noticed that earlier we chopped off the original Fiat one. IT MUST BE REPLACED by an alternative. DO NOT RUN WITHOUT ONE. It's purpose is to limit the compression travel of the shock BEFORE the shock bottoms out, OR the tire hits the fender.If the shock is allowed to bottom out, IT WILL damage and destroy itself !!! And the abrubt stoppge of suspension movement will cause an abrubt loss of tire adhesion. Luckily for us, many cars use a bump stop that is simply a chunk of rubber slid over the shaft of the shock. We can do the same. Just find a bump stop that is 20mm ID, and no bigger than 2" OD. As for length, well...we must choose a length that is a happy balance between:
1) Not allowing the shock to bottom out
2) Not allowing the tire to hit the fender under full compression AND
full steering lock to lock
3) Maximizing suspension travel
4) Remembering that the bump stop is rubber and wil compress
under load.
You have many choices of bump stops from other cars. I chose a later VW one, and trimmed the length. The length was carefully determined by intalling the new struts on the car WITHOUT springs and checking everything carefully. There can be so many variables in tire size, shocks, etc. that I hesitate to give you a length.

Next (and finally ! ) we need a proper dust boot to protect our fancy new shocks. Without one, sand and road grit WILL shorten the life of the shock seals. It took me a long time, but I finally found the perfect one. Pics and part # later.

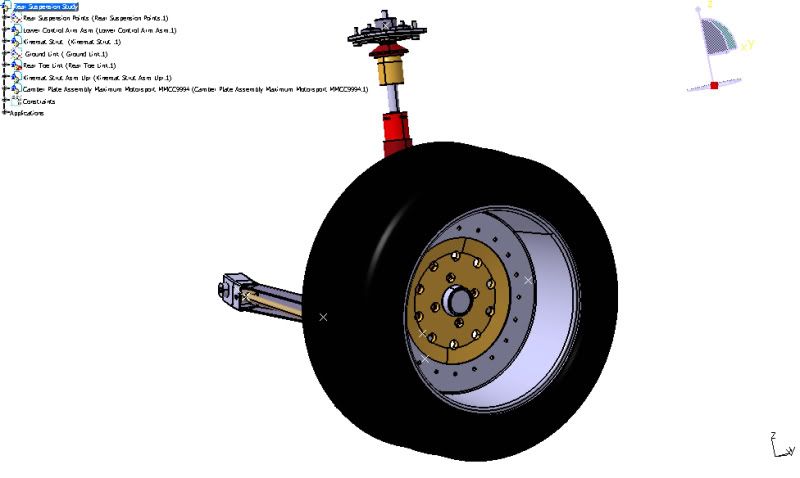
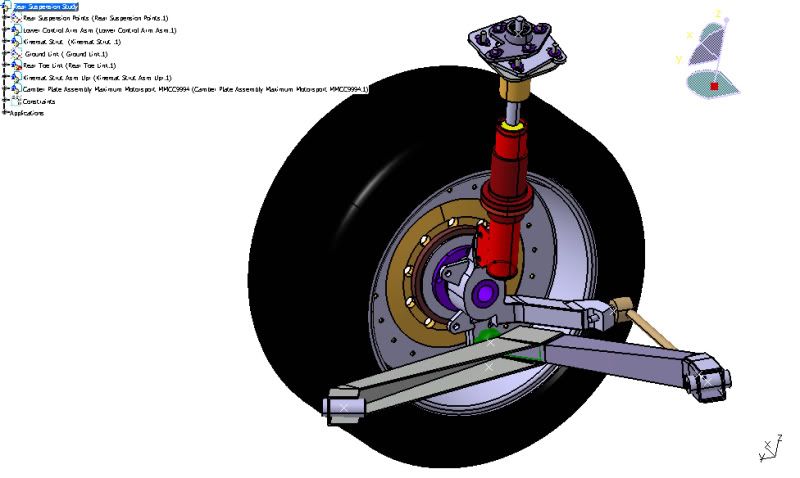
Next, rear upper perches and mounts. Stay tuned.....Doug
 
Rear upper perches and mounts

Much the same as the fronts.

From my research, it sems Fiat used 2 different rear upper spring perches.
The early type, used all all X1/9s up to mid '79, apparantly had a flat top (like the fronts) and a seperate cone. The later type (79 1/2 on)had the cone built in.


The later type is the ones you should use on all year X1/9s if building these coilovers.

Again, like the fronts, cut the original upper spring perch down to a 3/4" stub. And again, lay down some beads of weld until the spring fits nicely


Then, with a 2" hole saw (a 2 1/16" works better), cut out the flat section as shown


Of course the rears have no pivots so on top of the upper perch you only need the stock type rubber mount, and then the cupped washer (drilled out as before) and then again the modified bearing collar or washers. And of course the bump stops and dust boots, just like the fronts.


Now you should be ready to assemble everything. But of course you will blast and paint everything first, right ?


Assemble so that the springs are just held very slightly compressed. This, of course, will give you the lowest possible ride height.

Bolt onto car. You will probably want to use some camber bolts - in the top holes ONLY - to be able to adjust camber later.

At this point you should strongly consider getting some "Bigfoot" strut tower re-inforcement plates. Especially considering you will no be driving the car a lot harder now with your super new suspension.
http://www.fiatplus.com/plaia-big-foot-strut-top-kit-pr-300543.html


If desired, raise up the lower spring perch to raise the car to your desired ride height. At this point, you probably should loosen off the bolts of the inner suspension pivots and re-tighten with the wheels on the ground and car at desired ride height.

Drive the car a few miles to settle everything, and then go get a proper 4 wheel alignment.Very important. There is no point in building this suspension unless everything is adjusted properly.
 
Reply

Hey Dr. Jeff. Thanks for your interest and input.

As for the VW struts being a bit longer, well sort of. They have a body length almost identical to the X1/9s. but indeed the travel measurements are bit different, and they have about 1/2" more travel overall. But in fact - and nobody seems to realize it - X1/9s actually have different travel measurements front to rear. The VW ones kind of split the difference. And yes, the extra travel in the VW inserts DOES work against you, But in the end, I was finally able to find some tricks to compensate and achieve everything I wanted.

As for shortening the shaft, well for sure that would be a lathe job, but it would of course also shorten the amount the shock could be compressed !! Not good. The only way to limit the extension travel would be internally in the insert. I think Koni and Bilstein can do this for you on a custom basis, but I'm sure it would not be cheap !!

As for finding another alternate, well I tried. I actually own an auto parts warehouse and personally went through every insert we had in stock. The best one I could find turned out to be ... yeah a Rabbit one. As for the Mitsubishi 3000GT, well all my catalogs show they had a sealed strut like the later X1/9s. No insert. Maybe the aftermarket replacement struts for the 3000GT could be taken apart - like the KYBs for X1/9 - and you could then mess with the housing.

And as for finding a strut that you could just redrill the mounting tabs, well, I thought of that too. But the front of an X1/9 has the tabs sooo high on the strut tube that it would be real tough to find something there. The rears, yes its possible.

The main problem I faced was that if I was going to be welding and messing with the housings, then I would pretty much have to find a strut with replaceable inserts. But just about every manufacturer changed to sealed struts by the mid '80s. Fiat even sooner. Yeah, I'm sure somewhere out there a '78 Daihutsa Bongo had a strut a little more suitable for our needs, but A) good luck finding donor struts - and B) even better luck finding a good choice of performance inserts still available.

But I'm still looking. And hopeful. I thought the MR2s might work but from what I can find out they seem to be about an inch too long. But not 100% sure.

Strangely enough, us X1/9 owners are not alone. Google searches revealed Datsun 1200, 1st Gen. Civic,and folks wanting shorter struts for 240Z and 2002 all looking for the same thing we want. And pretty much all paths led to ..... yeah you guessed it.... VW Rabbit.

Hussein. Thanks for your interest. I will do my best to include more pics. I gotta admit, when I go back and read my write-ups it's even not too clear to me !!!
 
More process pics

Chopping original brackets off of X1/9 front struts. Please note that luckily for us they are only welded on the bottom of the brackets.


Chopping spring perch off VW strut


Slicing tabs off of VW struts


Make 2 rotation cuts as shown without touching main body of housing


Then pry off centre section


Using X Lathe, "turn down" remaining welds


Note. Remnants of spring perch only needs to be "turned down' enough so that threaded sleeve can slip over it.

4 stripped VW housings


Removing brackets from X1/9 rear struts


Back to VW struts. Removing excess material from bottom of housing


This above was done in chop saw and with dremel. First remove sections and tack weld end of plug so it doesn't fall out ! Then remove - with chop saw - the rest of protusions.


Nice execution

I think using a donor part for the knuckle flanges was very smart. My question is why didn't you use the BRP upper spring "purch" and a thrust bearing? If I missed something in your write up apologies.

FiatRearSuspension2.jpg

FiatRearSuspension.jpg

126_2678.jpg
 
Hi Doug,

Wow, another epic job of documenting your work! Excellent coverage, thank you very much.
I fully agree with you on the choice of the VW struts to use for this project. As you state, they are about as close to the Fiat struts as is likely to be found, they offer a few choices for improved inserts, and they are readily available and affordable. Frankly I did not realize you had access to a ware house of parts inventory to look through and choose from; that is a major advantage in finding the best choices for donor parts...thanks again for doing it.
I also agree that modifying the stock upper mounts would be a good choice for a street car, opposed to using uniball or similar solid mounts. Admittedly, I do not quite follow DallaraX19's suggestion for using a BRP perch and thrust bearing...perhaps someone could please elaborate on that for me?
By the way, did you mention what the final product (with your latest updates) yielded in lowering capabilities?
Thanks.
 
I'm looking at this......

DSC01096.jpg


DSC01097.jpg


DSC01098.jpg


The BRP upper perch seems to be a better solution than modifying the stock parts.
Here is a pic of my "back in the day" KYBs
106_0662.jpg

The front had a thrust bearing and the stock upper strut casting and the rears had the stamped upper strut detail.
 
DallaraX19

Thanks, I am not familiar with "BRP". I tried finding more info on them on-line, but it did not help. Please tell me more about these perches; are they readily available as shown or a mod part?, where does one get them?, ETC. Thanks.
 
DallaraX19

Thank you, now I see what you are referring to. It appears the top perch required some modification of it's center bore, and possibly a machined collar or sleeve to fit the strut? When you get the time, maybe you can tell us some details about how it was done. Thanks again.
 
Reply

CALMOTION: For springs I chose: front 10" x 2 1/2" - 150 lbs/in
rear 10" x 2 1/2" - 185 lbs/in
I will elaborate in a later post.

DallaraX19: Yeah I agree using the original X1/9 "knuckle brackets" (I assume you are referring to the sleeve/bracket part that bolts onto the upright) is best.


If you look at it closely when removed from the original housing you will see it is a brilliant and strong design. Even considering that Fiat only bothered to weld it on the bottom edge. And it is actually super easy to remove from the original housing - as long as you don't mind ruining the original housing in the process. I can do it in under a minute now. I think its way easier and stronger than fabricating some tabs and welding them onto the new housing. Which would require making up some very precise jigs first to do it with any degree of accuracy. Using the original bracket/sleeve guarantees precision and fit.

As for the upper perches, well - since you asked - I agonized over the design of the upper perches and mounts for months.

Yes I bought some upper spring perches from BRP - the same red ones in your pics, and started going up from there. They need to be bored out to 20mm -not a big deal. However, their thickness takes away a bit of available compression travel. And note they lower - by about 1" - the height of where the spring sits. This would have meant lowering the lower spring perch by the same amount. Which would probably have run off the downward limit in the front and forced you to use a shorter spring. Something I wasn't keen to do. 5" of travel on an 8" spring didn't seem too good to me. And in the rear, there is lots of downwards travel adjustment but then the lower perch would have interfered with the tire (if you were using a wide tire) thus forcing you to use a shorter spring again. But an 8" spring there would have forced the lower perch higher than the top of the threaded sleeve. Which would have meant raising the sleeve by fabricating a collar and welding it onto the strut housing to support the threaded sleeve instead of just using the knuckle bracket to support it. More complications.

Now having said all that, it could also be done by using a 9" spring. Tough to find but if you look hard enough they are available but your choices are limited.

And note the BRP upper perch has only about a 1/8" shoulder for the spring to seat on. Which means if you leave the spring at all loose it could easily jump off.

On the other hand, a slightly modified stock X1/9 upper perch is almost perfect for the job. Nice and strong. Although the stub is only 2 3/8" OD, a few beads of weld as shown makes it a perfect fit on the spring.


Verdict so far (well in my opinion at least): BRP - looks nice and lighter but costlier and doesn't function as well.

Moving up, if you use the BRP upper perch, you can no longer use the stock Fiat or Plaia pivots. You will then have to find a 20mm ID thrust bearing with a 35mm OD. Fot months I searched, googled, visited bearing suppliers, and tried to find an automotive equivilant. I wanted the bearing to be thin (a thick bearing would result in reduced suspension travel and limit the amount of lowering and stiffening you could achieve) AND to be totally sealed for along and happy life. Alas my search came up...empty.

But if you could find one (yes I see DallaraX19 you did find one but I see it not at all sealed - I wonder about its long term durability), then you would have to devise something for the an upper rubber mount. I looked though scores of mounts from other cars for something I could modify to fit. Most were in the $60 range and were too soft and/or too thick (again this would limit you) and would require considerable modification.

But at the end of the day I finally concluded that Chris will sell you a nice firm upgraded stock-type mount that bolts right in, for only $32. And that the Plaia pivots - while not perhaps perfect - would then slip right in, and at least retain the stock rubber seal to protect them (assemble them with plenty or grease). And that then the stock X1/9 upper spring perches could easily be modified for use. And then I discovered that by simply countersinking the aluminum cone you could gain even more.

So that, DallaraX19, is why I didn't use the BRP upper perches. Now I am not trying to say that my choices were better than yours, just different. Please don't take it any other way. And you did ask...

By the way, DallaraX19, your X looks absolutely stunning. Lucky you. And please tell us more about your coilovers - what housings and inserts and mounts did you use ? Looks like BRP threaded sleeve to me ? Upper mounts ? Springs ?

Cheers, Doug
 
Last edited:
Reply to Dr Jeff and help needed

Hey Dr Jeff. With all the mods I have done - and with the spring rates I have chosen - I would be able to lower the car about 1 1/2" in the front and about 1" in the rear.

But in the end, you have to realize that you can - or should - only lower the car so much. Obliviously you CANNOT let the tire hit the fender at the limit of suspension travel !! And really you should have at least 2" of travel from ride height to full compression. So I probably have a little bit more lowering capability than I need. So all is good.

See the following pics. Keep in mind that my car currently has NO engine, trans, interior, rad, bumpers, lights, battery, etc.. First is a pic with stock original springs and KYB struts.


Following is the same view with the new coilovers installed on that side.


If anyone out there would like to help, I need the measurement as shown by the tape measure on YOUR X1/9.


From the ground to the bottom of the fender lip as shown. Front and rear. Please state your car's year, tire size, strut (original, KYB, etc) and springs (original, Vicks, etc).

PLEASE try to help me out here so I have a better baseline to work with. My car is currently so stripped its tough for me to tell. If you are reading this - and with almost 5000 views it seems a lot of you have been- and have enjoyed it or learnt anything, please participate. Could be useful info for all of us. I would like to see at least 10 responses.

Thanks, Doug
 
Back
Top