Dr.Jeff
True Classic
I know this has been addressed a few times in the past, but I did not find any documentation of the procedure nor photos of the results (I apologize if someone else has documented this already). So I'll add what I did here:
Prior posts have suggested a few alternatives for replacement bushings to rebuild the original "dog-bone" engine mount/torque strut. Basically the goal is to remove the old worn rubber bushings from the round metal ends of the dog-bone and replace them with bushings from other applications. These options tended to fall under one of two techniques; 1) cut the metal 'lip' (rounded edge) off the dog-bone's ends to allow a full-size bushing to be inserted, or 2) leave the metal lip in place, remove only the center portion of the old rubber bushing, and use an undersized replacement bushing. Neither of these appealed to me. I wanted to see if a full size replacement bush of some sort could be installed without any cutting to the original dog-bone.
Although there may be even better bushing options out there, I decided to work with one that has already been used for this application but required the ends of the dog-bone to be cut (on previous installations). This bushing is part of a transmission/engine support for 1955-57 Chevy's (e.g. model BelAir or 210). It is a solid rubber "hockey puck" with a hole in the center, commonly referred by a generic part number "2123" (note it is NOT "2122", which looks close but the wrong size). Go to any parts source and search that number (2123) and it should come up. If not, try searching by the year and model. AutoZone lists them for $4 each:
https://www.autozone.com/external-e...4237_0_0?fromString=search&make=&model=&year=
You will need two, one for each end...total $8 for a rebuilt mount that is likely better than a new Fiat one (as we will see).
There are differences between the original bushing and this replacement item. The old one is wider and has a "hour-glass" shape to it. The new one has a slightly larger diameter and the center hole is too small for the original steel sleeve (for the mounting bolt). Also the new one is solid while the original has large recesses/voids on the sides and outer circumfrence. I was concerned these differences would make this bushing a poor choice, but as we will see that was not the case. The differences between them can be seen here:


The center hole of the new bushing must be drilled out to accommodate fitting the steel sleeve. Although the sleeve measures the equivalent to a 11/16" drill bit, I found a 3/4" bit worked better (the rubber tends to push away from the bit when drilling, resulting in a smaller hole). The rubber is very easy to drill, but don't get too aggressive or it may 'tear' rather than 'cut' the larger hole. [EDIT: Scroll down to my later post to see a photo of drilling out the center hole in the bushing]. The original center sleeve will now fit (but do not insert it yet). The new bushing is ready to be installed (easy enough so far):

Removing the old bushing was not difficult (sorry, no photos of this step). Press out the center metal sleeve using either a hydraulic press or large bench vice, and some large sockets as spacers. [EDIT: In a later post below is a photo showing how to install the steel sleeve into the new bushing, it is the same technique used to remove the sleeve from the old bushing]. Then remove the old rubber by prying it out with screwdrivers, etc., collapsing it toward the center hole to pull it away from the housing's lip edge. If necessary it can be made easier to remove by drilling out the majority of it with a hole saw first (after the steel sleeve is removed).
The empty dog-bone end will now look like this (undamaged):

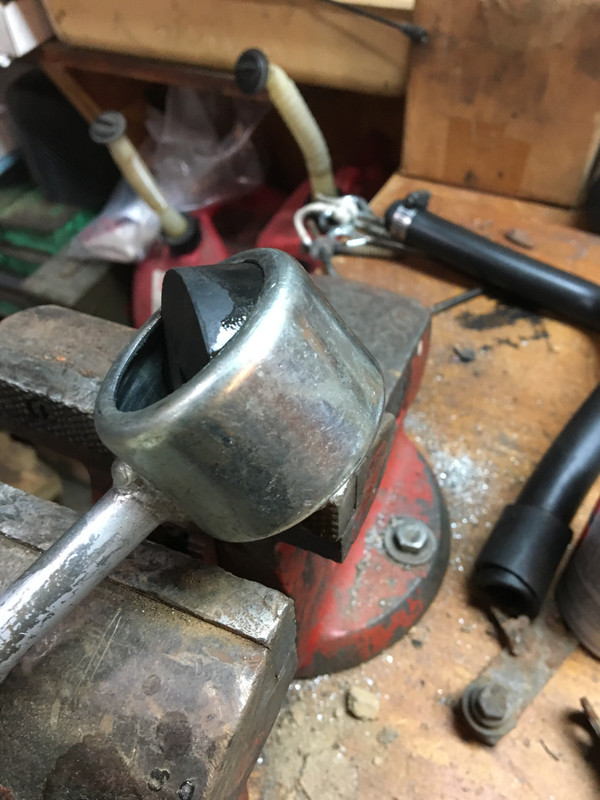
The next step is to insert the new bushing into the dog-bone. Recall that it is larger in diameter than the original one, and solid, and the rounded metal lips are still on the ends of the 'bone'. Looks like there is no way to get it in there:

With the steel sleeve removed, the center hole in the bushing allows the rubber to be squeezed together from the sides, flattening the center hole, and making the bushing "oval" rather than round. I did this by smashing it in the vice. Squeezing it together in the direction of the red arrows:

This allows the metal housing to be pushed over the bushing (sideways) in the direction of the blue arrow (below). Continue working the bushing into the housing (still sideways) until it is as far as it will go. Not very difficult to do:

Then work the bushing around (rotate it to one side) to get it in a proper "upright" position inside the dog-bone's end. [EDIT: See the later post below for several additional pictures detailing this portion of the installation procedure]. This was a bit of a struggle. I used screwdrivers as levers, a large drift and hammer to 'wiggle' the rubber edges in, and the large sockets and vice to press the bushing from both sides. [EDIT: The second bushing was much easier and only a couple tools were used, see the later post below]. But no damage occurred to the rubber bush nor the metal housing. Clamping the 'bone' in the vice while working the bushing, plus some spray lube, helped to move it around. Eventually it was seated into the dog-bone and I was surprised to find how much better it fits than expected. Although the new bushing was narrower initially, once it gets "squeezed" into the metal bore the sides are pushed outwards (making the bushing 'fatter'). This 'squeeze fit' also keeps it firmly in place; I had to use the press/vice repeatedly to center it. Note the rubber bushing was never 'ground down' to allow easier installation. Although it makes for a little extra effort to get it in, it also makes for a better fit once it is in place.
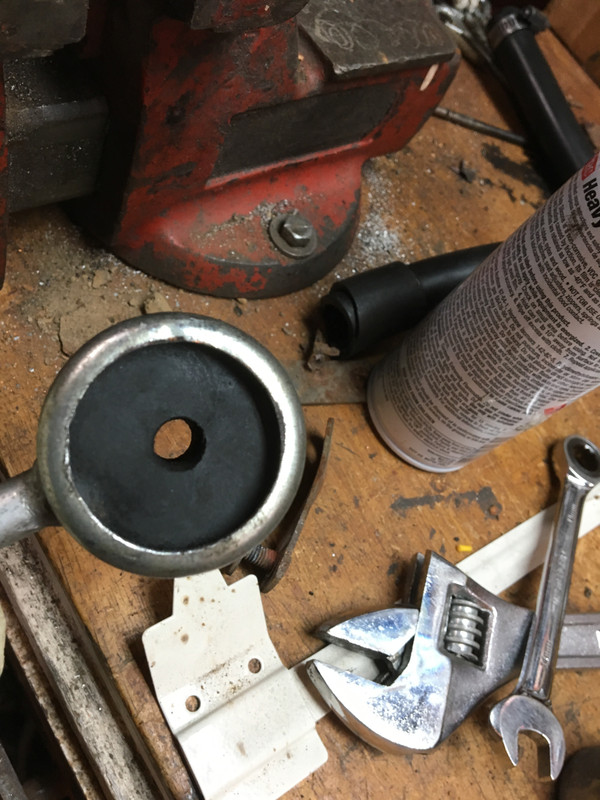
The steel sleeve can now be pushed into the center hole. [EDIT: See the later post below for more photos]. The hydraulic press or vice makes this easy. Its tight positioning into the hole creates additional pressure to the outside diameter of the bushing, making the fit even more secure:

The marks visible on the sides of the rubber were from the sockets pressing into it during installation; they eventually disappeared as the rubber relaxed.
The solid rubber design of the new bushing (compared to the relieved recesses in the sides and circumference of the old one) makes it firmer and I believe much more durable than the original. The listing for this part describes it as a mix of natural and synthetic rubbers and it is designed to support a cast-iron V8 engine. So it should last along time in the X1/9.
The fact that the new bushing is still slightly narrower than old one also helps to allow slight "axial movement" of the sleeve if needed (this was accomplished by the added 'give' of the recesses/voids and hour-glass shape in the original design). Basically what I am saying is the slightly narrower profile is offset by the firmer sold design:

[The above photo was taken at an angle, making the new "un-installed" bush appear much larger in diameter than the new "installed" bush. But that is not the case; refer to the comparison photos at the beginning of this post]
Note the large recessed "voids" of the original bushing compared to the solid design of the new one. The new bushing is made of rubber so it still offers plenty of vibration absorption, which poly bushings do not (it's been recommended NOT to install poly bushings on both ends of the dog-bone due to excessive transmission of vibration). I believe this rebuilt unit is actually better than a new original Fiat part; it should last much longer, and allow less unwanted 'torque' movement (which otherwise reduces the responsiveness of the engine), while still absorbing vibration/noise to keep things livable.
Unfortunately my X is currently in the process of getting prepared to go back on the road. So I cannot report on the "feel" of this rebuilt mount until later on. But my initial impressions of the result are much greater than I expected. If a slightly wider rubber bushing could be sourced it might be even better, but it will also be that much harder to install (I think this one was about the limit without cutting anything). I am considering the addition of a large nylon 'washer' on each side (next to the exposed rubber wall of the bush) around the center steel sleeve...to act as a spacer and fill-in any gap between the mount and the frame's mounting tabs. But this was something I thought to do with the stock original mount bushings as well. Although I don't think it will be necessary (as it is on the "snail mount" due to its tendency to move laterally).
As you can see I did not take the time to refinish the dog-bone in these photos. This was merely an initial test to see if it would work. Next I will go back and make everything look nice before installing it. I'll edit this later if I think of anything I left out or if I take additional photos. Please ask questions or make comments. Thanks
Prior posts have suggested a few alternatives for replacement bushings to rebuild the original "dog-bone" engine mount/torque strut. Basically the goal is to remove the old worn rubber bushings from the round metal ends of the dog-bone and replace them with bushings from other applications. These options tended to fall under one of two techniques; 1) cut the metal 'lip' (rounded edge) off the dog-bone's ends to allow a full-size bushing to be inserted, or 2) leave the metal lip in place, remove only the center portion of the old rubber bushing, and use an undersized replacement bushing. Neither of these appealed to me. I wanted to see if a full size replacement bush of some sort could be installed without any cutting to the original dog-bone.
Although there may be even better bushing options out there, I decided to work with one that has already been used for this application but required the ends of the dog-bone to be cut (on previous installations). This bushing is part of a transmission/engine support for 1955-57 Chevy's (e.g. model BelAir or 210). It is a solid rubber "hockey puck" with a hole in the center, commonly referred by a generic part number "2123" (note it is NOT "2122", which looks close but the wrong size). Go to any parts source and search that number (2123) and it should come up. If not, try searching by the year and model. AutoZone lists them for $4 each:
https://www.autozone.com/external-e...4237_0_0?fromString=search&make=&model=&year=
You will need two, one for each end...total $8 for a rebuilt mount that is likely better than a new Fiat one (as we will see).
There are differences between the original bushing and this replacement item. The old one is wider and has a "hour-glass" shape to it. The new one has a slightly larger diameter and the center hole is too small for the original steel sleeve (for the mounting bolt). Also the new one is solid while the original has large recesses/voids on the sides and outer circumfrence. I was concerned these differences would make this bushing a poor choice, but as we will see that was not the case. The differences between them can be seen here:
The center hole of the new bushing must be drilled out to accommodate fitting the steel sleeve. Although the sleeve measures the equivalent to a 11/16" drill bit, I found a 3/4" bit worked better (the rubber tends to push away from the bit when drilling, resulting in a smaller hole). The rubber is very easy to drill, but don't get too aggressive or it may 'tear' rather than 'cut' the larger hole. [EDIT: Scroll down to my later post to see a photo of drilling out the center hole in the bushing]. The original center sleeve will now fit (but do not insert it yet). The new bushing is ready to be installed (easy enough so far):
Removing the old bushing was not difficult (sorry, no photos of this step). Press out the center metal sleeve using either a hydraulic press or large bench vice, and some large sockets as spacers. [EDIT: In a later post below is a photo showing how to install the steel sleeve into the new bushing, it is the same technique used to remove the sleeve from the old bushing]. Then remove the old rubber by prying it out with screwdrivers, etc., collapsing it toward the center hole to pull it away from the housing's lip edge. If necessary it can be made easier to remove by drilling out the majority of it with a hole saw first (after the steel sleeve is removed).
The empty dog-bone end will now look like this (undamaged):
The next step is to insert the new bushing into the dog-bone. Recall that it is larger in diameter than the original one, and solid, and the rounded metal lips are still on the ends of the 'bone'. Looks like there is no way to get it in there:
With the steel sleeve removed, the center hole in the bushing allows the rubber to be squeezed together from the sides, flattening the center hole, and making the bushing "oval" rather than round. I did this by smashing it in the vice. Squeezing it together in the direction of the red arrows:
This allows the metal housing to be pushed over the bushing (sideways) in the direction of the blue arrow (below). Continue working the bushing into the housing (still sideways) until it is as far as it will go. Not very difficult to do:
Then work the bushing around (rotate it to one side) to get it in a proper "upright" position inside the dog-bone's end. [EDIT: See the later post below for several additional pictures detailing this portion of the installation procedure]. This was a bit of a struggle. I used screwdrivers as levers, a large drift and hammer to 'wiggle' the rubber edges in, and the large sockets and vice to press the bushing from both sides. [EDIT: The second bushing was much easier and only a couple tools were used, see the later post below]. But no damage occurred to the rubber bush nor the metal housing. Clamping the 'bone' in the vice while working the bushing, plus some spray lube, helped to move it around. Eventually it was seated into the dog-bone and I was surprised to find how much better it fits than expected. Although the new bushing was narrower initially, once it gets "squeezed" into the metal bore the sides are pushed outwards (making the bushing 'fatter'). This 'squeeze fit' also keeps it firmly in place; I had to use the press/vice repeatedly to center it. Note the rubber bushing was never 'ground down' to allow easier installation. Although it makes for a little extra effort to get it in, it also makes for a better fit once it is in place.
The steel sleeve can now be pushed into the center hole. [EDIT: See the later post below for more photos]. The hydraulic press or vice makes this easy. Its tight positioning into the hole creates additional pressure to the outside diameter of the bushing, making the fit even more secure:
The marks visible on the sides of the rubber were from the sockets pressing into it during installation; they eventually disappeared as the rubber relaxed.
The solid rubber design of the new bushing (compared to the relieved recesses in the sides and circumference of the old one) makes it firmer and I believe much more durable than the original. The listing for this part describes it as a mix of natural and synthetic rubbers and it is designed to support a cast-iron V8 engine. So it should last along time in the X1/9.
The fact that the new bushing is still slightly narrower than old one also helps to allow slight "axial movement" of the sleeve if needed (this was accomplished by the added 'give' of the recesses/voids and hour-glass shape in the original design). Basically what I am saying is the slightly narrower profile is offset by the firmer sold design:
[The above photo was taken at an angle, making the new "un-installed" bush appear much larger in diameter than the new "installed" bush. But that is not the case; refer to the comparison photos at the beginning of this post]
Note the large recessed "voids" of the original bushing compared to the solid design of the new one. The new bushing is made of rubber so it still offers plenty of vibration absorption, which poly bushings do not (it's been recommended NOT to install poly bushings on both ends of the dog-bone due to excessive transmission of vibration). I believe this rebuilt unit is actually better than a new original Fiat part; it should last much longer, and allow less unwanted 'torque' movement (which otherwise reduces the responsiveness of the engine), while still absorbing vibration/noise to keep things livable.
Unfortunately my X is currently in the process of getting prepared to go back on the road. So I cannot report on the "feel" of this rebuilt mount until later on. But my initial impressions of the result are much greater than I expected. If a slightly wider rubber bushing could be sourced it might be even better, but it will also be that much harder to install (I think this one was about the limit without cutting anything). I am considering the addition of a large nylon 'washer' on each side (next to the exposed rubber wall of the bush) around the center steel sleeve...to act as a spacer and fill-in any gap between the mount and the frame's mounting tabs. But this was something I thought to do with the stock original mount bushings as well. Although I don't think it will be necessary (as it is on the "snail mount" due to its tendency to move laterally).
As you can see I did not take the time to refinish the dog-bone in these photos. This was merely an initial test to see if it would work. Next I will go back and make everything look nice before installing it. I'll edit this later if I think of anything I left out or if I take additional photos. Please ask questions or make comments. Thanks
Last edited:
")