Dr.Jeff
True Classic
That's right - I'd forgotten about that option. I don't recall anyone reporting feedback on doing it and how well it lasted?I believe there was a discussion about using 124 spider upper trailing arms and shortening them to fit

That's right - I'd forgotten about that option. I don't recall anyone reporting feedback on doing it and how well it lasted?I believe there was a discussion about using 124 spider upper trailing arms and shortening them to fit
I probably should have clarified which torque mount I was referring to - the upper one (on models that used it on the left side of the motor) has a notorious failure rate. The one I meant is the larger part of the lower trans torque mount, such as this:
I had to cut the aluminum housing to extract it. It only made sense becuse I had several used ones to cut up.
View attachment 34263
If you get rid of the middle connection of the Volvo mount do the round parts fit an X1/9? Could you then connect the two ends with a couple of angle steel pieces?
Me too!You are right, the Volvo mount in my experience is the upper one.")
Looks legit. I might actually try this. I figure the trailing arm is exposed to more stress and work load over its life and might last a very long time.I believe there was a discussion about using 124 spider upper trailing arms and shortening them to fit.
And if I remember right (been a very long time since I had a 124), those Spider suspension bushings are solid rubber. Meaning they do not have the voids the X's dogbone bushes have. So even if the quality of the rubber is no better (although I agree, they should be more robust for a suspension part), the lack of voids will still improve its longevity.I figure the trailing arm is exposed to more stress and work load over its life and might last a very long time.
Are you thinking to use the entire 124 arm? I believe the prior discussions were about using only the rubber bushes from these arms, placing them into the old X's dogbone. Or is that what you mean? Because the rubber bushes are available separately new for not a lot of money.Anyone confirmed the bush dimensions for fit in the body & head bracket? Prcie is decent for good/used from MWB
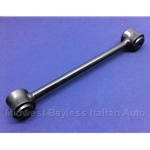
Trailing Arm - Upper Short (Fiat 124 Spider Coupe All 1967-78) - U8
Trailing Arm - Upper Short (Fiat 124 Spider Coupe All 1967-78) - U8www.midwest-bayless.com
Are you thinking to use the entire 124 arm? I believe the prior discussions were about using only the rubber bushes from these arms, placing them into the old X's dogbone. Or is that what you mean? Because the rubber bushes are available separately new for not a lot of money.
Anyone know exactly which one is the best fit and have the part number?
Just curious for stock installs.View attachment 34288
Obviously the trailing arms are longer. The trailing arm dowel is 48mm long, the dogbane dowel is 41mm long.
View attachment 34289View attachment 34291
The trailing arm end will fit in the engine mounted bracket, you would just have to cut down the dowel and bushing to fit, not a hard job, really.
The bolt for the dog bog is an 8mm shank and the trailing arm uses a 31mm shank (bolts that typically take a 17mm wrench. I suppose you could sleeve the dowel or drill out the brackets for larger bolts, again something most of us could handle. You would obviously need a welder to shorten the trailing arm and I would want a sleeve to go over the joint to reinforce it.
You guys are overthinking, this is a torque arm, not a motor mount. And that's for a motor that really doesn't make much torque.
Plus it's about the damn thing lasting more than a week without having to constantly replace it. The lack of torque is a true fact, but improving the service life and basic functionality are really the goal here. I guess the same argument can be made for improving the other mounts (lower trans and snail) as well. They don't NEED to be made better, but it sure would be nice if they WERE better.It's more (IMO) about the vibration that is generated when this mount isn't right.
OK, so I ordered the part from Amazon. Here is the part compared to a "stock" dogbone. This is actually a Vicks repro, but the dimensions are basically the same as stock.I wonder what the true dimensions are on this Nissan torque rod? It sure looks like there is some adjustment available. Maybe I will spend the $15 to find out if it even fits on an X. It is kinda ugly.
View attachment 34477


