EI Distributors - too good to be true?

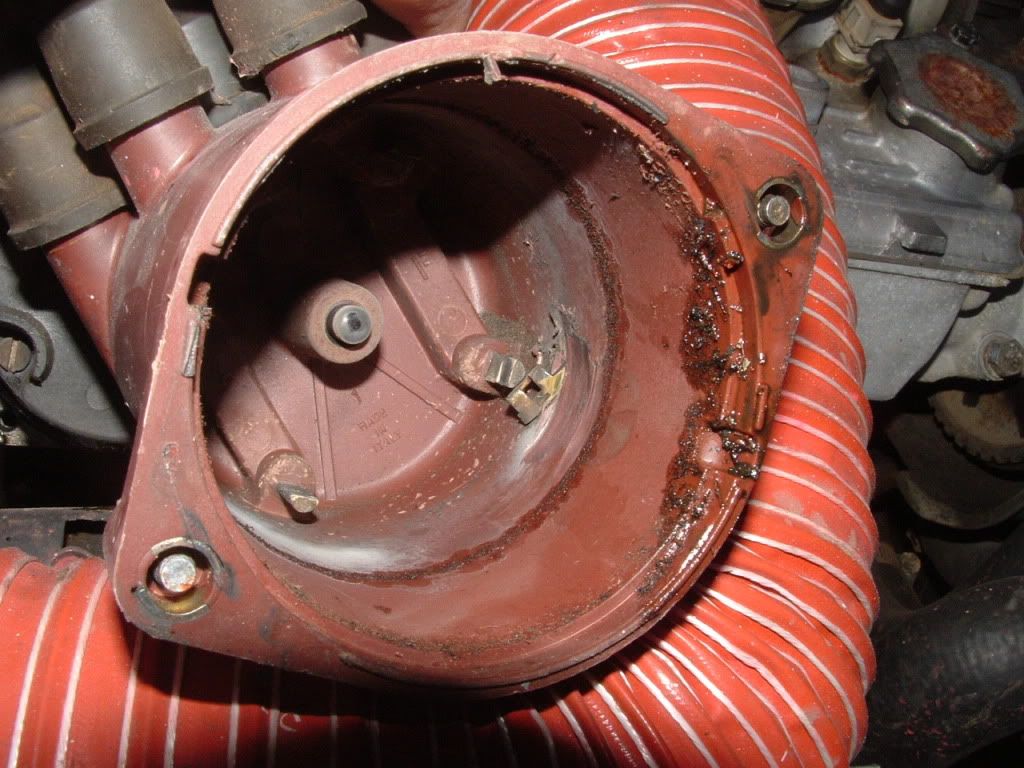
Here's what can happen...

With normal engine movement, I'm confident the longer distributor would occasionally hit the access panel cover.


When a distributor cap comes in contact with the car during engine operation, through engine movement:


Not pretty. That's the tip of the rotor embedded in the cap wall.

Pete
 
It works!!!

Just wired it up and plugged it in. Works great! Apparently my wiring diagram and harness does the job :)
Thanks to Henk and others for the recommendations...

Now I have to decide if I will keep it. My old distributor is "old" and I noticed the shaft spins ok but is clearly not as smooth as the new one -- but it seemed to work just fine. If I keep the new one I have to fabricate a new access panel. Hmmm... What to do...
 
Thanks for being the guinea pig on this install. You just saved me a great deal of frustration.

Perhaps I will need to cam my motor and then add the cam mount dizzy at that point.

Or... since you are using a 1500 and my car is a 1300, I wonder... could there possibly be a change in the distance from the firewall to the dizzy on a 1300?
 
Zonker -- not sure about the firewall clearance differences between the two motors but I'd GUESS the motor height is the biggest difference. I don't think the distance to the firewall is much different but there are folks who know better than I.

I like the idea of a more integrated, modern, and new distributor and ICM (that's also inexpensive). So I'd like to continue using it if it's not too difficult.

Wish I was more handy with fiberglass although this may be a good opportunity to try. I could use my existing panel as a plug to make a new frame, and then fiberglass a deeper access "pouch" on it to accommodate the depth. If Ricardo is watching this thread, he might have some good ideas.

Thanks for being the guinea pig on this install. You just saved me a great deal of frustration.

Perhaps I will need to cam my motor and then add the cam mount dizzy at that point.

Or... since you are using a 1500 and my car is a 1300, I wonder... could there possibly be a change in the distance from the firewall to the dizzy on a 1300?
 
Well its about time! Geez!

HA!

Thanks for the photos and comments... great work!

As for the clearance issue... ya really only need an inch or so a much like we have already with our stockers.

I have a couple ideas you may wish to consider...

1. Heat the old one with a torch and with three hands and possibly a sand bag of sorts... pound out the clearance you need.

2. Take the old cover and with some clay, mound it up on the back side and then lay across some fiberglass sheeting... using the now modified cover as a "buck". Apply resin and brush the glass matte into the shape of the old cover, and let it set up. Apply a few more layers for strength and then trim, sand, drill and use it as your new cover, or use it as a mold to make a more accurate sized cover. I think just using the first one will be close enough. Do use some caution on just how deep to make it relative to the spare tire and stuff.

BTW... the 'glass cover will better insulate against heat and noise as well!

Hope the weather is not too much of a hindrance!
 
One more thought after studying this foto a bit...


What about knocking out the studs, or re-drilling the mounting holes... and then "gasketing" or building up the perimeter a bit with metal, hard-foam, rubber, or even wood... and then bolting on the cover from the cockpit side?

That might be easier (better, faster, cheaper) than constructing a new cover or modifying the old one.
 
Working on a new panel...

So I started my fiberglass access panel project with larger "bump" to accommodate this distributor.

Photos below. I used the existing panel as a "plug." I am making a mold for the frame, will trim-out the center, and then create a new center with a deeper bulge in it. So far so good. I've created the fiberglass frame mold. Next step is to trim it. After that, I will tape a stretchy swatch of t-shirt fabric to the outer frame, blow up a balloon, wax the exterior, press against the t-shirt, apply resin, and then remove it when the resin hardens. I'll add some resin/mat to the back side of the mold to reinforce the fabric/resin. The final step will be to create a new panel from the mold, trim the edges and paint it. We'll see how all that goes in the coming week.

Waxed the outer access panel five times with turtle wax:


Trimmed a sheet of fiberglass mat


Applied resin to the the mat and pressed it down around contours/edges:


Removed the glassed area from the panel (despite all the wax this was challenging but it eventually came off):


Glassed area sitting back on the panel. Fit is perfect and inside finish is very smooth :)
 
Made some progress!

With the exception of glassing in the nose are of some RC airplanes I built as a kid, this is my first fiberglass project. It's going surprisingly well thus far.

I used a diamond tip cutting wheel (thanks HF for a $4 pack of five) and trimmed the inner piece, leaving a mold for the frame which fits the contours of the firewall. I epoxied a swatch from an old thick t-shirt to the perimeter and left as much slack in the center as I could get without causing wrinkles on the sides. Let it cure... Waxed a balloon, let it dry, and then pressed it into the center of the frame to make a large cavity where the distributor will fit. Painted it with resin, let it cure, and removed the balloon.

Wifey isn't loving the fumes from the resin which I am struggling to contain in the basement (gives her headaches :() and it's too cold in the garage, so I will take a few days off, and then go to the local maker space and reinforce the back-side of the bulge with more glass mat. After that, I'll wax it up and attempt to pull-off a completed part ready for paint. Having some fun with this...

Frame with t-shirt slack t-shirt material.


Back-side showing the frame with cut-away center section.


Waxed balloon pressed into place with tape on the backside holding it against the frame. Applying resin.


Current state of frame with "Buddha belly" modification. Will test-fit today and fully expect it to accommodate the longer distributor but to interfere with spare tire (which is ok since I carry an inflator and green slime instead).
 
How Do I PIN This Thread?

Anyone buying these Cheapo Dizzies, needs to know they don't just Fit right in. On "geeks" 81 he made a Fiberglass panel mod. I don't want to do that.
I'm thinking, how can i use a Dent Puller, from the inside of the cockpit to my advantage? I once used a sledge hammer on the firewall of a '57 Chevy to get clearance for the Dizzy of a 68 396 ci. Results, Wheel Stands and 150+ MPH on a Cops Radar Gun, in a 35 MPH Zone. OOPS! :grin:
Who needs a Spare Tire anyway? Anyone still Driving these cars has Triple AAA or some other Towing Package.
 
Last edited:
I'm not sure what the benefit is to this distributor.

Every carbed x1/9 I had, I converted to a Bosch dizzy from a later car. Fits right in - no mods.. Reliable and cheap!
 
I'm not sure what the benefit is to this distributor. Every carbed x1/9 I had, I converted to a Bosch dizzy from a later car. Fits right in - no mods.. Reliable and cheap!

One benefit would be that it's a modern (new) unit rather than a 30-35 year old one, available at a relatively inexpensive price. Another benefit is that the more-compact control module is mounted directly on the distributor itself, rather than having a large separate control box that needs to be mounted somewhere else (usually in the OE spot of the later cars, which can be subject to filling up with rain/water if the drain holes get clogged) & having extra wiring to/from the control box.

I began this thread merely to point out another possible alternative to the electronic ignition set-ups we already know of &/or use. Bummer that the base of these is too tall to use in an X1/9 without needing to modify the body-mounted access panel. It's probably not an issue with the 128/Yugo cars, which have more room to spare in that area.

If I had an X myself, I'd simply use my existing access panel as a general pattern to make another (improved as needed) panel out of sheetmetal or fiberglass, or even a heat-resistant plastic/lexan type of material. Would likely make a fun weekend project. :grin:
 
One benefit would be that it's a modern (new) unit rather than a 30-35 year old one, available at a relatively inexpensive price. Another benefit is that the more-compact control module is mounted directly on the distributor itself, rather than having a large separate control box that needs to be mounted somewhere else

I'm skeptical that this distributor is going to be reliable in the long run. Being stranded on the side of the road for a $65 distributor would piss me off..

I'll put my faith in my 32 year old Bosch dizzy over a very inexpensive unit from ebay (I'm assuming it comes from PRC?!? - high quality factory?) My Bosch unit has the original pickup coil, module, coil and the same wires for 24 years.. still works perfectly.


The other option is to use a Pertronix fitted into the points type distributor for early cars.


It's just a lot of work to fit something which the gains are minimal if any.
 
you need an additional (adapter) piece

what's the final verdict here? if you have the cam with the slot, will this bolt up on the cam box and work?

I dusted off my X from the winter and took some pics of my cam end plate. It has the required slot, but I don't see how the ebay dizzy can bolt up to it, unless you use some sort of adapter piece. Does anyone have an image of how a cam-mount distributor might fit?
 
Yes.

I dusted off my X from the winter and took some pics of my cam end plate. It has the required slot, but I don't see how the ebay dizzy can bolt up to it, unless you use some sort of adapter piece.

Yes, you'd need an adapter like I mentioned at the very start of this thread:
Of course, the cam-mounted ones will need to have an intermediate mounting base sourced or fabricated (like the X1/9-Strada units)...


Does anyone have an image of how a cam-mount distributor might fit?

Your next post shows the very same adapter I was referring to. :)

Photos 30.7a & 30.7b on page 43 of the Haynes X1/9 manual show the alloy plug that mounts in the "normal" hole/location of the block-type distributor, for use when the cam-mounted distributor is fitted instead (this plug looks similar to the one used on the Fiat 124/131 DOHC engines that have a cambox-mounted distributor).

Unfortunately, the Haynes manual doesn't show this particular style of cam-mounted distributor, but photos 5.1-5.7c on page 68 do show the "other" version of the cam-mounted distributor (uses a short splined center shaft & longer adapter housing).
 
Soooooo...

Whatever happened with this? Did you ever finish this modified access panel? Does it fit/work? Any more miles on the car using this distributor? How's the performance? Reliability? :confuse2:

Don't leave us hangin', man! :D
 
I have one

It has been in the car for about a year. I only drive about 3 K a year.

One benefit for my 79 over stock is that the advance works like a standard vacuum advance on low vacuum and not as flow port vacuum. Another is that the curve for advance is better suited than stock.

As for clearance I removed the access cover and used a body panel beater bag and a tear drop mallet to put some more clearance between the dizzy and the cover. No issues yet.

TonyK.

Grimsby Ontario Canada.
 
I think TonyK is smarter than me... Modifying the existing panel is probably easier than fabricating one out of fiberglass.

It's, uh, been VERY cold here these past few months. WINTER. So my X has been on jack stands and I've been pulling apart the manifolds, etc. Cleaning things up, replacing the timing belt, installing the BobG radiator, and installing a new exhaust.

So net-net is I haven't driven any significant mileage with the new distributor. Hope to have everything buttoned up in a few weeks and back on the road. Not done with the fiberglass panel either. It was too cold to work in the garage and the resin fumes give my wife headaches. Hope to get to it soon...
 
Back
Top