Eurosport body, K20 power

I thought the only wheelbase change was for the actual Dallara - the rear wheel position is changed compared to std. X1/9

Your kit seems to have much more space on the rearward side than my Dallare kit does - I had to shave the lower rear area to clear the tires

IMG-20200405-180035.jpg
 
Congrats on finding a better candidate for your project. To the best of my knowledge, there is no difference in the wheelbase for any X1/9, Euro, North American or other. I would assume the fender problem is related to the kit and not the cars.
 
The other thing I am curious about (and would like to see detail pics of) is the precise connection of panel to body - it appears that the fiberglass panels are molded to include a step/lap (whatever it's called) to allow for proper bonding - at least it appears that way for the rear panels by the targa sail/rear quarter. Would you mind detailing the attachment for the front fender tops and sills? The specifics are always important to understand.
:D

By comparsion, the US Greenwood Dallara panels are all molded with the intention that that will be feathered and simply overlap the existing sheet metal for bonding.
 
I seem to recall reading somewhere that the X19 wheelbase is different for European cars versus North American cars. Is that correct? The reason I ask is that the front wheels do not sit centered in the wheel well. I noticed this when fitting the body kit to the '74 as well. I can fix this by cutting a piece out of the bumper and reshaping the wheel well on the fender portion, but I wonder if there is another fix available.

View attachment 34846
The location of the front wheels within the fender openings (front to rear) is determined in part by the front suspension's trailing arm (radius rod, brake torque strut, etc) length. The rubber bushings on the forward end of that trailing arm and shims will adjust the position of the outer end of the main suspension ('swing') arm, and therefore the location of the wheel. However that adjustment is for setting the caster and any changes to it will affect handling. So I wouldn't change the length of those trailing arms just for the sake of centering the wheel in the fender. On the other hand, they may not be the correct lengths and therefore the caster and wheel location may not be right as it currently sits. Check the condition of the rubber bushings (they deteriorate and crush badly) and the alignment (caster) settings first. Then look at where the wheels sit in the fenders. That being said I've found on all of my X's with the correct settings that the front wheels tend to sit further forward in the fender openings (not centered) similar to your picture. So I assume there must be some sort of design issue there. As a result the front lower corner of the stock fenders is where wider tires usually rub first. So you might have to modify the fenders if the wheels still don't fit centered after all settings are correct....unless you want to alter the caster from stock. Pushing the wheels further rearward would make the caster more toward zero or even negative (if moved far enough), making the steering more "twitchy" and less tendency to self center after turning/steering to either side.
 
Thanks guys for the confirmation re wheelbase - I expect I will have to massage the fiberglass.

The other thing I am curious about (and would like to see detail pics of) is the precise connection of panel to body - it appears that the fiberglass panels are molded to include a step/lap (whatever it's called) to allow for proper bonding - at least it appears that way for the rear panels by the targa sail/rear quarter. Would you mind detailing the attachment for the front fender tops and sills?

You are correct in that the rear fenders have a step molded in to allow the body panel to lap the fiberglass:
Rr fndr lap joint.jpg


At the forward edge these attach to the B pillar lip:
B pillar lip.jpg


At the rear the fenders attach to the bumper from the wheel well back. For the rear bumper the primary attach is to the original bumper mount location - I will need to fab up the attachment. I will also likely add some support at the bottom. Finally I will also tub out the inner wheel wells and attach to the fender/bumper.

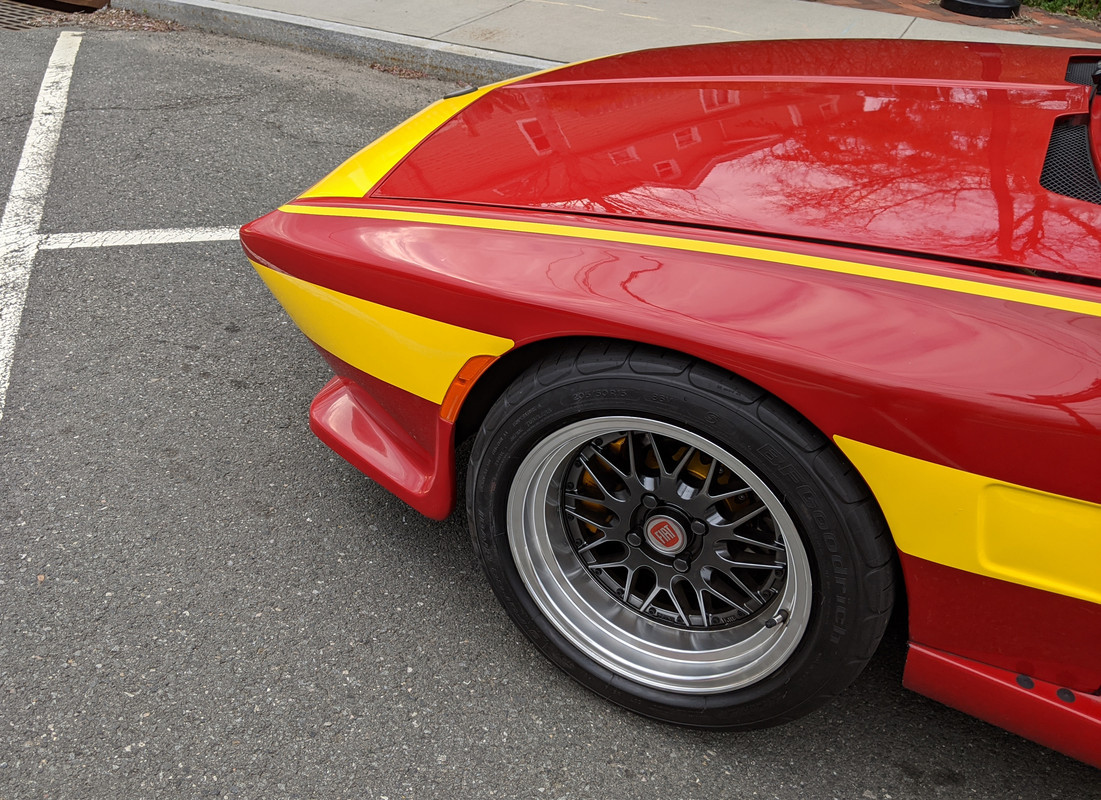
On the front the fender attaches to the A pillar bulkhead:
A pillar bulkhead.jpg


The top of the fender slips over the hood rail and attaches there:
Frt fndr lip.jpg


The front fender also attaches to the bumper from the wheel well forward.

Similar to the rear bumper, the front bumper attaches at the original bumper mount position, the second indentation is where the attachment point is (the first is for a signal light):
Frt bmpr attach.jpg


And of course the front wheel wells will also get tubbed out to the fenders and will provide additional attachment points. The front bumper will get additional support at the bottom.

For the sills, they attach along the bottom step of the door opening, and I expect I will have to make up something for the bottom to attach to:
Sills.jpg


I am mostly just feeling my way along, and will discover my errors and omissions during the course of the project. As you are undoubtedly aware, this is not a popular body kit and I have not seen anyone who has documented the install of it.
 
Now I understand the need for all of the metal cutting on the original body. When you first posted pics after removing the unwanted panels I wondered why it required so much removal. But I see the kit is designed that way - very comprehensive kit. I don't think I've ever seen a aftermarket body kit with such elaborate attachments.
 
Thanks for the detail pics. I kinda wish the US Dallara panels keyed in like that - would have made fitment much less of a nebulous affair. Bonding & forming the rear edges of the front fenders and forward ends of the quarters was not fun at all with my kit. I'm undecided on the overall looks of the kit you have though - primarily as the integrated bumper sections give it such an early 80's feel to me. I have to wonder what it would look like closer to a Dallara variant, with the modded sides but a nose & tail treatment closer to Dallara.
 
Not a great pic, but I hope you can see that the Eurosport kit does have the front wheel a little forward in the opening. This may be because Fiat increased the castor angle during production and the kit was made from an earlier version.
DSC07686.JPG
 
the integrated bumper sections give it such an early 80's feel
Obviously it's a personal preference. But I tend to prefer a bumperless look as well...not just on the X but for any car. Some of the early "aero kits" (what they used to call fiberglass replacements for front and rear spoilers, side rocker extensions, and widened fender lips) were made to replace the entire front (and/or rear) facia and eliminated the bumpers. However they were not legal and that concept went away unfortunately. But those were the better looking ones in my opinion. I frequently look at production cars and think how much better they would look if they didn't have the big ugly bumpers on them. Many of today's car designs have gotten much better at incorporating the bumper into the bodywork. However as I say it is a personal taste and I can certainly see where the "80's bumper look" would be preferred. It is more 'period correct' for these cars, giving a custom look without being completely shaved.
 
Finally got back to where I left off on the first body. The Media Blaster suggested I scrape all the undercoating off the bottom as that was very difficult to remove with his blasting equipment. It took quite a few hours, using a heat gun in one hand and a small scraper in the other, but we got there.

Bottom undercoat scraped off:
Car Btm Scraped.jpg


I also rebuilt my K20Z1, here it is ready for the flywheel/clutch/transmission:
Eng rebuild complete.jpg


And here it is mounted in the car - from the top:
Engine from top.jpg


I was able to make the engine bay side cuts a bit smaller than the first time around.

Right side engine bay cut:
Engine bay cut right side.jpg


Left side engine bay cut:
Engine bay cut left side.jpg


I cut the hole for the shifter and welded in the mounting plate:
Shifter.jpg


And I fabbed up the surround and door for the spare tire well cutout:
Spare tire well modification.jpg


Next is to weld up all the engine bay cutouts, add the reinforcement bar along the back of the rear crossmember, repair all the rust damage, and then paint the interior, trunk, frunk, engine bay and bottom. Epoxy primer first, then leaning towards using body color in these areas (planning on "Dark Tourmaline Metallic" base/clear) with a semigloss clear.
 
Engine looks good. Maybe a positive way of thinking about the first car is it gave you the experience and knowledge to make better cuts on this one. ;) Interesting color, looking forward to seeing it on the car.

Regarding removing the undercoating, I just posted a response to your question about the rust repairs (other thread). Too late to help with the undercoating removal now, but it might have been useful.
 
I must ask. Why are you doing all your measurements in inches and fractions? You know, it is ok to use proper measurements--and you're from BC to boot! :)
 
Finally finished rust repairs, think I can put the welder away for a while.

When I built an addition onto my shop I added a little paint booth, interior about a 7' cube, very useful for painting parts.

I added a big fan (24") and it moves plenty of air:
Paint Boot fan.jpg


It is time to get some epoxy primer on the Fiat body, and put some color in the trunk, the engine bay, the interior, and the frunk. I will do this part myself, the final exterior paint will be done by a professional.

By opening the double doors to the paint booth, setting the car in front of the booth, and adding some plastic barrier around the car I believe this will work for painting. I am sure my fan can move enough air, and I will keep the top of the extended paint booth open for air flow.

Here I have partially wrapped the framework with 6 mil poly:
Paint booth 1.jpg


And here it is from the other side:
Paint booth 2.jpg


Finished that up today. Next step is to wipe down the car with a cleaner and then put the epoxy primer on. I am using a PPG product CRE-321, recommended for blasted surfaces.
 
Where is the fan relative to your enclosure? When I used my outdoor canopy as a paint booth I found I needed fans (just box fans, hence 2 of them) at the top of each end to adequately suck out all the airborne paint. You also need somewhere for air to be drawn through, so maybe have a open slot at the base of one end? If the entire surround is sealed I'm not sure the extractor will work as intended?
 
The end wall of the paint booth is a filter wall, 7' x 7', and there is a 2' deep plenum behind that. The fan is attached to the plenum and exits to the outside. Because the car and rotisserie won't fit inside the paint booth I butted the extension up to it. So the paint booth acts as a 7' x 7' box fan at the end of the extension. I have left the top of the extension open so there is plenty of flow. I debated with covering the top and putting a filtered opening at the end, but decided to leave it open to maximize light, and accept the penalty of reduced airflow at the end of the extension farthest from the booth.

Opening a slot at the bottom of the far end is probably a good idea, wouldn't hurt and would possibly get a bit of flow through there.
 
Now the fun part, sanding, filling, sanding, more filling, sanding, sealing, sanding, and did I mention sanding? 😢

As I begin to do the bodywork on mine, and seeing your pics here, I really wish I had a car rotisserie to work on it.
 
Back
Top