Eurosport body, K20 power

PAINT FAIL!!

That's what I get for ignoring the advice of those smarter than me! I used a PPG DTM (Direct to Metal) primer on the entire body. The tech sheet said it could be topcoated without scuffing if done within 4 days. In my case it was about a day between primer and topcoat. The base coat was from Automotive Art, not PPG. I had read previously to be careful if using different brand paint products......................but I went ahead anyway without testing.

The base coat did not adhere at all to the primer. I could put a piece of masking tape on it and when I pulled the tape off the topcoat came with it.

Bah!

I had the media blaster here on Saturday and he blasted all the color off.

Oh well, live and learn. Only problem is I probably won't live long enough.
 
DANG!!!!! So now you have to sand back the entire exterior? Or just scuff it? I'm confused about the 'direct to metal' description of the primer - what primer isn't direct to metal - isn't that the whole point of it?
 
DANG!!!!! So now you have to sand back the entire exterior? Or just scuff it? I'm confused about the 'direct to metal' description of the primer - what primer isn't direct to metal - isn't that the whole point of it?

The areas I had color on were primarily the frunk, interior, engine bay, and trunk. Have already blasted the color off, will have to sand down some of this as a lot of the primer is still on.

DTM primer is an epoxy primer that works directly on sandblasted metal and is supposed to double as a sanding primer, other primers would require some sort of etching process first, either with an "etching primer" or with some other conditioner.
 
That really sucks, and it's a bit of a surprise. I'm no paint expert, only from what I've seen/learned/experienced, typically a failure like that (a coat not adhering) is due to something contaminating the surface it went on. Like a solvent that was used to wipe it down before painting which left a residue. Yes, scuffing any surface will help with grip, but there are coats that should not be scuffed. Chemical adhesion is the primary bond. And yes, adding coats within a specific window also helps, but it sounds like you were within that window.

I also use DTM, more specifically a "all in one" DTM, that as you say acts as the etching primer, plus high build sanding primer, and surface coating for the color coat. And I've left it for several days before painting over it without problems. However I've also seen where the DTM did not adhere to the metal due to something else I did wrong (the surface didn't get cleaned well enough).

As for not using different brands of products together, I've always thought that was more marketing talk than actual fact. If the products used are of the same category as intended (i.e not putting a enamel over a lacquer without a seal) then there shouldn't be any issues. I don't think I've ever used all one brand on any of my paint work.

Run it past your paint supplier to see what they think happened.
 
..........As for not using different brands of products together, I've always thought that was more marketing talk than actual fact.............

That's what I thought also, but now I am a believer. My paint supplier had advised me to do a test panel to confirm compatibility and being a doofus I did not do it.
 
Paint v2. I have repainted the interior parts of the car - hopefully it sticks this time! I hand sanded all the interior spaces over the last 3 months, used compatible PPG primer and color, and put the color on the same day as the primer so should have a good chemical bond.

Interior Paint v2.jpg


For the record, I did do a few other things during this period:
Radiator.jpg


Question for those who have used dual fans like this - How have you had them wired? Do both come on at the same time or are they staggered in some way? I have the stock switch on the rad that cycles at 87* and 92* Celsius (tested and confirmed). I expect the engine temp could be a fair bit warmer than the rad temp given the distances so perhaps an earlier trigger for one fan would be beneficial. The K20 has a trigger(s) for the fan as well and I can use that, I expect there are settings in the ECU that can be accessed by Hondata.
 
On the stock setup with 2 fans, the second fan comes on w/AC - so a second relay tied to the ground feed that goes to the thermoswitch, with a second ground via the AC thermoswitch.
 
Good to know, no AC on this car so could set up fans to come on at staggered temps. Or could just remove one fan to allow more air flow.........
 
Nice work on the paint and other refurbishings.

I'd definitely set up the two fans to come on at staggered temps. And I'd select temps below the target engine temp. The thermostat on the head will regulate the actual engine operating temp, so long as the coolant supply is BELOW that.

A couple ways you can do it. If you want to retain a temp sensor/switch on the rad and use it to control the fans, then swap it for a two-speed one. There is a good selection of them for VW's that are a direct fit, with your choice of temps. Or you could use the Honda sensors and/or ECU to control the fans, but I don't know how to set that up.
 
I personally have dual stock fans installed with one fan wired through the stock circuit but with a lower temp switch which turns on at 82 and off at 77. (see picture) and the second wired through a separate relay and switch to function manually.
1D124DB0-1B44-4D0A-915F-0EAD2206A079.jpeg
 
I know the use of a manual switch to control a fan (primary or secondary fan) is very common and many prefer it. However for me personally, I'd prefer to leave that up to a temp sensor of some type. To be honest I just don't pay that much attention to my gauges and therefore it would not be of any use. ☹ But that's purely a function of my driving style, I do not like to think about anything other than what's going on around me (outside of the vehicle). So I make all controls as automated as possible. In other words, I'm not nearly as reliable as a temp switch. :rolleyes: 
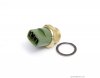
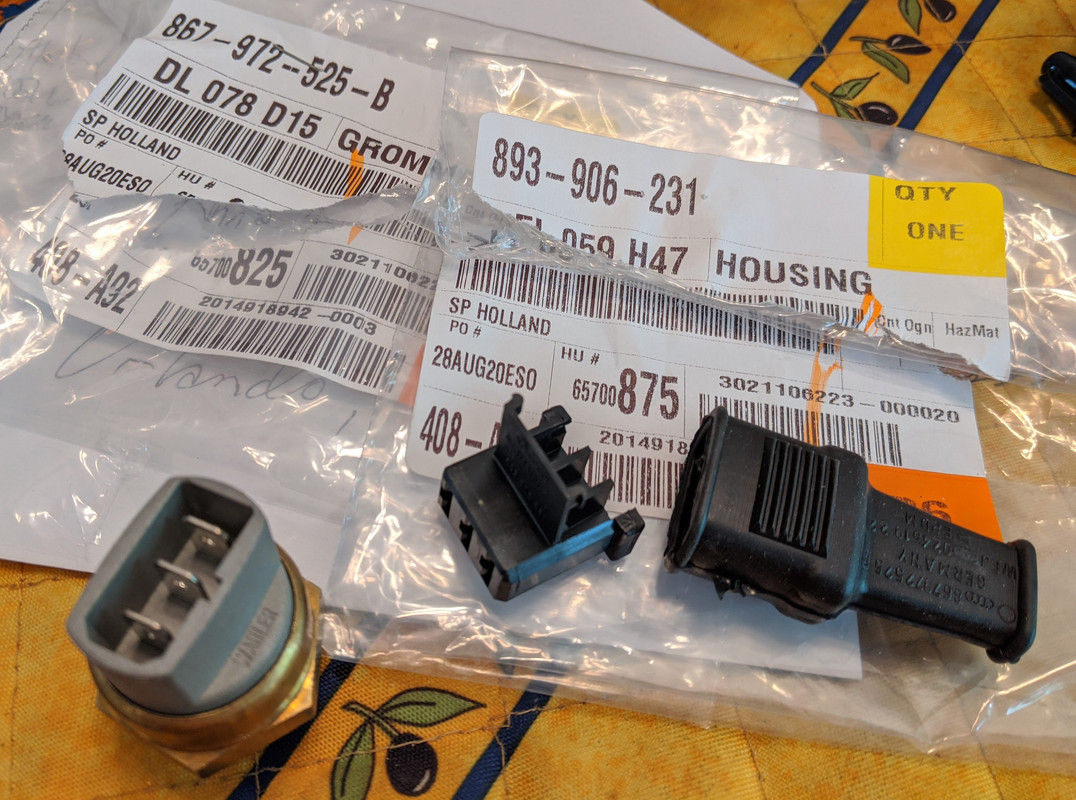
That being said there is no reason not to have the fan manually controlled if that's the preference. ;)
 
VW dual temp sensor. There are a variety of versions of this with different connectors and temperatures. This is the early one for Rabbits and Jettas of the early 1980s. The ones for the later cars have a connector which is a rounded triangle.
 

Attachments

  • 852B341F-DB37-4080-A82A-4DC1ABAA568F.jpeg
    852B341F-DB37-4080-A82A-4DC1ABAA568F.jpeg
    42.5 KB · Views: 91
To add to this - there was another thread (can't remember which one now) with lengthy discussion on temp switches - Maybe from Dr.Jeff? In any event, I elected to go with the dual temp 3 -pole switch Karl linked above. You can still buy the connector & boot from Audi. I assume I put the PN's in my build thread somewhere :(

EDIT: Found it:

IMG-20200829-152414.jpg


The main point is, with the K20/24 swap - depending on how you setup your t/stat - the rating of the t/stat will be critical to maintaining the appropriate engine temp. If your t/stat is "remote" in any way shape or form you need a much lower temp t/stat to compensate for the minimum 20º drop the t/stat will see relative to the block/water housing. I could not get my coolant temp below 200ºF with a 180ºF t/stat, and once it gets that high, nothing works to drop it back to the required 180º range (which is what I bought the lower temp switch for). I installed a 160ºF t/stat, and coolant temp is @ 180ºF, and fans cycle as they should (with factory temp switch). I'm still going to wire in the dual switch, as all the testing I did was in the late fall/winter. I want one fan coming on earlier in the summer months, with the AC in use, etc.
 
Last edited:
Time to report a bit of progress.

First thing I put back on:
PXL_20210228_012128008.jpg


Then I installed the brake lines and pedals:
PXL_20210228_012404429.jpg


Pedal Box in Car.jpg


Brake Line 1.jpg


Brake Lines 2.jpg


And Fuel Lines:
Fuel Lines.jpg


Fuel Lines at Tank.jpg


Here is a shot of the engine bay now:
Firewall Insulation.jpg


The soft line is for the clutch slave cylinder. There will be another soft line from the fuel pressure regulator to the fuel rail on the motor. There will also be a fuel pressure gauge attached to the regulator where the brass plug is now.

Last step before installing the engine for the final time (he says hopefully) is to run the wires from the rear of the car through engine bay and into the interior.
 
Looks great! From the looks of how the FPR is plumbed, I'm assuming you are using the stock K20 fuel rail?
 
I have one on order from Hybrid Racing, but essentially stock.............what would be different otherwise?
Most common is fuel pump connected directly to one end or center of the rail, return line from rail end to one "top" port on the regulator, and the return line from the "bottom" port to the tank (as you have it plumbed now). The second "top" port on the regulator is blanked off and not used. Depends on the fuel rail you are using - it it has a feed and return port than it's set-up like the above example. If it has only a feed and no return port it is set-up the way you have it plumbed now.
 
Back
Top