Favorite Tool To Remove Gland Nut

Triestino

Daily Driver
On to the next venture...front suspension maintenance on my 128. Wondering what tool folks prefer/use to unscrew the gland nut (as pictured and as found on the top of the strut tube assembly that holds the strut insert/cartridge in-place).
I was planning to build my own tool or buy, but would first like to know what is out there on the market or folks have built that works well. mulholland.jpg
 
It will depend on the specific strut inserts you will be working with. There are several different types of gland nuts as far as the tool goes:

Some have a 'hex' shape that extends to the outer edge like a large regular nut (KYB comes to mind). A big Crescent wrench can be used on those.

Some have two round holes through the top on opposite sides (e.g. Koni). This needs a "pin" wrench, which you can make if you have a welder. I used a old Crescent wrench and welded two pieces of round stock to it, one on the end of each jaw. That makes it adjustable in size for other uses as well.

Some are similar to the above but with square holes (appears to be what's in the picture you posted). The same tool could be made using some square 'key stock'.

Some have a pair of notches on opposite sides that are accessed from the side vs the top (Bilstein if I remember correctly). This uses a "spanner hook" wrench, like coil-over shocks use to adjust the spring height. Those wrenches are fairly universal but you will need one of the correct diameter. Many are adjustable to fit several sizes.

Some have a knurled outer diameter, as if they were intended to be done by hand (ya, right). A pipe wrench works on them.

Also different strut housings (body) use different gland nuts. For example inside vs outside threaded tubes/nuts. But the type of tool used is usually one if the ones already described.

Regardless of the wrench type you will need, most of then are fairly expensive to buy for something you will likely only use a couple times. So if you have the resources I'd make one.
 
It will depend on the specific strut inserts you will be working with. There are several different types of gland nuts as far as the tool goes...

The photo of his Mulholland 128 strut inserts shows the gland nut type he was inquiring about, the kind with a large plus-sign "+" (or is it an "X"?) in the center:

mulholland.jpg


I've used this same brand of strut inserts on my 128's before - good quality! Rather than spend $20-$40+ for the "correct" fork-type tool for this job, I made my own using some old long-handled Channel Lock type pliers & a couple of small bolts. I basically drilled a hole in the center of each jaw of the pliers, ran a bolt through each hole & then secured the bolt firmly in place with a nut on the end. You then fit the extended ends of the bolts down into the outer ends of the "+" slot of the gland nut, & rotate the nut as needed with the pliers. With the strut mounted in a bench vise, the long handle on the pliers gives good leverage to slowly rotate the gland nut as needed. I've used this tool multiple times on different struts, works great every time. :)

I'll head over to my shop & snap a pic of them in the morning.
 
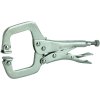
I like your idea Jeff! Similarly, I was thinking of using a set of lock pliers that have been collecting dust in my garage. My plan was to remove the swivel pads and install a couple of small bolts with securing nuts (holes are already there). The pliers are adjustable so the bolts could be fitted in the gland nut accordingly. This setup may not be as strong or have as much leverage as the channel locks...but I was going to give it a try. BTW, the gland nuts I'm referencing are identical to the ones in the photo as are the cartridges that I will be installing.

pliers.jpg
 
Rather than spend $20-$40+ for the "correct" fork-type tool for this job, I made my own using some old long-handled Channel Lock type pliers & a couple of small bolts. I basically drilled a hole in the center of each jaw of the pliers, ran a bolt through each hole & then secured the bolt firmly in place with a nut on the end. You then fit the extended ends of the bolts down into the outer ends of the "+" slot of the gland nut, & rotate the nut as needed with the pliers. With the strut mounted in a bench vise, the long handle on the pliers gives good leverage to slowly rotate the gland nut as needed. I've used this tool multiple times on different struts, works great every time. :)

I'll head over to my shop & snap a pic of them in the morning.

Stock 1300 X1/9 rear strut housing rebuilt with NOS Monroe insert (to be used on the front of a lowered 128) - these use a top gland nut similar to the Mullholland inserts. Not shown in the photos below is a round, thin plastic collar that I would normally slide down/around the base of the chrome shaft of the strut, to prevent the shaft from accidentally being nicked/gouged by the jaws of the (gland nut tool) pliers.

Here's my improv tool & how it's used:

struttool01.jpg

struttool02.jpg struttool03.jpg struttool04.jpg struttool05.jpg
 
Looks like a hammer and a small flat ended punch would remove any of the nuts pictured above without damaging anything.
 
Looks like a hammer and a small flat ended punch would remove any of the nuts pictured above without damaging anything.

On these struts, the top lip of the strut tube gets staked against the gland nut to prevent the nut from loosening after installation. When disassembling the strut for rebuild, it sometimes takes a bit of force to overcome the staked area(s) when removing the gland nut. It was those exact tools (hammer & punch) that caused the damage to the (left & right) slots on the gland nut as seen in this photo:

struttool02.jpg


Sometimes there's no other way to get the job done with the tools you have on hand. ;)

The tool I fabricated works best/easiest when reinstalling (tightening) the gland nut, but can also be used to remove/loosen it. Just remember to use something between the tool jaws & the strut shaft to protect the shaft from possible scratches/gouges, as there's a tendency to want to squeeze the tool handles together, thus clamping the plier jaws around the shaft. One can also place a small, appropriately-thick block of wood between the 2 handles to prevent being able to squeeze them together too far.
 
On these struts, the top lip of the strut tube gets staked against the gland nut to prevent the nut from loosening after installation. When disassembling the strut for rebuild, it sometimes takes a bit of force to overcome the staked area(s) when removing the gland nut. It was those exact tools (hammer & punch) that caused the damage to the (left & right) slots on the gland nut as seen in this photo:

View attachment 26094

Sometimes there's no other way to get the job done with the tools you have on hand. ;)

The tool I fabricated works best/easiest when reinstalling (tightening) the gland nut, but can also be used to remove/loosen it. Just remember to use something between the tool jaws & the strut shaft to protect the shaft from possible scratches/gouges, as there's a tendency to want to squeeze the tool handles together, thus clamping the plier jaws around the shaft. One can also place a small, appropriately-thick block of wood between the 2 handles to prevent being able to squeeze them together too far.

I didn't suggest a BFH and a chisel. That looks like what was at work there.
Also, it's best to relieve any staking before you try to remove the nut. That saves the threads on the outside of the nut and avoids FURTHER damage to the shock/strut housing.
 
I didn't suggest a BFH and a chisel. That looks like what was at work there.

Nope, just a regular hammer & a punch (from the Fiat factory tool kit).

Also, it's best to relieve any staking before you try to remove the nut. That saves the threads on the outside of the nut and avoids FURTHER damage to the shock/strut housing.

Yes, of course (I've rebuilt several sets in the past, both for my cars & friends cars).
 
Thanks for all the info folks! I will build a tool similar to Jeff's except I will first attempt to built one using some dusty lock pliers I have (pictured above). If that fails, I will use a crescent wrench. Interesting point that you raise Jeff regarding the staking of the the top tube to prevent the gland nut from turning. I'll have to take a closer look at mine as I didn't notice anything at first. Will keep folks apprised of my success...or failure :)
 
Back
Top