Dr.Jeff
True Classic
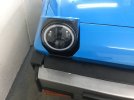
I am working on a custom modification to the headlight doors and came across a couple of issues.
One of the existing (original) doors had a bit of damage to the aluminum casting along one edge. It's a small dent or crease upward (away from the car) that caused a tiny crack in the cast metal. I assume the door was closed with something in the way (perhaps a tool or such) and the force of the door motor (which is great) actually bent the cast door over the object. I removed the doors to do the mods and attempted to straighten out the damage first. However I was not able to get it as nice as I'd like so I will use a spare door.
That brings me to the second issue. The spare door is from a rusty X that I bought as a "parts car". The factory paint has lifted from most of the door due to oxidation of the cast aluminum underneath. We've discussed this before, it seems to happen often. However I don't recall anyone describing a effective method of prepping the door prior to repainting, to avoid further paint lifting. Obviously I will strip it but I'm not certain what is the best treatment to avoid more problems. I know some acids work excellent as aluminum cleaners/polishes. Traditional sanding, cleaning and priming before painting seems normal. But is there any specific pre-paint treatment for these cast aluminum doors?
And there's a third issue. I found the replacement door did not fit my car well. The two doors (original and spare) appear to be identical. But when the replacement was mounted it had a slight interference with the hinge mounting plate on one side. I had to grind some aluminum off the door to allow it to clear nicely. I can't see any reason for the difference, why one door works well and the other doesn't. One is off a '79 US spec X and the other a later model Bertone spec. Perhaps there were minor production differences during the years in between.