
You are using an out of date browser. It may not display this or other websites correctly.
You should upgrade or use an alternative browser.
You should upgrade or use an alternative browser.
How to replace valve on heater core?
- Thread starter davejake
- Start date
-
- Tags
- box cooling core heater valve
No need to pull the core. You go in the passenger footwell to access the valve. Dropping the fuse panel will give you a little more room. Be sure to drain the coolant as much as possible to limit the dripping in the footwell.
Check the manual in the wiki for instructions. I am not at my PC or I would try o find you a link.
Check the manual in the wiki for instructions. I am not at my PC or I would try o find you a link.
kmead
Old enough to know better
Happily you don’t have to remove the core.
You just need to crawl into the passenger footwell after draining the cooling system.
You might consider using a coolant system flush product in the car before replacing the old valve to get all the crap out.
Do you have all the parts needed? A new valve obviously and two of the seals? I would also consider getting two new nuts and washers to attach the valve to the heater core.
- Start with removing the reservoir cap, this will remove the pressure from the system
- Jack the car up such that you can get to the middle of the car, I would suggest putting one end or the other on ramps and the opposite end up on jack stands and more or less level the car.
- Remove the negative lead from the battery
- Get a couple largish tubs. Crawl under the middle of the car and remove the two 10mm bolts you will find in the coolant lines under the car. These are the primary drains. If your car has notable rust you might choose instead to remove the hoses from the radiator, it will be faster and less likely to find out something you didn’t want to know (that your coolant lines were on their way out accelerated by removing the drains. The advantage to removing the drains is you get all the low lying crap out of the hard coolant lines. Wait while 2.5 or so gallons of old coolant drains out.
- While the coolant is draining you could loosen the radiator vent which is in the front left corner of the frunk, this should be an Allen key, I don’t recall the exact mm but it is smallish ie 4 or 5 but could be a 6. This will get coolant out of the radiator.
- Alternatively you could choose to clamp the coolant heater return hose in the engine bay and the coolant heater supply hose in the engine bay to not have to work as hard at the end to refill and bleed the entire coolant system. I am a lazy man and this is what I would do. You might also consider clamping just below the heater core as well or as an alternative
- Next lower the tray for the electrical in the passenger footwell. Remove it from the steel bar at the back and arrange it as best you can to get at the heater valve and protect it from splashed coolant.
-
- There will still be coolant in the heater lines which wants to get into your interior so prepare for this. Loosen and remove the two coolant lines from the supply and the return lines catching the coolant as best you can. A wet vac is great at getting the coolant as it starts to escape the hoses and will allow you to suck any coolant out when the valve is off. Move the hoses to the side.
- Apply penetrating lubricant to the two nuts that hold the valve to heater core and let sit for a bit if yours is corroded like mine is.
- Remove the heater control wire by loosening the philips screw that clamps it. I would take a pic of it first to see where the end of the cable sheath is in reference to the clamp so when you put it back it is easier to get it where you need it to be.
- Remove the two nuts from the heater core that hold the valve. To get to the lower nut, you may need to drop the bottom of the heater by removing spring clips that hold the lower to the upper. Hopefully you don’t need to do this.
- You now have the valve in your hand. Remove the inlet from the valve and clean it up as it likely has some corrosion on the neck that goes into the hose. Discard the valve and the two old seals, one on the inlet and one on the heater core.
- Install a new seal onto the joint between the new valve and the inlet neck. I use a small amount of Formagasket 2B on the metal surfaces to ensure a seal which will last for the rest of my life. Use some antisieze to the bolts and join the two parts with the seal in between.
- Tidy the threads on the heater core with a small brass brush, apply some of the Formagasket to the rubber seat faces and antisieze to the threads on the heater core.
- Install the valve to the heater core ensuring the rubber seal is properly aligned and not pinched (this is one of the reasons I use the Formagasket which will hold the seal as it is permanently sticky) and using the new nuts and washer tighten the new valve onto the heater core.
- Now reattach the hoses and tighten the new clamps up or reuse your old clamps if they are in good shape.
- Refill the coolant, remember to close the vent on the radiator before trying to close fully fill the system. I won’t go into the coolant dance but if you were a lazy man like me you wouldn’t need to.
Attachments
Last edited:
Jimmy II
Fair weather only
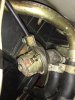
You don’t need to remove the core. The valve is located on the passenger side firewall to the front trunk. You should be able to see it a little to the left of the open fuse box. It will have the heater control cable (similar to a bicycle handbrake cable) coming from above. Replacement is intuitive once you see it. Space is tight but manageable.
I was able to unstick mine, but it developed a major leak a few months later. Fortunately nothing sprayed into my fuse box. I wouldn’t wait to change yours out.
I was able to unstick mine, but it developed a major leak a few months later. Fortunately nothing sprayed into my fuse box. I wouldn’t wait to change yours out.
Dan Sarandrea (Phila)
Waitin' On Parts...
Depending upon your size and flexibility, it may be useful to remove the pass seat.
dcioccarelli
Dominic Cioccarelli
Just be happy you don’t have a right hand drive car!
+ 1