Making of a 308 interior

I do still think the top should level off a tad before meeting the dash though...

Understood. With the dash being a bit elevated now it changes the angles from the posted picture. I'll take another one tomorrow with the new dimensions and you can see the difference I am talking about. It actually does utilize the original mounting point now with it higher up which is great.

Note: I think I will keep a slightly exaggerated "S" shape on the armrest in an attempt to compensate for the straight edge of the X19 window ledge. The 308 has such a nice "swoop" to it that the X just doesn't share but putting a more pronounced curve in the armrest seems to compensate for that a bit - to me at least.
 
What to do?

index.php

Are the series of holes for reinforcement plate/dowel bonding? I have no idea how to envision the armrest reinforcement for use, and it's been buggin the crap out of me :D . Please share your process here if you don't mind, it will help me map out my approach immensely.
 
Got a few hours yesterday to start preparing the center console for glassing. As mentioned earlier I need to protect the foam from the polyester resin that I will be using for the fiberglass. The original plan was to prepare the pieces with acrylic paint but when push came to shove I just went with what I was familiar with - painters tape. Its cheap, thin, relatively easy to apply, and can conform to many shapes and sizes with little effort and the polyester resin won't eat it for breakfast. I'm thinking now that I may wish to spray it quickly with a liquid wax as a parting agent to make the separation easier. I'll probably test this method first on the door armrest to make sure that everything is copacetic as these pieces are easy to fabricate in the event that something happens to go awry.

View attachment 8789
Use clear packaging tape instead or over your green tape and no need for mold release.
 
Are the series of holes for reinforcement plate/dowel bonding? I have no idea how to envision the armrest reinforcement for use, and it's been buggin the crap out of me :D . Please share your process here if you don't mind, it will help me map out my approach immensely.

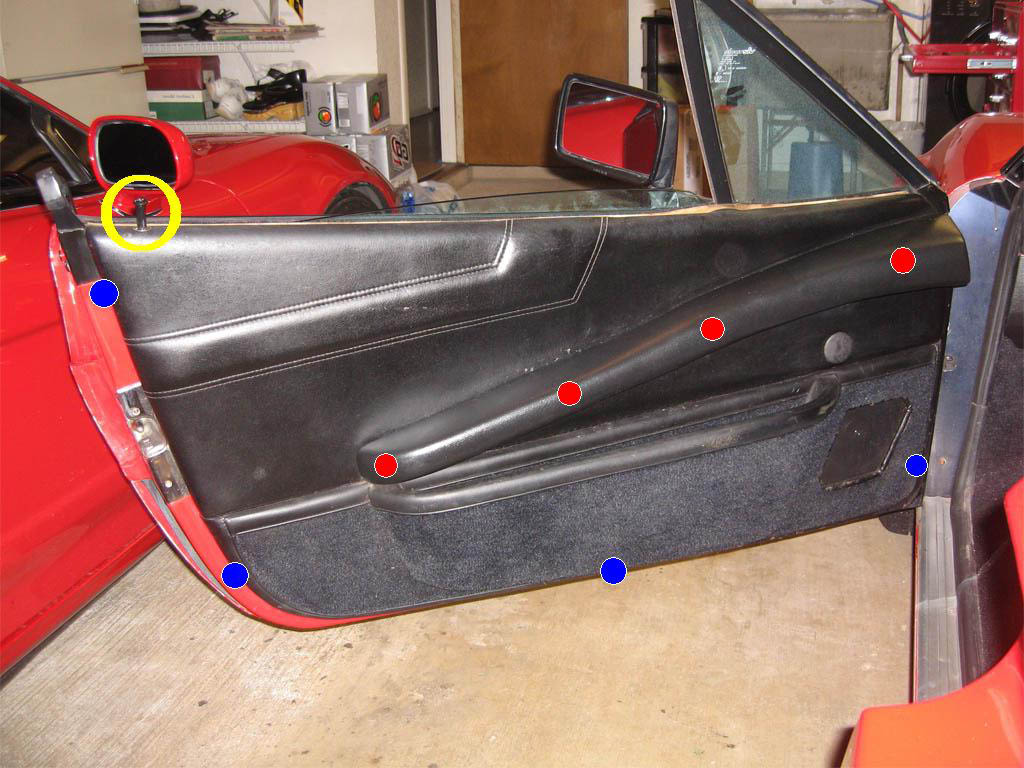
Hey Hussein... nothing overly complicated with the holes. They actually have nothing to do with mounting at all. I cut the armrests from 2" foam sheet to get a consistent thickness throughout the length. What that didn't provide however was the curves that I needed ("S" shape). So in order to create the curves I cut a series of slits on the top at the front and on the bottom at the back and bent it into the shape of the "S" hinging a little bit every time on the slits. I then taped it into place but it was pretty flimsy from all the cuts so I bored some holes at the place of each one and filled them with the expanding foam to make the "S" joints more solid. That was the only reason for the holes.

As far as mounting is concerned I will be utilizing the original mounting holes in the X's door. That just seems the most simple to me. Two of them will need small metal extensions so they will meet the armrest but that won't be complicated. I plan on glassing over the whole foam core. There are no small angles or delicate pieces that need care so I count on putting 3 or 4 layers of glass on it (or until it seems strong enough). There is also a hollowing out on the underside nearest the front that one uses for closing the door that I still have to carve out on mine. As you can see from the following pictures this is what the Ferrari uses for mounting points. I plan on glassing a metal strip on the inside of the armrest that the mounting screws secure to. That should be good enough from what I can tell. (I hope :) )

armrest.jpg


Below is a link to birdman's site where he shows the location of all the mounting points on the 308...
http://www.birdman308.com/service/windowservice/index.html

photo02.jpeg
 
Spent a few more hours in the garage today...

This is the drivers side armrest only (I flipped the top image just to show the other side. 1.5" steel will be used for mounting.
armrestmetal.jpg


I was getting sick and tired of seeing just foam on the dash. Ended up adding 5/8" to the top of the bottom items as well. (This raises the "just sitting there" height of the dash so the armrests clear the window cranks now. I think I'll start cutting the binnacle out in the next few days to make it easier to cover with vinyl. Hopefully I have left enough of a gap between the various pieces to allow for fiberglass and covering.

greendash.jpg
 
Spent a few more hours in the garage today...

This is the drivers side armrest only (I flipped the top image just to show the other side. 1.5" steel will be used for mounting.
View attachment 9172

I was getting sick and tired of seeing just foam on the dash. Ended up adding 5/8" to the top of the bottom items as well. (This raises the "just sitting there" height of the dash so the armrests clear the window cranks now. I think I'll start cutting the binnacle out in the next few days to make it easier to cover with vinyl. Hopefully I have left enough of a gap between the various pieces to allow for fiberglass and covering.

View attachment 9173

Looks like it's coming along very nicely. I kinda like the way it looks in green - can't see the tape edges from here :D

Clark, can you clarify your statements?

1.5" wide & what gauge?

5/8" to the top of the bottom? Do you mean increased the lower portion to raise the entire dash piece?

What is the purpose of the separate rectangle in the center lower section above the vertical 'pocket"?

I'm assuming you're not botherign with the defroster vents on the far left & right ends of the 308 dash....
 
1) The plate I am using for the door armrest is 1/8" x 1.5"
2) Do you mean increased the lower portion to raise the entire dash piece? - YES
3) What is the purpose of the separate rectangle in the center lower section above the vertical 'pocket"?

It's connected to the pocket below and has no purpose at present. One could put a GPS in there I suppose but there is a metal bulkhead behind it so nothing can be too deep.

4) Concerning the defroster vents..... If I could find something that looked close to the Ferrari's I would put them it. If anyone has any ideas????


vent.jpg
 
Thanks for the clarifications.

I was considering the 'generic' vents sold be VintageAir - I didn't check dimensions, although I got the impression they were not large. They need to be pretty compact, and they are not curved, which shouldn't really be an issue.
 
Weekend update...

Getting closer to laying some glass. This weekend I cut the top off the dash to make it easier for covering with vinyl. Once cut the top of the dash needed to be leveled and a few gaps filled in with drywall mud.

drywallmud.jpg


Next it was time to cut the passenger side armrest. After shaping the foam with sandpaper I cut the slits and bent it into the "S" shape and drilled a few holes which were filled with expanding foam to hold the new contour. Next it was taped to the drivers side armrest to make sure both sides had a similar curve as the expanding foam set.
armrests.jpg


After the drywall mud had hardened I finished covering the dash with the green painters tape. The passengers side armrest is all that remains to be taped before glassing :p
almostdone.jpg


Here are a few shots to give you an idea how close the foam bits hug the structure under the dash. I tried to keep everything as far forward as possible to maximize space inside the cabin....
glovebox.jpg


Once these are formed with fiberglass I still need to weld back the reinforcement from here down to the tunnel which should fit nicely inside this center console.

centerconsole.jpg
 
Nice! I was thinking this morning about the dash & binnacle placement (whilst looking at Ben Louis's dash removal pics in his ongoing thread) - in terms of making sure it is pushed as far forward as possible. I see that you have factored that in. My Binnacle may need to sit another 1" forward as I use a Personal steering wheel that is one size smaller than the Fiat/Bertone stock wheel. I can't think of any other way to make sure the gauges are as visible as they can possibly be. I suppose I can play with the taper of the binnacle to allow the IP to be recessed further without actually pushing the binnacle itself further forward - I can see from your pics that there is very little latitude for that.
 
It all looks so simple now, just a few parts, what’s the big deal? :D

Congrats, good luck with the glass
 
Ready for glass...

Got the last armrest done tonight. Fiberglassing should happen shortly. :cool:

View attachment 9520


Very Nice.

Are you integrating reinforcing plates along the backside for mounting as with the armrests? Using the existing mount locations? I'd love to see pics of that side too - I don't have any current visualization of where or how the dash is anchored. What about the IP dash cover?
 
Very Nice.

Are you integrating reinforcing plates along the backside for mounting as with the armrests? Using the existing mount locations? I'd love to see pics of that side too - I don't have any current visualization of where or how the dash is anchored. What about the IP dash cover?

I plan on using the existing captivation points on the top of the dash as per this picture. I may have to remove the metal brackets that slide into these locations from the existing dash or just make my own. I will them find other places on the lower section to mount with screws to firmly affix it.

Image1.jpg
 
Well.... Nothing X related sadly. A few buddies and I are going to Chile in August for astronomy. I needed to make a portable telescope to take with me - so that's what I have been doing this past week :) I still have to stain and varathane it and create a cloth cover to keep stray light out so the X will have to wait for another week.

IMG_20180330_172015.jpg
 
When you get back to the interior project, perhaps consider using your formed parts to make molds. Then the molds could be used to make additional sets. Someone might offer It as a kit for others to convert their X's interior. A possible product for sale.
 
Back
Top