lookforjoe
True Classic
I've used LimeAway on crusty radiators before. Seemed to work OK. I had to let it sit for a couple of days though.
Thank you - letting it sit for a few days is not an issue since I'm not in any rush to get this completed.

I've used LimeAway on crusty radiators before. Seemed to work OK. I had to let it sit for a couple of days though.
Good thing that post you went over wasn’t a foot or so to the left that could have gone quite badly for you.


Much more and you would have had the Flintstone’s car.
Didn't expect to see that on YOUR car.

I second that!Didn't expect to see that on YOUR car.
that is so bringing back not so fun memories when I did mine. looking good!!!!Tacked the cuts before removing
View attachment 41561
Removed the remnants of the old floor weld flange - just have to grind it clean
View attachment 41562
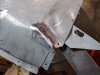
Rocker that needs patching
View attachment 41563
Additional material to be removed to keep just an inch overlap
View attachment 41564
Have much to consider with this area - some rust, some damage from when the sway bar ripped off. Very awkward area to weld, for me anyway.
I have cut away some of that & see what I can do. All the rocker work needs to happen before the pan is installed, or I'll never be able to access these properly.
View attachment 41565
Made a stepped lip for the rear edge - I want the joint with the existing floorpan lip to be lapped - new panel seam faces rearward, on the outside.
View attachment 41567
View attachment 41568
Welded the rest of the cut seams. I'll have to do more work on them - I don't want any visible seams from the underside besides to outer perimeter
View attachment 41569View attachment 41570
Main area trimmed out.
View attachment 41566
Sweet. Nothing like the smell of grinding metal. Great job HusseinThis took about 4 hours to get done:
Cut, fit & weld bulkhead extension. I made it drop lower than the original (seam on right), simply because it was easier to weld abutting the weld for the repair section below it. Really awkward to weld. My neck & lower back are really not happy. I put a few large sheets of cardboard on the concrete garage floor, which kept the cold from creeping into me for awhile at least.
I ran out of time, so the grinding & sealing will hopefully happen tomorrow. There still needs to be another patch section where the crossmember meets the rail on the left - that area is not covered by the new floor pan, just a few inches square.
Once it's done, I will spray cavity wax into the that crossmember, and into the left rail
View attachment 41707
View attachment 41708
got the two small sill repairs welded up, to make sure the floor pan lip has a uniform & complete area to bond to.
View attachment 41705