Performing Honda K24a3/AST5 6spd Conversion

Moving along with the floor... sanded, caulked - & final primer inside & out

PXL-20210206-185310161.jpg


PXL-20210206-185331420.jpg


PXL-20210206-190757757.jpg


Seam is reasonably concealed on this side. I think once the rocker Schultz & undercoat are applied it will be invisible

PXL-20210206-190816714.jpg


PXL-20210206-190828862.jpg


had time to get first layer of top coat on the inside

PXL-20210206-211333815.jpg


also made a housing for the power window relay mod - I used 900 series relay sockets -

PXL-20210206-203136218.jpg


based on this type retainer

PXL-20210206-203325749.jpg
Better than original. Would have expected nothing less from you anyhow. Stellar work Hussein, double "LIKES" on this one for sure!
 
Removed the rad/fans/AC condenser today

View attachment 42474

.....was thinking of putting one of the Volvo fans on, however they are all at least 16" deep - just no way top make that work on a 12" rad.

If you have room for a couple of the stock Fiat ones then I think you will find that they are significantly more powerful than these low profile ones. They are louder and draw more current, but for a good reason...

Cheers,
Dom.
 
If you have room for a couple of the stock Fiat ones then I think you will find that they are significantly more powerful than these low profile ones. They are louder and draw more current, but for a good reason...

Cheers,
Dom.

I do have the originals. I didn't like the fact there is no shroud guiding the flow. Can't think of any vehicle since the 80's that doesn't have a fan shroud. I'm not convinced that they are more powerful - they may draw more current, but the fan blade design is antiqiutious :D I know this has been discussed at length in a range of threads. I don't recall seeing any definitive data
 
There is the Lada multi blade fan and a somewhat newer blade design, I don’t know if it is the same diameter as the X one but one could imagine cutting it down...

The thing I have always disliked is the gap from the spoiler to the face of the radiator and having the fans short cycle the air in a loop around the radiator.


E2B8A136-3D1C-4BDD-A865-B5099A97B52D.jpeg
 
Last edited:
There is the Lada multi blade fan and a somewhat newer blade design, I don’t know if it is the same diameter as the X one but one could imagine cutting it down...

The thing I have always disliked is the gap from the spoiler to the face of the radiator and having the fans short cycle the air in a loop around the radiator.

This aspect I addressed during the 2.0 nose - I added an air guide to prevent any air from dropping below vs. passing through

IMG-20200902-174033.jpg


by "and having the fans short cycle the air in a loop around the radiator." are you referring to the cavity behind the rad? -

I'm not sure what to do about that - I really don't want to cut holes in the frunk wall. At this point, I think I have covered my setup-specific temp issues with the lower temp t/stat. The fact that the rad is angled forward doesn't really help in terms of the fans drawing air through & out - since they point uphill at the inner frunk wall. The fans do cycle, and the expected temp is maintained. Of course, I haven't exposed it to summer temps & heat soak after a highway run, so that could change. I'd like to do all I can now while it's apart to mitigate any potential issues.
 
You have already done the work, something I had forgotten.

Short cycling or recycling the air immediately around the bottom of the radiator is the issue when standing (ie a light right after coming off the highway) in traffic or lights.

I am with you on not making the changes to blow out the wheel wells or out the frunk lid. Being bathed in hot air coming up and over the windshield is not my idea of a good time.
 
All I got done today was cleanup in the rad well. I'm wondering if I can mount the fans on an angle, instead of parallel to the rad (which sits about 15-20º forward, currently pointing the fans more upward.

PXL_20210210_210807747.jpg
PXL_20210210_210803082.jpg
PXL_20210210_210655650.jpg


EDIT. -found this old pic of Jovani's rad (thread link)- I may have to experiment with a modified angle of install since I have the time

20171205_103136.jpg
 
Last edited:
Started futzing with the radiator/condensor positioning. Can't go as extreme as Jovani - the deeper core rad and additional depth of the condenser do not allow for such an acute angle. Not sure how he did that without kinking the hoses, actually.

Pretty much vertical here - perhaps a slight rearward lean - with both hoses in place . lower hose prevents further rearward lean - it's too short. Also stops the rad from sitting slightly over to the left where it needs to be for AC hoses to fit on the right side.

PXL_20210212_225006786.jpg


PXL_20210212_225120472.jpg


This is better - but won't work unless I get a different lower hose and/or extend & pivot the hose relationship between rad outlet and fcoolant pipe. Will need a seal strip along the top to prevent air passing over the core between the header tanks. Also have to drill a new access hole for the bleeder.

PXL_20210212_230102688.jpg


PXL_20210212_230054915.jpg
 
Last edited:
Couldn't get the rad / support to align - found that the rad was twisted from the accident - not surprising really. Bolted two 6ft angle iron to it & tweaked it back :)

PXL_20210213_205514532.jpg


Made the modified rad support (using the one from the parts car - thanks again @aarpcard :) ) - using Volvo ancillary mount bushings & sleeves so the support is isolated from the chassis

PXL_20210213_222331478.jpg


PXL_20210213_222338658.jpg


underside - top hat bushing. There will be a washer same OD as top hat - that is the failsafe in case the bushing failed

PXL_20210214_210900385.jpg


Cut the old lower hose to extend it & adjust clocking - I have proper 1 3/8 hose barbs coming from Pegasus. I'll cut the new stock hose when those arrive. With that, the rad sits properly on the support, without tension on the hose

PXL_20210213_224914679.jpg


Just have to add new pins to the base of the header tanks to drop into the rad support. A revised lower air guide will be needed to prevent air from passing below the rad/condensor.

PXL_20210213_224837250.jpg


Upper hose is fine as is. I have to figure out the fans next

PXL_20210213_224855299.jpg


Rad is set back about 6" from stock position and set forward somewhat at the base - still enough clearance at the base for the grille to go behind the spoiler. I will make a seal for the gap along the top - has to be compressible as the tub curves at each end - its flat for approx 22" then curves downward for the outer 4-5" on each side.

PXL_20210213_225536853.jpg


I have the gap I need on the right for the two AC hoses, I believe.

PXL_20210213_225616660.jpg
 
Last edited:
Just little time today, so I stripped out the Headlamp motor wiring from the L&R pod areas, I started tidying it up across the tub. The three left side wires I will repurpose for the fan thermoswitch.

PXL_20210214_205642409.jpg
PXL_20210214_205637153.jpg
 
Plugging away at the various elements.

Bought some 3/8" aluminum rod, cut threads (3/8-16), cut to approx. 2" & welded to header tanks

PXL_20210215_171436284.jpg


Bushing to locate/isolate rad in support bar

PXL_20210215_171410761.jpg


Welded thick washers to the underside of the support where I drilled for bushing location
PXL_20210215_185421133.jpg


Checking fit

PXL_20210215_190807074.jpg


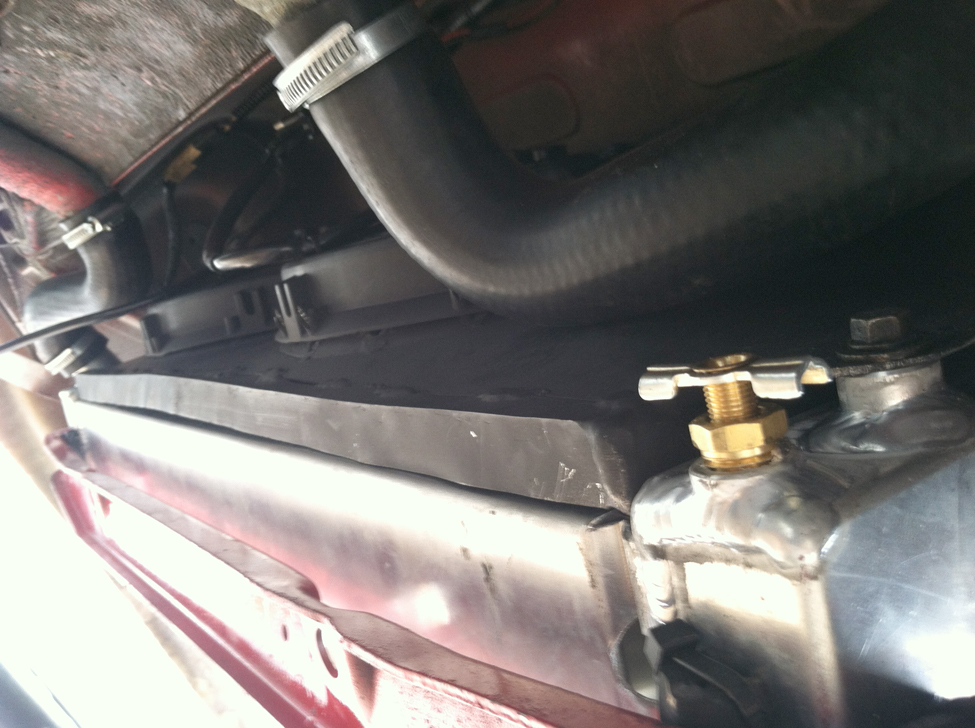
Welded shims to the support mount bolts so I don't need to use a wrench on the head. I don't want to weld the bolts to the bracket as per stock setup

PXL_20210215_185435079.jpg


PXL_20210215_185509391.jpg


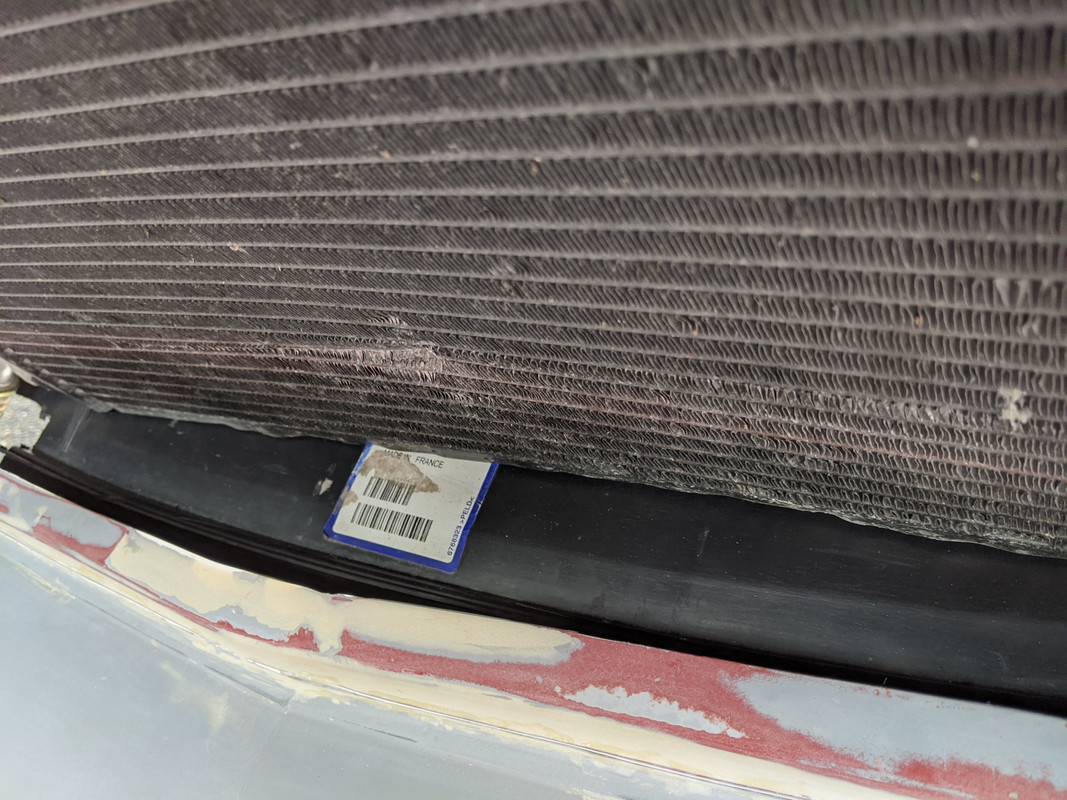
Temp install of locating brackets at top of tub -1/4" neoprene to buffer the rad. After it's riveted in place, I'll use a full strip of neoprene to "cup" the rad.

PXL_20210215_194130639.jpg


PXL_20210215_194556423.jpg


PXL_20210215_194611255.jpg


Checking fan shroud - after some reworking to make it fit & adjusted mounting to get another 20º or so degree downward tilt. Added a seal on the top of the shroud to take up the 3/4 gap created by angling it. May add a 1/16" - 1/8" seal along the bottom of the shroud where I cut off the frame I had made. Stock Fiat fans will not fit in the reduced cavity.

PXL_20210215_205132092.jpg


Not sure how this is going to be in operation - at least the fans aren't pointing upwards to the back of the tub. Worst case, I revert to stock :D

PXL_20210215_205727429.jpg


Checking hose fit around shroud - (edit) I think I can cut an inch or so off the rad end to relieve some of the tension applied to the mid/lower bend now pushing forward against the shroud. I'll experiment with the old hose shown here.

PXL_20210215_205708291.jpg


About 1/2 the fans now sit below the tub floor line. Bottom of rad is now an inch or more higher up due to revised angle.

PXL_20210215_214425685.jpg


..... compared to original install angle

IMG-2833.jpg
 
Last edited:
Worked on the upper and lower seals for the rad - to make sure air has to go through the condensor & rad

After much futzing with various foam seals I settled on using a U channel that would accept old Fiat seals - I used a 26" section from a trunk seal for the lower and a 26" section of the targa seal (at least I think that's what it was)

PXL_20210216_221730084.jpg


test fitting to determine placement of the attaching channel - requires installing & removing the rad several times over until I got it right

PXL_20210216_172202840.jpg
PXL_20210216_171744963.jpg


PXL_20210216_171731098.jpg


With that part figured out, I drilled & riveted the channels - to the support

PXL_20210216_203710300.jpg


...in the tub, and body caulk on the seams

PXL_20210216_203738968.jpg


Looks good to me

PXL_20210216_190824431.jpg


remove again & paint everything

PXL_20210216_221403254.jpg


PXL_20210216_221340206.jpg


PXL_20210216_221421549.jpg


Have to finish up the fan shroud mods tomorrow
\
PXL-20210216-221427019.jpg
 
Last edited:
This will definitely improve airflow. I wish I could do it like that, but I need the lower space for my IC heat exchanger. If the new aluminum radiator doesn't solve the heat problem, I will probably cut vents on the hood. Nice job Hussein.
 
Just curious, what are the perceived advantages of tilting the top of the rad rearward, as compared to the forward tilt of the stock setup?

If you look at the shape of the rad 'tub', and the stock angle of the radiator placement, when the fans pull air through, they are sending it all upward into the "cup" of the tub - it then has to move down & out, but that means it is pushing back (or forward, actually) in order to achieve that. Clearly it works for stock configurations, since most people don't have overheating issues.

My goal is simply to ensure I have done absolutely everything I can to keep the motor temps where they should be, under the harshest possible conditions - which for me would be aggressive highway romps followed by heat soak at highway exits :D

Angling like this simply allows a portion of the pull through air to escape without hindrance, which will hopefully facilitate drawing the upper area flow down & out with it.
 
Last edited:
Didn't get much done today - had to spend a chunk of time fixing part of the garage roof.

Anyway, did some cleanup on the shroud, and also I added a locating tab - since I removed the lower frame section of the shroud the bottom edge is no longer rigid.

PXL_20210217_191504710.jpg


Started on the wiring for the fan circuit - I'm leaving all the stock wiring intact unused, except for the AC-on trigger. The Volvo relay will go under the molded AC hose/wiring cover. I'm moving the headlamp relay mod under that cover also.

PXL_20210217_211854692.jpg


PXL_20210217_222514391.jpg
 
Heavy snow today - glad I took care of the sagging garage roof section yesterday!

Futzed with the wiring today - although I have the big ugly fuse breaker & Honda ELD, I really don't want extra wires running over by the battery or over to the wiper relays, so I ran new wires crimped with the fusebox supply cable, in through the bulkhead & back out into the trunk following the stock harness. I used heavier (than the Fiat) gauge Volvo wires - to make sure I don't have load issues. These will be the fused 30 supplies to the headlamp relays, wiper relays, cooling fan relay, and something else I've probably forgotten at the moment

PXL_20210218_190406996.jpg
 
Last edited:
Moved the wiper relays & power supply to under the dash, left side. Frunk wiring is back to stock appearance (LOL - no extra wires or relays evident).

PXL_20210219_191436253.jpg


Pink & grey are the factory High & Low feeds - I'm using switched feed wire at least twice the diameter to make sure there is no issues. The main feed is approx 3x the diameter. The main goal of off-loading the switch is achieved, and the much heavier gauge supply & feeds should ensure no lags in wiper performance, given the additional harness lengths.

PXL_20210219_194215713.jpg


will be tucked underneath, so accessible with dash in place

PXL_20210219_194201660.jpg


Have to remove the wiper motor to get to this - the source of my water ingress on the left floor pan - probably the reason the floor rusted in the first place

PXL_20210219_191453689.jpg
 
Last edited:
Back
Top