Performing Honda K24a3/AST5 6spd Conversion

Very odd failure. Is that another hole to the left on the inside?

That looks like a job for some of that epoxy to bond a piece of steel over all of that. I need to do something similar to the space above the fuse box which was rusted out in my ‘87. Mine rusted I believe because of the supply hoses to the masters collecting dirt etc and holding moisture on the steel for years.

Fusor its called?
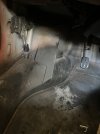
The hole to the left is the factory dimple cut in the inner "A" pillar. Or did you mean right in the corner where the panels all meet? It does look like there are large panel gaps where all the panels come together in this corner - originally there must have been some of that useless 'dum-dum' sealer that I've found completely hardened in other panel junctions.

Yes - Lord Fusor is what I will use to bond a small repair plate. Just trying to figure out the best way to form it - there are multiple compound curves there - so maybe plate it on the cabin side, then level the repair edges on the cowl side to prevent any lips/ridges that could accumulate moisture/dirt. One cannot readily get ones hands in there to work and see at the same time. I dunno yet.
 
I believe you are right, where the panels come together they used the putty to sort of close things off. It does dry out after all these years. We use it for doing acoustic testing and have a different name for it, monkey isht.

We forget these were production cars not intended to last beyond 10 years...
 
Pouring rain today, so I got a little down inside the X1/9

Made a small repair section for the dash hole and bonded it in place
PXL_20210328_135228923.jpg


PXL_20210328_140813787.jpg


In this pic, I can see there is some crud up above the repair that needs stripping - the problem is, you can't actually see up in there :(

PXL_20210328_140828827.jpg


Added the closed-cell foam to the brake ducts & installed both ducts

PXL_20210328_142132745.jpg


Needs some minor heat/shaping on the flange

PXL_20210328_143821187.jpg


For the tub end, I rolled the lip to create a flange that cannot push back through the tub wall. Applied some body caulk. Not planning on removing them anytime soon
PXL_20210328_164013638.jpg


PXL_20210328_210257023.jpg
 
Last edited:
For the fender end do they make a gutter piece which fits into the end of this to act as a flange?

The pressure of water coming off those wheels will be remarkable, I would hate to see this get blown back into the frunk.

A0521063-514B-4FC0-B20E-150C5A7F777B.jpeg

Something like this to trap it:

B6691238-6652-407D-AA08-6EFE96B58A64.jpeg


I know, belt and suspenders...
 
For the fender end do they make a gutter piece which fits into the end of this to act as a flange?

The pressure of water coming off those wheels will be remarkable, I would hate to see this get blown back into the frunk.


Something like this to trap it:


I know, belt and suspenders...
I'll have to look - I was thinking of something rigid just to make sure the tubing doesn't deform more than anything else. It cannot push back into the frunk - the corrugation is creating tension in both directions as I had the compress it just to get it in place.
 
Moving along. Got the fan shroud in, fans wired, Hoses in, coolant added.

PXL_20210331_165123667.jpg


PXL_20210331_165151118.jpg


PXL_20210331_165201210.jpg


Installed center panel, glovebox door, insert & radio. Have to do some more (re)wiring - I forgot the clock wiring & WBO2 had to be moved

PXL_20210331_222559496.jpg


PXL_20210331_222208734.jpg


PXL_20210331_222535384.jpg


I can't remember - does the carpet have to go in before the center console, or doesn't it matter?
 
Last edited:
Carpet first

Thanks, Rodger! I bought the new (2 piece) carpet set from Henk years ago - I can finally install it on the DS at least - I found a small rust repair needed on the PS inner sill, that I need to address - so no console yet. I can at least install the DS carpet & get the driver's seat back in....
 
So.... The carpet doesn't fit :( The driver's mat appears to be for a model that doesn't have the foot rest, even so, the foot pad is way off :(

start from the steering column & gas pedal, then work out & back from there.

Looks good in the pic, however there is much extra material on the left

PXL_20210404_171628864.jpg


PXL_20210404_171401974.jpg


foot pas should be where I'm pointing

PXL_20210404_171416823.jpg


this should tuck under the handbrake...

PXL_20210404_171555898.jpg
 
Worked on the Speaker pockets discussed some time back.

4" holesaw, then peined the lip to allow the larger speaker cup to sit flush. I used the rear door speakers (still 6 or 6 1/2" - can't recall offhand), since I already put tweeters in the dash, and they don't do much underneath. Easier to fit these close to flush.

PXL_20210404_141543428.jpg


PXL_20210404_141556211.jpg


PXL_20210404_142909000.jpg


cut the back shield off the speakers so it will sit back in the foam cup - I'll add about an inch foam around the flange to take up any residual gap between this and the foam cup

PXL_20210404_142754266.jpg


PXL_20210404_142800865.jpg


PXL_20210404_142803385.jpg


drilled & added M5 rivnuts to retain the speakers. I may or may not remove the residual butyl. Don't know WTF I was thinking putting that crap all over

PXL_20210404_190601171.jpg


PXL_20210404_190608175.jpg


Put the wiper motor & transmission back together, now the bulkhead/cowlrepair is finished

PXL_20210404_225946212.jpg


relocated rad bleeder - I use a 1/8" NPT home radiator bleeder (key is removable, of course).

PXL_20210404_230451711.jpg


Spent time finalizing the wiring for the relocated center gauges - just have to do the wiring switch over for the main console to wrap that up

PXL_20210404_230518617.jpg


Finally, it was dark enough to check the puddle lights I added

PXL_20210404_230908998.jpg


PXL_20210404_230920176.jpg


They are the same lights I added to the targa sail vents

PXL_20210404_230926880.jpg
 
Last edited:
The carpet is a bummer, it looks good sadly not fitting.

Suffering brain fade on the interior lights, what do they come from? Lighting in an X (and the Miata) is rather less than ideal. Finding something good at Pickapart would be good.
 
The carpet is a bummer, it looks good sadly not fitting.

Suffering brain fade on the interior lights, what do they come from? Lighting in an X (and the Miata) is rather less than ideal. Finding something good at Pickapart would be good.

This iteration comes from Volvo 850/ S70 / V70 >2000. It has a metal heat/reflector shield. It is located in the under-dash panels. There are other easy to remove style variations in the C30/S40/V50, but this version is a clean fit (shown installed in targa vent)

X19-0994.jpg
 
Last edited:
Yeah, that carpet is a mystery. Guess you’re waiting for a reply from Holland?

He says he's never seen an X1/9 with the welded pad :(, which seems odd, however the quality of his products is excellent, so I believe he would have noted/adjusted the product and/or listing to reflect this version had he been aware - so it seems I am SOL, unless I cut off the welded pad....

I started a poll here. If you don't have the welded pad, they will fit just fine, they really are nicely made.
My 81 and 82 both have the foot pad
 

Attachments

  • 875E017F-F3DF-418C-A681-1DF4E1AB6A32.jpeg
    875E017F-F3DF-418C-A681-1DF4E1AB6A32.jpeg
    172.4 KB · Views: 107
Wrapped up the cluster rewire - took awhile. Transferred one set of idiot light connections at a time - I easily get distracted/dyslexic when it comes to this. Took me about 2 hours to rewire 10-11 sets of wires(!)

PXL_20210406_212821729.jpg


PXL_20210406_231801233.jpg


PXL_20210406_231820272.jpg


back in the car - I didn't make any mistakes for once.

PXL_20210406_232754057.jpg


PXL_20210406_232903173.jpg


Binnacle set back

PXL_20210406_233946975.jpg
 
So.... The carpet doesn't fit :( The driver's mat appears to be for a model that doesn't have the foot rest, even so, the foot pad is way off :(

start from the steering column & gas pedal, then work out & back from there.

Looks good in the pic, however there is much extra material on the left

View attachment 45715

View attachment 45717

foot pas should be where I'm pointing

View attachment 45716

this should tuck under the handbrake...

View attachment 45718
Answered your poll but I have a 79 fiat and an 87 bertone and both have the foot pad like yours. Let me know if/when you find a suitable replacement bc I need one as well.
 
Answered your poll but I have a 79 fiat and an 87 bertone and both have the foot pad like yours. Let me know if/when you find a suitable replacement bc I need one as well.

His carpet really is superior quality. I'm going to remove the foot rest & figure out remounting it afterwards. JimmyX gets carpet from a site in the UK - it's not fitted though. You can take a look in his thread though & see if that style would work for you.
 
Back
Top