Restoring a 1985 Fiat Bertone X1/9

Wools66

Low Mileage
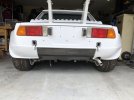
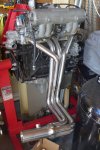
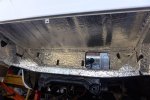
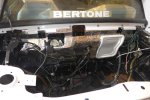
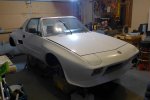
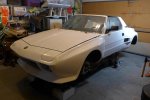
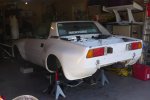
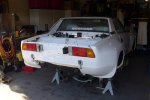
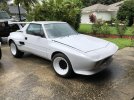
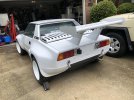
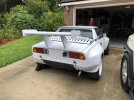
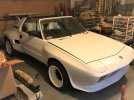
I've decided to list my project since I'm coming to the part where I have to install the engine and transmission. I love cars but I'm no mechanic. A mechanic friend of mine took the engine out but he retired with a bad back. Needless to say, I have to figure it out for myself now. My first question: is it possible to install the engine and transmission without having the rear suspension in place?
 

Attachments

  • 7BF0977D-CD41-45D1-A2DE-2523DA84046B.JPG
    7BF0977D-CD41-45D1-A2DE-2523DA84046B.JPG
    241 KB · Views: 106
  • L1360105.JPG
    L1360105.JPG
    180 KB · Views: 111
  • L1360117.JPG
    L1360117.JPG
    326.9 KB · Views: 105
  • L1360116.JPG
    L1360116.JPG
    240.8 KB · Views: 106
  • L1360114.JPG
    L1360114.JPG
    272.9 KB · Views: 106
  • L1360113.JPG
    L1360113.JPG
    199.3 KB · Views: 105
  • L1360122.JPG
    L1360122.JPG
    216.8 KB · Views: 100
  • L1360121.JPG
    L1360121.JPG
    171.7 KB · Views: 100
  • L1360120.JPG
    L1360120.JPG
    237.1 KB · Views: 97
  • L1360119.JPG
    L1360119.JPG
    121.8 KB · Views: 97
  • L1360118.JPG
    L1360118.JPG
    235 KB · Views: 102
  • L1360112.JPG
    L1360112.JPG
    178.2 KB · Views: 97
  • L1360111.JPG
    L1360111.JPG
    197.2 KB · Views: 102
  • L1360104.JPG
    L1360104.JPG
    187.1 KB · Views: 99
  • L1360103.JPG
    L1360103.JPG
    200.3 KB · Views: 106
  • 980827C5-E505-46C0-B9A3-9E405472399E.JPG
    980827C5-E505-46C0-B9A3-9E405472399E.JPG
    541.2 KB · Views: 118
  • 4869EA38-84A4-41AF-BC43-A06F12FF7BE4.JPG
    4869EA38-84A4-41AF-BC43-A06F12FF7BE4.JPG
    515.4 KB · Views: 110
  • 372A0E87-BE1A-416D-92AC-A27A30D9102C.JPG
    372A0E87-BE1A-416D-92AC-A27A30D9102C.JPG
    428 KB · Views: 104
  • 268C310B-83FD-4FFE-A077-BD72A52BCDC2.JPG
    268C310B-83FD-4FFE-A077-BD72A52BCDC2.JPG
    503.1 KB · Views: 103
  • 0D009496-18AE-46C8-80CB-68A5F856371D.JPG
    0D009496-18AE-46C8-80CB-68A5F856371D.JPG
    294.5 KB · Views: 111
I did it that way; thru the left side, on slide plates, then hoisted it up into place, and installed the crossmember and snail mount. Dogbone later.
Laid it over to slide under, then rotated upright.
motor.jpg
 
I rolled my engine/trans in through the right rear wheel well with the metal shields removed. I then pulled it up into position with an engine crane. The rear suspension was removed.
 
You will want to remove the header and intake so you don‘t scratch/dent them. Particularly the intake to get it up in there.
 
Since the header needed to be removed for maximum clearance, it was also a convenient time to remove the carbs.
 
Not to be contrary, but I don't remove the carbs and header when I install the engine and trans. I've got a little fixture that I made out of a HF furniture dolly that holds them up as one unit. I use the engine hoist to lift the body high enough to slide everything underneath the car, then lower the body down on jackstands and lift the engine and trans up into place. The hard part is getting the mount that attaches from below to the trans because you have to work around the lift legs. It's not hard, just confining. To me it's just easier to attach the manifolds on the engine stand.
 
That's an impressive looking X.

I too lift my X with my engine hoist, roll the motor/trans underneath through the left side, drop the body onto jackstands and then use the engine hoist to lift the motor into place. If a 74 year old, scrawny Fiat clown can do this by himself then anyone can. Like Mike, working around the hoist legs is a pain but can be done if you are flexible enough. Also as noted, this job is actually easier with the suspension out as you usually have to remove the left size strut and arm anyway.

Don't forget to remove your rear wing before you start!
 
Not to be contrary, but I don't remove the carbs and header when I install the engine and trans. I've got a little fixture that I made out of a HF furniture dolly that holds them up as one unit. I use the engine hoist to lift the body high enough to slide everything underneath the car, then lower the body down on jackstands and lift the engine and trans up into place. The hard part is getting the mount that attaches from below to the trans because you have to work around the lift legs. It's not hard, just confining. To me it's just easier to attach the manifolds on the engine stand.
I removed the carbs to make sure they don't get damaged during the engine install. With the forces being generated for the install, I don't want the carbs accidentally absorbing any of it.
 
They were three piece rims from Weld Racing. The product line is "Weld Racing Import Drag Black Anodized Wheel" coming as a stainless rim with a black center. I powder coated them to fit the white & black theme of the Fiat. Sizes: 15" x 9" for the front and 15" x 10" for the rear.

An interesting tidbit I forgot to mention in the beginning: I always adored the Lancia Stratos HF Integrale as a kid and wanted something with a similar shape. Since the Lancia is way above my paygrade I opted for the Fiat with a kit. The body kit was handmade years ago for me by a guy in Italy long before the kits were readily available to buy on the internet. It was based on and had exactly the same dimensions as the X19 Dallara racing car that had a shorter wheelbase. I did not know this at the time so it didn't fit properly. The body guy that fitted them for me was a maestro and he reworked them to fit perfectly. :)
 
Great job! What sizes and makes are your wheels?
They were three piece rims from Weld Racing. The product line is "Weld Racing Import Drag Black Anodized Wheel" coming as a stainless rim with a black center. I powder coated them to fit the white & black theme of the Fiat. Sizes: 15" x 9" for the front and 15" x 10" for the rear.
 
Back
Top