Rusted-out A-pillar rebuild

myredracer

True Classic
The 850 coupe shell I'm restoring has misc. rust all over the place that I'm having to repair. Not sure about the 850 spiders and sedans, but the A-pillars in the coupes are susceptible to rust due to questionable design by Fiat. Water easily gets inside the A-pillar where the door check "strap" attaches and sits there, leading to the inevitable. Water can also travel down to the rocker panels and cause them to rust, like it did on my drivers side.

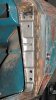
Here is what the passenger side looked like. There's an outer and an inner layer of metal and the outer piece had rotted completely away. Not good. You can see where the check strap attaches there's an opening directly into the inside of the A-pillar. I welded a piece of sheet metal on behind that and will use some seam sealer to keep water out.
DSCF0440.JPG


Cutting away the rusted part of the outer piece revealed what is was like at the bottom of the inner vertical piece.
DSCF0465.JPG


The inner piece of the A-pillar had to go so that got cut out. Good thing because the backside of it inside the A-pillar was very rusty and crusty. Not shown is the piece of A-pillar on the interior side of the car which I cut out for access. It was the only piece of the A-pillar without rust and will get welded back on as-is. After cutting this piece out, I found that the vertical piece on the forward side of the A-pillar in the wheel well was badly rusted so that got cut out and you can see through the A-pillar in this photo. To be able to re & re that piece, I had to drill out most of the vertical spot welds that hold the fender in place against the A-pillar.
DSCF0474.JPG


Having cut out all the bad metal, I had to figure out how to replicate the lower/outer piece with the multiple contours in it. Fabricating something from scratch would have been a real challenge. Upon closer inspection, I discovered that the upper part of the outer piece on the opposite (drivers) side of the car would be a 100% match except for having to trim it down on one side and welding a new flange on. This photo shows the outer piece (on left) and the area within the red line is the patch piece from a donor car fully welded in place and sanded down. I made a temporary jig to ensure it was all aligned and spaced properly. The piece on the right is the inner A-pillar. It's also from a donor car and it had some bad rust on it so I welded a patch piece in, as shown withing the yellow line. This piece is 16 gauge and is what the door hinges attach to so it has to be structurally sound and adequately welded back in. Has a wee bit of pitting but nothing to worry about being 16 gauge. You can see the vertical row of holes I drilled to plug-weld it. Fortunately, my mig torch was able to "just" fit inside the A-pillar.

DSCF0501_LI.jpg


One improvement that I could simply not do is use some paint and weld-through primer to protect all the bare metal. I was also able to get some paint (Rustoleum "Professional" grade rust converter) down into the rocker panel, which was relatively rust free.
DSCF0506.JPG


Tada! After all the repair pieces were welded in, this is what it looks like. Will finish the vertical seam and grinding and sanding another day. When the body gets painted, it will look like nobody touched a thing in there. Can't wait (not) to get over to the drivers side and do the same thing all over again... o_O

DSCF0526.JPG
 

Attachments

  • DSCF0501.JPG
    DSCF0501.JPG
    128.1 KB · Views: 135
  • DSCF0521.JPG
    DSCF0521.JPG
    180.5 KB · Views: 150
Last edited:
Nice job. ;)

What weld-through primers have you tried? I haven't had much luck with them so far. Typical issues I've found are things like it not allowing a good weld (ie. not really 'weld-through'), or it burning off the surrounding areas during the weld process (ie. not very good primer), or it not providing much protection over time (defeating the purpose of it).
 
I've tried a couple of zinc based ones and they were just awful with lots of sputtering and bad welds. Then I switched to U-Pol copper based type after reading some recommendations out there. Works much better and the arc starts just fine. I sometimes scratch a wee bit of the primer off in the center with an awl to give the arc a better chance to get going but generally seems to work fine not doing that.

The trick seems to be once you have the arc started in the center, make sure you are paying absolute close attention, don't flinch if it does sputter and stay on top of it so you don't burn through or get off to the side. It happens so fast it's easy to not get it quite right. You really want to get a plug-weld done in one good pass (circular motion) so that the metal is hot enough to get some penetration. If the weld isn't quite right, and you go back to add more weld material, you may not get the bottom layer hot enough to do anything. When you're welding 2 layers of metal through a hole you'll need a little more heat and I sometimes turn the voltage up a bit depending on the gauge thickness and diameter of the hole.

I have no idea how well weld-through primer protects metal in the long run but has to be much better than nothing at all. It would be interesting to do a test weld and then pull it apart to see what the primer looks like.

There is a guy by the name of MP&C on the garagejournal.com fabrication sub-forum that posts a lot of info, tips and tricks on bodywork. He has an excellent 3,000+ page thread that is worth reading if a person has the time. IIRC, he uses epoxy primer instead of weld-through type. He mixes and brushes the epoxy on pieces as needed as he goes along. Then he uses the type of spot-weld drill like in this photo (which is what I use sometimes) and grinds off the little tip so the end of the bit is flat. Then he uses that to remove epoxy in the hole before doing plug-welds. I'm not so sure it's that great an idea because it seems to me the heat around the weld will burn off some of the epoxy. Could probably do the same thing if using weld-through primer.

a3b8324d-fe23-44db-84a8-20358f12b172_1.dcd58f625c9691abe28ed797a2f2141e.jpeg
 
they were just awful with lots of sputtering and bad welds
That's what I've found. Don't think I've tried the U-Pol copper yet. But I've pretty much resorted to something like in the reference you noted. I go ahead and paint the part, then scrape off the paint through the plug-weld hole before welding. I just use a tiny round wire brush in a drill chuck to remove the paint. I think any weld-through primer, or other product for that matter, will burn off around the immediate areas when the weld is performed. So really it is about protecting the larger, blind surfaces behind the the panel. Then paint over the plug weld after it cools.
 
I use the U-Pol copper as well, maybe the reason for the copper is so when it does burn off the binders the copper melts and "plates" the area thus protecting it from rust???
Just my thought I have thought about applying some primer to a couple scraps then welding them together and leaving them outside for a year to see what happens. but I haven't done it yet.
 
Three thoughts that I suggest be considered concerning rust:
1) when finished welding and before plugging any holes spray zinc based paint (be certain it's AN mil spec approved) everywhere inside. Zinc has the characteristic of "traveling" into scratches and SMALL voids with age. Sort of a self sealing aircraft gas tank concept. It actually does happen and I've seen it. I'm basing it on having been a Sheet Metal worker/contractor/tech college teacher almost 50 years.
2) One can now buy expanding foam that skins over in easy to apply spray cans. They have a short hose to "inject" into blind areas. Probably still available are variable density versions that must be mixed and the volume calculated to fill voids that are HIDDEN otherwise. These would be the ones you can't get in but water can and they rust from the inside out. Take care NOT to use in an area that can be subject to pressurization. They exert very little "pressure" before they set but can "tin can" some applications. A razor will easily trim the places (everywhere!) it oozes out. Once the membrane is penetrated it must be sealed with epoxy paint to keep the seal intact.
3) Here's where I'll open a can of worms in comments! Fiberglass! I had a friend who owned a fiberglass Funny Car shop. Those things that look like a car at 100' but have painted on headlights. He examined my Abarth 750 GT during restoration and asked if I ever considered going fast in it. When I said "hopefully" he got out the chopper gun and started at the footwells and went all the way back to the top of the rear firewall. This was after ALL rust removal was completed and it was epoxy coated. He then took a 1/2" roller and pressed the glass/resin into the exact same shape as the original steel. When painted black it looked like a steel floor, was very rigid and actually very "quiet" with hardly any extra weight. Key was having it rust free and sealing out any oxygen entry to start rust again. Poorly done it can just trap water and promote rust.
 
What I find interesting about the copper based weld-through primer, is the copper. Copper does not weld. That's why it is used to backup open holes, etc when you want to fill them with a weld but not go through too far. So how can it be a weldable surface coating? I'm not saying it doesn't work - obviously it does, and apparently quite well. It just surprises me.
copper-or-brass-spoon.jpg
 
What I find interesting about the copper based weld-through primer, is the copper. Copper does not weld. That's why it is used to backup open holes, etc when you want to fill them with a weld but not go through too far. So how can it be a weldable surface coating? I'm not saying it doesn't work - obviously it does, and apparently quite well. It just surprises me.
View attachment 19475
Interesting point. I think the spray-on weld-through primer layer is so thin, once the arc is started it pretty much vaporizes instantly. Don't forget that mig wire has a copper coating on it and same thing there I would think?

BTW, that's a pretty nice copper welding spoon! Looks just like the fancy one I got at Harbor Freight. :) Copper backing does come in handy a lot. Besides a spot weld clamp with copper pad on one side, I have some thin pieces I made from thinwall tubing.
 
I'd like to know the chemistry that happens as the copper primer heats up and cools during the weld.
 
My chemistry background is more about body fluids and biological reactions, so can't even speculate here. But it is an interesting question why they use copper for both 'non-welded' and 'welded' applications (so to speak). I wonder if it is more about heat dissipation rather than chemistry?
 
Impressive work, sure was a god send to have some donor pieces to blend in. Well done.
Man, I don't know what I'd have done without donor pieces. Fabricating complex shapes like the A-pillars from scratch would be very difficult and time-consuming. Some ordinary panels are available like fenders, rockers, etc. but they can often be a bad fit. There's nothing like original factory pieces from when a car was built.
 
Three thoughts that I suggest be considered concerning rust:
Interesting. I'll have to look into that foam stuff.

On fiberglass, the previous owner of the coupe I cut up scabbed on new sheet metal over rusty areas and just tack welded the new metal in place. Then he put fiberglass over that and also in a lot of other places. Enough fiberglass to build a boat. I guess the thought was it would be even better at preventing further rusting. He clearly did not properly clean paint or remove all traces of rust under the fiberglass. It was all painted black and *looked* decent but what I thought was a great body turned out to have really bad rust in a lot of places, pffft... There was also bondo and fiberglass hiding significant damage in some places. All the work the guy did simply ruined the body. Removing fiberglass from a metal car body sure isn't easy.

Gil,
the foam cans are available in just about all home improvement outlets. Wear throw away gloves as it sticks to skin better than anything else! The special mix stuff of different density can probably be found online. I've never used it but a VW friend used it before the cans were available,
Frank
 
Frank, How does the foam keep moisture from getting trapped between the foam and the metal causing future rust issues?
 
I don't know if it is true, but I've read that those spray can foams actually hold water. That's not good.
 
Back
Top