Temp gauge rising

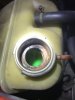
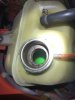
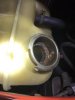
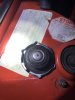
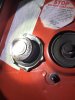
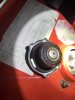
Thanks for that tip. I’ve recently replaced the rad, pump, thermostat and all associated gaskets and flushed the coolant fully when I changed the rad. I also had a ton of brown crud. All my hoses are in good shape. I tried cleaning the opening for my expansion tank which is very rusty with not much success. I’m really hoping that perhaps changing the expansion tank and cap will solve the issue. I’ll let you know. I googled bad coolant cap and there was a lot about overheating.....fingers crossed.
 
Hey Mike, seeing how you're getting on? Took my X1/9 out for a bit of a run today, and reasonably sunny and warm, with a bit of stop/start, and am pretty much staying under 3 o'clock (90) all the time. I was having a similar issue to you. I had been losing a bit of coolant from time to time, but having replaced all the hoses and the radiator cap, everything seems fine? Don't know what to pin it on, air in the system, as there must have been a leak somewhere, the new radiator cap, as the seal on the old one was stuffed, or even cleaning out the 'sludge' when draining. Not loosing any water at all now, but it's back to that murky rust colour again, so tempted to do another full flush again.
 
Hey Mike, seeing how you're getting on? Took my X1/9 out for a bit of a run today, and reasonably sunny and warm, with a bit of stop/start, and am pretty much staying under 3 o'clock (90) all the time. I was having a similar issue to you. I had been losing a bit of coolant from time to time, but having replaced all the hoses and the radiator cap, everything seems fine? Don't know what to pin it on, air in the system, as there must have been a leak somewhere, the new radiator cap, as the seal on the old one was stuffed, or even cleaning out the 'sludge' when draining. Not loosing any water at all now, but it's back to that murky rust colour again, so tempted to do another full flush again.

Well, it’s winter here in Cambridge, Ontario Canada. Yesterday “felt like” -4 Fahrenheit with wind chill so my projects have begun. I started tearing apart the rear trunk floor etc for rust repair and removed the exhaust. (See my other post) but! I was lucky enough to snag a stainless reservoir tank on the forum here. Waiting for delivery. (Just made the deal a day ago)
I need to take a close look at the hoses on the engine side for wear, loose clamps etc. When I changed my old rad for a new aluminum unit I thoroughly inspected and cleaned those hoses and replaced the clamps with new ones so they’re good. I’ll take some pictures of the old tank opening and cap and post them when I get a chance. The opening is really quite bad. Anyway, once I change the reservoir And check the hoses I’ll run her up to temp and see what happens. I won’t be able to drive her under load due to salt on the road so we’ll see...
 
Here’s some pictures of the old reservoir opening and cap. And this is after I tried to clean it up with a wire wheel...
 

Attachments

  • DB3DE82F-C533-4325-BAC1-E2C3B6EA4276.jpeg
    DB3DE82F-C533-4325-BAC1-E2C3B6EA4276.jpeg
    131.8 KB · Views: 103
  • 388B415E-9E65-4DB5-828D-7113CF72994F.jpeg
    388B415E-9E65-4DB5-828D-7113CF72994F.jpeg
    137.4 KB · Views: 111
  • 1C3D29D0-4A3C-44D5-A878-466F172FA544.jpeg
    1C3D29D0-4A3C-44D5-A878-466F172FA544.jpeg
    112.1 KB · Views: 92
  • 90F2F896-00BB-4B7C-A324-D7D7D0A6F1F8.jpeg
    90F2F896-00BB-4B7C-A324-D7D7D0A6F1F8.jpeg
    140 KB · Views: 95
  • BA1BD1CA-289D-4019-9235-EA81E02DB80E.jpeg
    BA1BD1CA-289D-4019-9235-EA81E02DB80E.jpeg
    164.3 KB · Views: 104
  • A15909FB-ED0E-4E0D-BC19-DCB37675AF47.jpeg
    A15909FB-ED0E-4E0D-BC19-DCB37675AF47.jpeg
    154.1 KB · Views: 97
Here’s some pictures of the old reservoir opening and cap. And this is after I tried to clean it up with a wire wheel...
Mine was in similar situations. I had just the right size wire wheel and got all the rust off the top side. I contacted Rust-Oleum and they recommended their 500F engine paint as being good for wet applications. I used that and so far no rust after ~6 months.
 
I also went ahead and purchased a stant superstat thermostat from rockauto. I’ve read in a few posts that it performs well and at this point I could use all the help I can get. With the current postal strike in Canada though not sure if or when it will arrive as rockauto ships via usps.
 
Couple quick updates.
Installed my new spal 10” fan and wired a manual fan switch.
Acquired a used plastic coolant reservoir from mr Tony K as my stainless one will need some work. (Long story) anyway, the used plastic tank’s inlet opening is pristine and coupled with a new stant rad cap should make a very tight seal. When I change the tank I will also switch the stock thermostat to the stant superstat I got. After that, she should be running as cool as a cucumber! If not, back to the drawing board.
 

Attachments

  • 94E9AF16-43E9-4732-8C49-FBFBB536C0AE.jpeg
    94E9AF16-43E9-4732-8C49-FBFBB536C0AE.jpeg
    211 KB · Views: 76
  • E3472518-925C-4890-9235-7C2D43D62A7C.jpeg
    E3472518-925C-4890-9235-7C2D43D62A7C.jpeg
    170.3 KB · Views: 77
  • BAC753C8-682A-4E79-9902-7E8337E60ED0.jpeg
    BAC753C8-682A-4E79-9902-7E8337E60ED0.jpeg
    169.7 KB · Views: 77
Couple quick updates.
Installed my new spal 10” fan and wired a manual fan switch.
Acquired a used plastic coolant reservoir from mr Tony K as my stainless one will need some work. (Long story) anyway, the used plastic tank’s inlet opening is pristine and coupled with a new stant rad cap should make a very tight seal. When I change the tank I will also switch the stock thermostat to the stant superstat I got. After that, she should be running as cool as a cucumber! If not, back to the drawing board.

FD3A308E-9AE8-45B3-94F3-7808615595A2.jpeg


Might I respectfully suggest that instead of all those uninsulated connectors you either:

  • Use a relay holder with integral wires to reduce the number of connectors by half

4193C4BD-AAAD-4B34-9FDB-82A8F763516A.jpeg

  • Or better still use the above holder and a discarded relay to solder the ends of the wires to a relay base to replicate the connections above the relay sockets in the OE fusebox and add your two wires to those being soldered?

  • Or most preferably remove the two screws that hold the relay bracket into the fuse box and add the two wires to the existing ones under the relay so the relay stays in its standard position and you have only two connections in a very stable arrangement underneath the relay bracket.
Honestly that looks like a fire waiting to happen.​
 
I thought that the as-pictured state was the "proof of concept" phase and that once you verified correct operation, it would have been cleaned up in a sensible manner.

Well, I am very handy but unfortunately wiring is not my forte. This did indeed verify the desired operation but I’m still learning the “ins and outs” of automotive wiring.
I’m definitely open to any constructive criticism otherwise I wouldn’t be on this forum.
 
Well, I am very handy but unfortunately wiring is not my forte. This did indeed verify the desired operation but I’m still learning the “ins and outs” of automotive wiring.
I’m definitely open to any constructive criticism otherwise I wouldn’t be on this forum.
Presumably your switch operates to complete the ground on the relay activation circuit (connectors 85 and 86). You could dismount the relay panel for access to the back side, determine which wires are the 85 and 86 on that particular relay receptacle, and then use good quality "T taps" to graft in the leads to your panel switch.
 
Ok, does this look like a good product for “teeing” into a wire?
 

Attachments

  • 92BBEF90-5DE7-4B88-B2C8-5BA7BF7F38E7.png
    92BBEF90-5DE7-4B88-B2C8-5BA7BF7F38E7.png
    752.6 KB · Views: 81
I cringe every time I hear or see T connections. they do damage the original wire and provide to protection for corrosion. with that said. they are often used under the dash with no problem (might think of drilling a drain hole in the bottom of the fuse panel (if you get any leak above it. it is a nice bowl to keep the water on the wires and sockets)
 
It is possible to remove the existing wire from the relay block, remove the end and recrimp a new connector with the locking feature with the old wire and a new wire sistered to it. The connectors are out there to do this and not expensive. You could even buy a new tool to do the crimping (new tools are always nice to have).

Your new wire can be very light gauge, to trigger the relay takes very little amperage so an 18 or 20ga wire is quite adequate. You could also do it with only one wire to the relay by getting the power to the switch from a spot more local to the switch, just make sure it is switched similarly to the relay is today (which most of the switches are (not the interior light switch which is always hot) ).

That would be how I would try to do it.
 
Back
Top