
You are using an out of date browser. It may not display this or other websites correctly.
You should upgrade or use an alternative browser.
You should upgrade or use an alternative browser.
Ten BONUS POINTS awarded.....
- Thread starter lezesig1
- Start date

Les you are a glutton for a certain kind of punishment. Hope the flex joint is ok.
lezesig1
expatriot
Punishment ?
Greg,
I think it reward") as in a NEW part now fitted to the auto.
as in a NEW part now fitted to the auto.
Notice the dis-assembled hub assembly stack up in the pic? It revealed a hot/worn bearing. NOT detectable before dis-assembly. That worn part was a surprise.

lezesig
' 72 850Sp

THE 850 SPIDER BEGINS TO START WAKING UP
Greg,
I think it reward
as in a NEW part now fitted to the auto.Notice the dis-assembled hub assembly stack up in the pic? It revealed a hot/worn bearing. NOT detectable before dis-assembly. That worn part was a surprise.
lezesig
' 72 850Sp
THE 850 SPIDER BEGINS TO START WAKING UP
Aha!
Does this mean you found a way to get your distributor apart?
Does this mean you found a way to get your distributor apart?
lezesig1
expatriot
Distributor is bathing
Hi Greg,
Yep, the distributor advance separates from its shaft by just circlip removal on each weight pivot shaft. Marelli chose to use an end hold down machine screw for this same function.
The Ducellier pictured is a replacement donor.
The original is still bathing in an EVAPORUST solution. I haven't checked on its progress for a couple of weeks now. The upside is that I will have (2) reworked distributor assemblies after the original frees.
Modification to the 30DICA


What's the latest on the Scorp?
lezesig
'72 850Sp
Hi Greg,
Yep, the distributor advance separates from its shaft by just circlip removal on each weight pivot shaft. Marelli chose to use an end hold down machine screw for this same function.
The Ducellier pictured is a replacement donor.
The original is still bathing in an EVAPORUST solution. I haven't checked on its progress for a couple of weeks now. The upside is that I will have (2) reworked distributor assemblies after the original frees.
Modification to the 30DICA
What's the latest on the Scorp?
lezesig
'72 850Sp
Since you asked...
OK, you'll need to explain that modification...
Since you asked about the Scorpion, I'll relate the latest saga. A couple of weeks ago, I had the alternator out to figure out why the light was coming on. Tried different combos like an internal regulator alternator I had in my stash. That didn't fix it, it was bad. The problem turned out to be the aftermarket solid state regulator, which I ordered a replacement for. The newer alternator needed a rectifier, brushes/regulator, to work right. So now I can swap if I want.
Forward to last weekend, when we left early saturday morning for an FEN club drive. But, just past Nisqually, a rattly sound came from the engine area, and inspection revealed the alternator pulley nut was gone. I turned around but partway home the pulley came off enough to freewheel, so I called AAA. It was too bad since it was the first time in years Dr. Wifey joined me for an event.
Came home, removed the alternator. Found a suitable nut, bought an M12x1.25 die to fix the threads, a 3mm woodruff key, hose to replace section cut by pulley. Fixed by evening.
Always something. I need to have a talk with my mechanic about tightening things for sure.
lezesig1
expatriot
Mean this one ?
Greg,

Iron pulley on the scorp alt ?
If it IS iron......pretty lucky that mass didn't create more havoc than it did ! An aluminum pulley would probably loose inertia quickly, right.
Coincidently....I am looking up the torque value now for that pulley nut on this one. It took EXTREME (un measured) torque removing it.
This alt had a little bearing growl that MIGHT have been perceivable in the engine bay with the engine running. This newly rebuilt alt should now purr like a kitten. It's that silky smooth.
Heard anything recently from our friend in the Winlock area ?
lezesig
'72 850Sp
Greg,
Iron pulley on the scorp alt ?
If it IS iron......pretty lucky that mass didn't create more havoc than it did ! An aluminum pulley would probably loose inertia quickly, right.
Coincidently....I am looking up the torque value now for that pulley nut on this one. It took EXTREME (un measured) torque removing it.
This alt had a little bearing growl that MIGHT have been perceivable in the engine bay with the engine running. This newly rebuilt alt should now purr like a kitten. It's that silky smooth.
Heard anything recently from our friend in the Winlock area ?
lezesig
'72 850Sp
johnt
Daily Driver
Looks like funHi Greg,
Modification to the 30DICA
'
How did you plug that smog hole? Is that some lead? I threaded mine and inserted a custom screw plug.
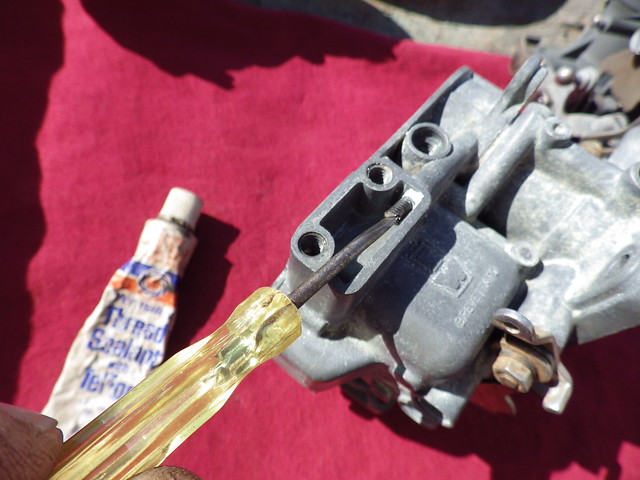
Hole on the other side of the carb was plugged with a socket head screw and o-ring.
Jeff Stich
True Classic
Re: carb mods
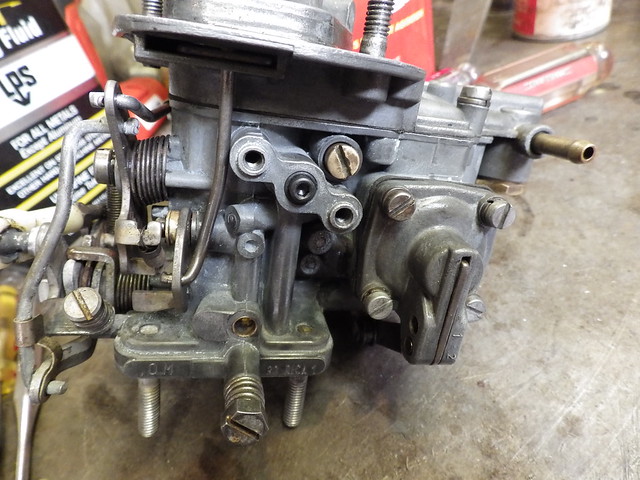
Good stuff. :thumbsup: These are mods that most of my 850's have received as well, though I took the lazy route & instead of drilling/tapping/plugging that hole, I just made a small metal cover plate to mount in place of the module you removed. A small square of gasket material (cut to shape) & the original 2 mounting screws keep it all tidy & sealed.
Replacing the pressed-in fuel hose barbs with the screw-in type (or at least J.B. Weld-ing the originals solidly in place) should be MANDATORY on any 850 carb rebuild! (Ditto for those fittings on the fuel pump) :wink2:
Modification to the 30DICA
Good stuff. :thumbsup: These are mods that most of my 850's have received as well, though I took the lazy route & instead of drilling/tapping/plugging that hole, I just made a small metal cover plate to mount in place of the module you removed. A small square of gasket material (cut to shape) & the original 2 mounting screws keep it all tidy & sealed.
Replacing the pressed-in fuel hose barbs with the screw-in type (or at least J.B. Weld-ing the originals solidly in place) should be MANDATORY on any 850 carb rebuild! (Ditto for those fittings on the fuel pump) :wink2:
Jeff Stich
True Classic
Lead...
Yes, it looks like a lead shot to me. I've used those little round crimp-on type lead fishing weights to do this before - drill an appropriate-size hole, drop the lead weight in, tap it with a punch to squish it in place, then a dab of JB Weld over the opening to positively secure it in place while also sealing it off with a nice gray finish.
Looks like fun
How did you plug that smog hole? Is that some lead?
Yes, it looks like a lead shot to me. I've used those little round crimp-on type lead fishing weights to do this before - drill an appropriate-size hole, drop the lead weight in, tap it with a punch to squish it in place, then a dab of JB Weld over the opening to positively secure it in place while also sealing it off with a nice gray finish.
lezesig1
expatriot
Ah ha ! The cut off the head....
....from the machine screw trick and slot the end for a driver......routine.
Close ?
How did you make such a fine slot ?
The lead I used was from small rod, rolled into a smaller rod then snipped. Drivin into the counterbore, and like Jeff said, overlayed and fared with a dab of performance filled epoxy...aka JB Weld.
You have me curious about plugging the vacuum brake assembly. I chose to keep mine when I witnessed it rotating the choke butterfly to accept some air under greater vacuum (warmup cycle).
Thinking now...It truly isn't required since it is the CHOKE circuit only.
thoughts?
lezesig
'72 850Sp
lezesig1
expatriot
Too many horror stories.....
Jeff,
....about the famous fuel hose pulloff from the carburetor....and subsequent compartment fire.
I put one out firsthand, spur of the moment, in traffic, for a stranger piloting an 850 Spider. The 'kid' was lucky that I had an extinguisher onboard my passenger car.
With regards to the fuel tube fittings. Pretty interesting orfice on the output side. A feature that I had NOT anticipated and had to fabricate for the new threaded fitting. Been there ?
thoughts?
lezesig
'72 850 Sp
Jeff Stich
True Classic
With regards to the fuel tube fittings. Pretty interesting orfice on the output side. A feature that I had NOT anticipated and had to fabricate for the new threaded fitting. Been there? thoughts?
I assume you mean the fuel return tube on the carb lid? I've never bothered with it... My cars are all pre-1970, so the gas tanks & fuel pickup/sender units don't have the air vents & fuel-return setup on them (my Racer now has an early Coupe/Sedan fuel tank). I use the 1970-on 30DICA carb modified as you & John have shown, but swap the lid out for one from the earlier 30DIC, which only has the fuel inlet tube & no return tube.
By doing this, I get an "improved" carb with 23mm/23mm venturi (vs. 23/21 of the 30DIC) without all the smog/emissions garbage on it, so it still looks like the stock early carb on the outside & everything else is OEM 850 as far as replacement parts go (jets, linkage, etc.). :grin:
johnt
Daily Driver
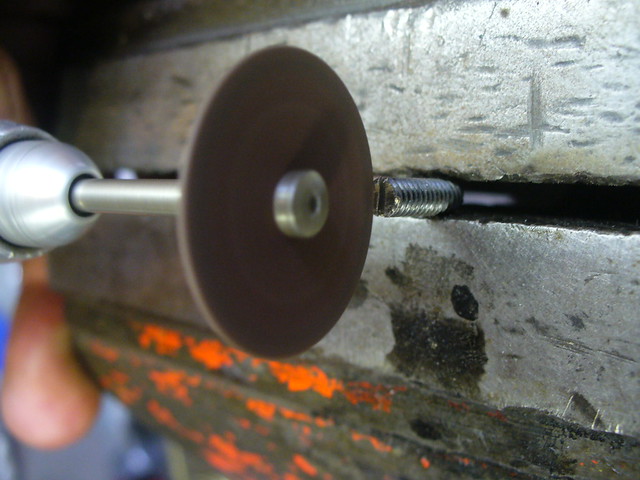
I started with a socket head screw (10-32?) and cut the slot with a Dremel cutoff wheel. Must use a steady hand cutting the slot....from the machine screw trick and slot the end for a driver......routine.
Close ?
How did you make such a fine slot ?
mg: 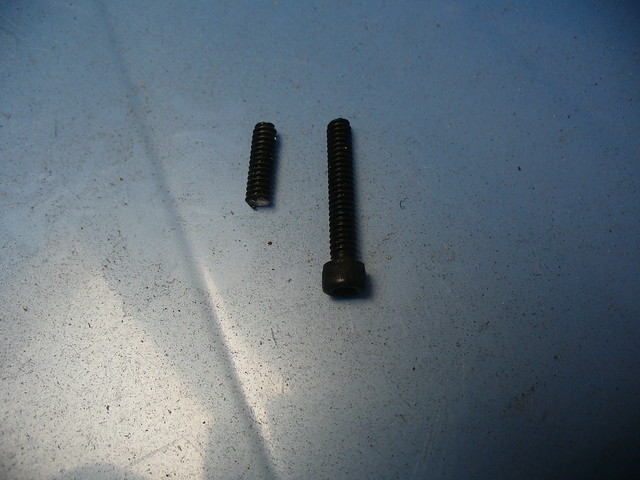
There are a few other ways to do the same thing and some other holes to plug in different ways depending on which carb you have to work with. I have a few samples in this Flicker photo stream...
https://www.flickr.com/photos/johntz/with/17488366704/
lezesig1
expatriot
Confused ?
Hi Jeff,
Care to take a sec and clarify ?
I measured both throats on my DICA...and both measured 32 on the top plate, and 30 in the body.
Mic'd my other (2) DICA's and each measured the same as above.
I am having trouble figuring out where the "23mm/23mm venturi (vs. 23/21 of the 30DIC)" dimensions are coming from.
I figure I must be measuring the wrong area ?
Series I air cleaner assembly

lezesig
'72 850Sp
What's your thoughts on the fuel pump pressure fighting the float shutoff valve? I have often wondered about these carbs without the bypass must prematurely age the float shutoff valve ?
Does the mechanical fuel pump STOP delivering pressure....does it have an internal bypass ?
I won't even mention the cooling aspect of a continuous flow system.
thoughts ?
Maybe I'll get some insight here : )
Thanks upfront
Hi Jeff,
Care to take a sec and clarify ?
I measured both throats on my DICA...and both measured 32 on the top plate, and 30 in the body.
Mic'd my other (2) DICA's and each measured the same as above.
I am having trouble figuring out where the "23mm/23mm venturi (vs. 23/21 of the 30DIC)" dimensions are coming from.
I figure I must be measuring the wrong area ?
Series I air cleaner assembly
lezesig
'72 850Sp
What's your thoughts on the fuel pump pressure fighting the float shutoff valve? I have often wondered about these carbs without the bypass must prematurely age the float shutoff valve ?
Does the mechanical fuel pump STOP delivering pressure....does it have an internal bypass ?
I won't even mention the cooling aspect of a continuous flow system.
thoughts ?
Maybe I'll get some insight here : )
Thanks upfront
johnt
Daily Driver
johnt,
You captured some great images.
Looks like you have been pretty deep into the auto(s).
How about inner race on outside rear bearing holding tight to the shaft.
Been there ?
lezesig
'72 850Sp
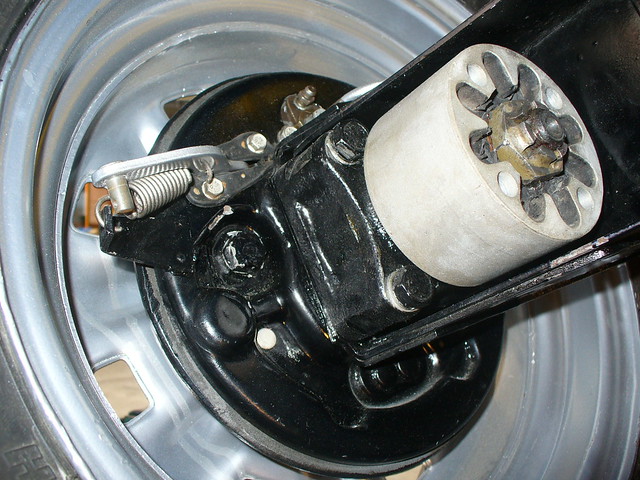
Yes I know that inner race or spacer :geek:It's there for the inner rear seal to ride on and somewhere for the flex coupling to butt up against. Don't think it matters how tight it is on the shaft since it doesn't rotate on the shaft.
When the castled nut is torqued down, it cinches down all this: the inner race/sleeve, both bearing inner races and spacer between the bearings.
If the sleeve has been tampered with or is not the factory part, then maybe that's why it's tight. It usually just falls out after the flexible coupling is removed. Everything that fits over the stub axle is a precision fit, not a friction/tight fit. Nothing has to be heated to get it over the axle shaft.
Does this help in understanding that inner race :nuts: Maybe not :hmm2:
Here's my assembly, where the nut is holding everything together.
lezesig1
expatriot
Re-direction
Hello johnt,
Nice pic. Clean swingarm +
Here is a better description of the exploded hub assembly.
This is the two piece bearing.

Uncovered and encountered during the bearing inspection and repack routine.
I suspect MOST would just use the existing race and not remove it from the shaft. i.e. buy the new replacement two piece and only use one half of the new one. The outer race.
.....a practice I will not do....
1-Torch it off
2-Part with an abrasive wheel
3-Part with an abrasive wheel and cold chisel
4-SMACK with a sledge at 0 and 180 degrees to shatter the race
Been there ?
out for now,
lezesig
'72 850Sp
Hello johnt,
Nice pic. Clean swingarm +
Here is a better description of the exploded hub assembly.
This is the two piece bearing.
Uncovered and encountered during the bearing inspection and repack routine.
I suspect MOST would just use the existing race and not remove it from the shaft. i.e. buy the new replacement two piece and only use one half of the new one. The outer race.
.....a practice I will not do....
1-Torch it off
2-Part with an abrasive wheel
3-Part with an abrasive wheel and cold chisel
4-SMACK with a sledge at 0 and 180 degrees to shatter the race
Been there ?
out for now,
lezesig
'72 850Sp
johnt
Daily Driver
1-Torch it off
2-Part with an abrasive wheel
3-Part with an abrasive wheel and cold chisel
4-SMACK with a sledge at 0 and 180 degrees to shatter the race
Been there ?
Haven't been there and glad I haven't :dance2: You really find some awful work to do on these cars
But what your doing looks entirely possible and feasible given you don't have another axle assembly. Buying a used stub or entire assembly might be cheaper than the price of that big bearing. Did you already buy the bearing?I like ideas 1-4 above. I might add heating the race to red hot and watch it fall off from extreme expansion or heat it enough so a vise-grip can twist it off.
Only caution is don't heat the stub axle shaft too much as it might be hardened and if you use a cut off, be careful so you don't slip and damage anything. Maybe using an impact hammer with a chisel end to shatter the grip or crack it off. You have lots of brutal ways to get it off.
Did you fix the mushroomed end? Wonder why it was hammered on :nuts: