Tool thread

I've often wondered if those "pencil sharpener" type devices might be an acceptable alternative.
I wasn't sure either, they seemed a bit gimmicky at first. But after using one I've become a believer. There are several options in the settings for all types of drill bits. So it can be used on pretty much any bit you might have. Although to be honest I find I only use it in the "normal" setting on standard type bits, which is all I pretty much use.


Do you have a Link for the specific item? I have stacks of dull drill bits - I hate to throw them out (*so I haven't).....
In the past I tended to use a bit until it simply would not work, doing more damage than good. Then I'd buy a new one. But since I got one of these sharpeners I've been using one set of bits ever since. Just keep sharpening them. A couple of the most common size bits that I use are getting shorter than the rest due to the number of times I've sharpened them. So I suppose eventually you might have to replace a bit here and there. But I still have a few other sets of new bits that I haven't even touched because I can keep using the same ones over and over. It really is amazing to me how well this works.

One possible thing that I wonder about is if new bits are more 'hardened' at the very cutting tip than the rest of the shaft. If so, then that will eventually get ground away. I have noticed certain bits do not seem to hold the newly sharpened edge as long as others. That might be the reason, not sure. But if I sharpen them again they work perfect again. Therefore some bits may end up needing to be resharpened more frequently as a result?

Overall the plain HSS drill bits are great. They can be sharpened as needed and keep working like new. No need to buy the higher priced "special" bits so long as you keep them sharp.

There are a few models of Drill Doctor sharpeners. Some are smaller and therefore can only sharpen bits up to a certain size (you'd have to check their specs to see the capacity). Although I don't use really large bits that often, I have found they are more critical for being sharp to work well. So the larger model of sharpener is worth the extra cost in my opinion. This is the specific one I have now (before I had the smallest one and wished I'd got a bigger one):

I found it on special somewhere for around $100.

This shows the complete line of them:
 
I wasn't sure either, they seemed a bit gimmicky at first. But after using one I've become a believer. There are several options in the settings for all types of drill bits. So it can be used on pretty much any bit you might have. Although to be honest I find I only use it in the "normal" setting on standard type bits, which is all I pretty much use.
I found it on special somewhere for around $100.

Many thanks, Jeff. I just bought the 750x off Amazon - price was the same as direct from DrillDoctor. I also agree - the need for the larger bits being sharp is paramount - and often I'm using over 1/2" bits. Long term, it will definitely pay for itself, the way I go through bits :)
 
I'll be interested to hear your impression of it.

One thing I did not think to mention is it is difficult to use it on really small bits. They are too small to get set up into the 'holder' on the sharpener. But in my experience those tiny bits tend to break rather than get dull. And I very rarely use them anyway.

I found the instructions needed to be slightly modified to work best for me, but nothing major. I think they could improve them to be clearer, but I find that to be true with most stuff. Once you figure out exactly what the machine is doing and how to set it up for your needs it is very easy to use. The older unit I had (an early version of them) was a bit finicky in a couple areas but the newer one seems to have improved those issues.

I just went through a box of old bits my dad left behind. I'd been ignoring them because they were a real mess. But I took the time to sort through them, discard the real trash, and sharpen the good ones. So I must have sharpened at least 20 to 30 bits that afternoon. The sharpener worked great, even repaired some badly damaged (broken) bits with enough repeated runs through the machine.
 
I think it was this thread where some time ago I posted about the idea of using a "scale remover" to clean off exterior undercoating and interior sound deadening? I decided to give it a try and bought one. I'm referring to one of these:
Air-Needle.jpg


Overall it works pretty well. I used it to remove the interior and exterior materials on the driver's floor so I could hammer/dolly all the dents out of it. It isn't a total miracle solution, but better than the methods I've tried in the past. I used it like a "scraper", at an angle and going back and forth as it dug into the material and lifted it away. To completely strip an entire car floor would still be a task with this, but like I said it is better than any other hand method I know of. However media blasting or chemical dipping would be much better for a complete car. But to do a rust repair patch or some body work (like I did) it is a good solution.

Here is the interior floor after using it:
014.JPG


I'm looking forward to trying it for another application it's supposed to be good at, cleaning a old crusty engine block.
 
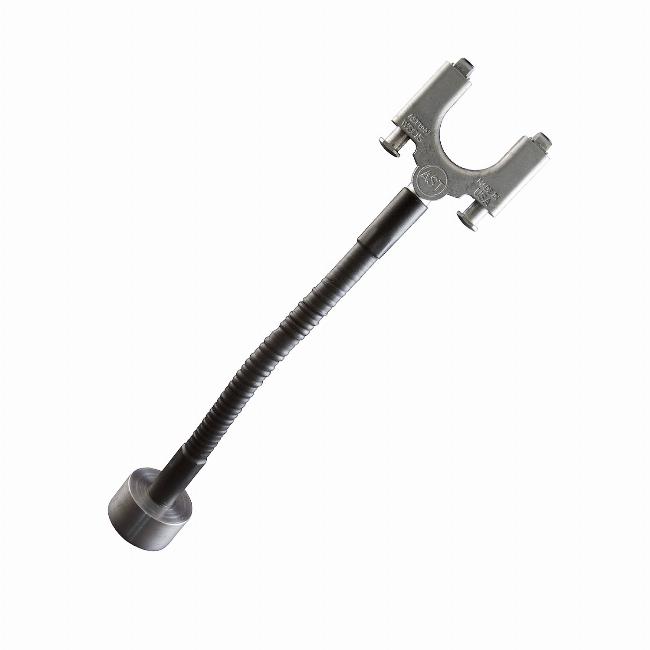
Recently I saw a tool being used that looked interesting, to assist when soldering wires together. Basically it holds the wires in place, freeing up both hands to do the soldering. There are a few such rigs, but not all of them work very well.

The one I just saw is this...

I like the magnetic base, flexible arm, and the spring loaded wire clamps. However it is a bit expensive for something that would seldom be used.

Then I saw a simpler version here....

Has the magnetic base and is MUCH less expensive. But I've found those alligator clips don't always work very well - at least not for me (see below). I'm not sure if it would be better to have a shorter/more compact one like this or the longer flex one like above?

This is the cheap version I have....

Not only do the alligator clips not hold well, but the multi pivot joints below them are worthless. But it is very inexpensive.

This is a simple type of tool. I bet it would be very easy to make something that is better than any of these by combining ideas from each. Maybe a fun little DIY project someday.
 
That Assenmacher clamp looks like the one Ant used in the TR4 episode. I thought he had fabbed something up from a connecting rod!
 
That Assenmacher clamp looks like the one Ant used in the TR4 episode. I thought he had fabbed something up from a connecting rod!
Looks really well thought out, but yeah, expensive!

Got this for xmas (how life changes based on age and cars), and it’s awesome. No batteries, magnet, directable, and multiple light directions. On sale for $24 tomorrow. Think I’ll grab a second: https://www.harborfreight.com/390-lumen-magnetic-slim-bar-folding-led-work-light-56329.html
 
Recently I had a offline conversation with a member about some shop equipment that each of us has made over the years. He asked if I'd post some pictures. As we all know I'm really bad about taking pictures, so today as I was putting away a few tools (following recent projects) I decided to take a couple pics and post. These are not anything special. All of it was thrown together using only scraps I had around, no new parts involved. So all of it cost me nothing. And usually I make things when I need then, which means I'm in a hurry to make it and not concerned with how it looks or how nice it is...just functional (and often for a one-time use only). So please don't expect much.

This started out as a working stand for crankshafts. Just to make it easier to mic the journals, etc. But then I decided to make a crankshaft polishing set-up. So I converted the 'static' stand into a driven one. The gear reduction motor came off a broken ice maker. The bearings for the crank to spin on are from a old roller blade. The wheels for the belt polisher are from a Razor scooter and a skateboard. [My best friend's kids go through toys at lighting speed, so I salvage parts before they go in the trash]. The belt driver is a air drill with a bolt in it, and the skate wheel fixed to the bolt. It runs slower than the commercial ones but I prefer that; better control, slower polishing rate, and less chance of screwing things up. The stand is fully adjustable to allow various cranks to fit (I've used it on several VW and Fiat ones so far), and to allow the crank to be leveled:
View attachment 38279

A VERY simple (read as "crude") piston ring filer. Copied the concept from some online 'DIY' ones. The "cutting wheel" that is used on its side is not in place here:
View attachment 38280

Speaking of pistons, here's some devices to remove and install the locking clips (rings) for the wrist pins. This concept came from my Porsche days; look up "Stomski Racing" to see how they work:
View attachment 38281

Makeshift radiator flush, pressure test, etc, items:
View attachment 38282

A couple of the many transmission specialty tools. These are certainly nothing to speak about; the locating dowels to install it and a flange to pull the stub axles. But I've made a LOT of tools to work on transmissions. They often call for a specialized factory tool that is incredibly expensive to buy. So I make a cheap version. Someday when I start working on my trans again I'll dig out others:
View attachment 38283

Valve stem seal remover and installer. The nut on the rear end of the vice grips allows the tool to be connected to a small 'slap hammer' if the seal is really stubborn (that's something I had to add for Fiat engines, no other engine has been that difficult to remove):
View attachment 38284

Oil pump priming tool. Just a dizzy drive gear welded to a bolt, and a socket secured over the head of the bolt:
View attachment 38285

Previously I've shown several other examples in various threads; the bead former to roll a securing bead on aluminum turbo pipes, the jack pad adaptor to connect a floor jack to the X's side receptacles (stock jacking points), the pressure brake bleeder, the tire mounting machine mods and blast cabinet mods we discussed here, the 'easy-roll' creeper (more Razor wheels, thanks to Daniella and Jared...now fully grown up so no more 'donated' sports gear), etc.

A few others I've built include an adaptor for the hydraulic press to make removing Fiat valve spring retainers easier. A vacuum pump set-up for filling the cooling system. Fuel injector testing and cleaning rigs. High pressure fuel pump tester. Engine knock (detonation) tester, for tuning purposes. Flywheel lock. "CC'ing" rig to measure combustion chambers. Can't remember it all. And there's a lot that is not for Fiat stuff, but specific to other vehicles I build. Now that I've started this thread I'll try to keep it in mind when I come across the bigger, more interesting items (most of it is deeply buried in storage).

I also have a file full of other ideas. Many are either equipment I see at trade shows, or things I see online, or something derived from other industries that I want to adapt to use on my car builds. I've been inspired by what people do in other countries, when they have to improvise. Also most of the inexpensive equipment from Harbor Freight needs some upgrades and mods to get the most out of them. And there are some original ideas I have that might even be marketable.

Hopefully others will share some of the tools and equipment they've made. [ @CnC79X19, that means you ;) ]
Just saw this Doc, cool stuff!
 
Just saw this Doc, cool stuff!
"Recently I had a offline conversation with a member about some shop equipment that each of us has made over the years."
So now Cliff, let's see some of the equipment that the referenced person has made. :D
 
"Recently I had a offline conversation with a member about some shop equipment that each of us has made over the years."
So now Cliff, let's see some of the equipment that the referenced person has made. :D
Will do Doc. Hope you're keeping yourself well.
 
I was looking at the website for a company that makes specialty tools for a particular make of German car. They also have some tools that are more universal, and a couple stood out to me. Not that these are anything new or special, just good ideas. Some appear easy to duplicate as fun DIY projects.

A rig to hold a 'dial indicator' in difficult locations, like checking a flange for out-of-round, or a rotor for warpage:
ES3673954 - Copy.jpg


A circlip tool that has a threaded adjustment for the position, to hold the clip open (or closed) once you've spread (compressed) it. Sure would help in some situations where the clip is difficult to access and wants to keep flying off:
ES3673955 - Copy.jpg


To make "bubble flares" for brake or clutch lines while the tubes are still on the car. This is a handheld, small footprint, flaring tool:
ES3673925 - Copy.jpg


Although most likely this has been around for awhile, I've never seen it before. Sure seems like a obvious thing for low slung cars. Fluid drain pan that not only has a very shallow profile, but also built in rollers to make it easy to slide out from under the car without sloshing everywhere:
ES3673927 - Copy.jpg


Oil filling funnel that secures to the rocker cover by temporarily replacing the oil cap. Especially for cars where there are things directly inside/under the cap, preventing a traditional funnel's neck from reaching down far enough to it in place. This could be made from a spare cap and a modified funnel/jug/bottle:
ES3673888 - Copy.jpg
 
Recently I did a little product test for a company, to give them a general assessment of a power tool they are considering adding to their line. Part of the agreement is that I don't share my experience with anyone but them, so this is NOT the product I tested. ;);)

It is a electric powered "transverse" or "angle" drum sander that looks similar to this:
41sS4SKyt6L.jpg

That pic shows a "polishing" wheel on it. They also come with an assortment of sanding drums, 'cylinder' wire brush, flap wheels, and others for various uses.

I thought it might be great with a wire wheel or 'flap' or scrubber wheel to clean up rusty metal. So I tried it on one of my X's being prepped for paint. Unfortunately the wire wheel that came with it is soft brass and narrow. So not only did it not cover much area, but the bristles flattened almost immediately. I looked online to see if a better wire wheel is available, but sadly none that I could find. The "scotch brite" type scrubber/polishing wheels (like in the pic) and flap wheels were also not effective. They did nothing for the rust, mostly just picked up some dirt/debris. The sanding wheels were rather mild grit and did the most of any attachment, but I found this style of tool to be awkward for sanding. I'd rather use a disk or other style sander. Plus there are basic drum sanding arbors available inexpensively to fit existing power tools.

It has a variable speed feature that is nice, and the general 'power' of it was ok. Overall quality seemed decent, although the motor got pretty hot after a few minutes of use. But all in all I found the tool design to be pretty poor and not of any real benefit over other tools. I did not find anything that it did really well, or uniquely different from other equipment.

Considering the prices I see listed online for many of these (offered from many brands and sold by lots of sources) is fairly high, I can't see any reason to buy one. Which was my recommendation to the company. Fortunately I did not pay for this one, but honestly I don't see myself ever using it for anything. If some substantial wire wheels (perhaps stainless bristles) were available then it might be used for some general cleaning; scale removal, welding prep, rust removal, paint stripping, etc. But sadly as I said I could not find any such wheels from any of the makers out there.

EDIT: I should clarify that my comments about the design not being very useful was not aimed at just the one I reviewed. I did not find this style of "angle" or "transverse" drum power tool (regardless of who makes it) to be very useful. If anyone has found a good application for them please let me know.
 
Last edited:
I recall a discussion about "hub stands" for use with DIY alignment as well as various services. I'm referring to something like this (the basic version):
hsjpg2.jpg


Or the fancier "alignment" version lie this:
img_4890.jpg

pc292842.jpg

pc292832.jpg


Those are cool but they can get very expensive.

Then I saw a 'kit' to adapt existing "wheel dollies" into a hub stand:
Simple wheel dolly...
148838_2000x2000.jpg


Adaptor kit....
88-1040.jpg


When assembled they look like this...
88-1035.jpg

88-1000.jpg


That reminded me, decades ago I bought a pair of those simple wheel dollies. But soon after I bought the "lifting" or "roller" type (like below) and stashed the old ones in a corner.
Replacement rollers...
BW-CJD.jpg


Which means I still have the old pair of wheel dollies. So why not make a set of the DIY alignment hub stands by converting my dollies into stands with something like those 'adaptor kits', then add alignment attachments as needed.

I noticed a variant of the hub adaptors that are very simple and could be easily made without any laser cutting, etc, of parts....
Champ-Adjustable-Wheel-Stands.jpg

88-1050.jpg


It would be very easy and inexpensive to use some scrap angle iron to make these. And with some extra bits attached they can be used as DIY alignment hub stands. The roller wheels will act as "turning plates" and make it easy to "settle" the suspension after adjustments are made. Plus with the car's front wheels out of the way, the suspension/steering components can be easily reached to make adjustments.

One thing that has always bothered me about the pre-made DIY alignment hub stands is how do they compensate for camber? Seems the stands need to have a bit of "tilt" built in, or better yet be adjustable in that plane also.

I put this on my project list and will develop the idea further when I get around to it. But any input for improvements is appreciated.
 
Last edited:
Had to break down & buy a new cable for my trusty Dewalt DW28110 angle grinder. Last time I used it, I put the grinder down over the cable whilst the disc was still spinning - shaved through the sheath & exposed the + wire. I had patched it before, so it was time.

Found a decent cable for only 7-8bucks on Amazon, and the strain relief boot for another 4.

PXL_20210129_155749001.jpg
PXL_20210129_155742404.jpg
PXL_20210129_160111698.jpg
 
Had to break down & buy a new cable for my trusty Dewalt DW28110 angle grinder. Last time I used it, I put the grinder down over the cable whilst the disc was still spinning - shaved through the sheath & exposed the + wire. I had patched it before, so it was time.

Found a decent cable for only 7-8bucks on Amazon, and the strain relief boot for another 4.

View attachment 42091View attachment 42092View attachment 42093
One of my angle grinders has a 2.5"cord for the same reason. 😕 Triggered the circuit breaker when that happened.
 
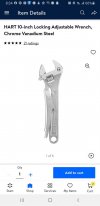
This was just mentioned in a facebook Harbor Freight group and I couldn't believe its real. These wrenches always open up on me. Is it wrong to be so excited about a tool???
 

Attachments

  • 184547954_3932946916793558_7088207208803540732_n.jpg
    184547954_3932946916793558_7088207208803540732_n.jpg
    53.7 KB · Views: 126
This was just mentioned in a facebook Harbor Freight group and I couldn't believe its real. These wrenches always open up on me. Is it wrong to be so excited about a tool???
I've seen something like that but never tried one. Sometimes they can loosen up a bit when using them, especially with a older one. On the other hand, there are times when a adjustable wrench is a benefit - being able to adjust it tightly onto a stubborn fastener where a normal wrench has a touch of play. So this might be a handy item.

What I don't think will work are some of the other designs I've seen for adjustable wrenches. Like the ones that are supposed to be "ratcheting" by not having a full/flat contact surface on the wrench faces and allowing play over the fastener. Or the "quick adjust" ones that you slide a knob to move the jaw up rather then turn the thumbwheel.
 
Way back in post #15 of this thread we started discussing blast cabinet and air compressor upgrades and mods. I finally got around to doing some of the latest improvements on my system. Basically I just redid the plumbing and filtration arrangement on the compressor. And I installed the gravity feed "metering valve" (instead of the suction pickup) and the cyclone dust collector on my blast cabinet. Spent the better part of two days fooling around with all that. Haven't tried the blast cabinet since the upgrades to see how much it has improved. But just glad I finally got around to doing it. My "to do" list is miles long, and it seems by the time I cross something off of it, three more have been added. :confused: But at least now I can try and catch up on some of the media blasting that's been piling up.
 
Back
Top