Volvo C30 AWD Conversion

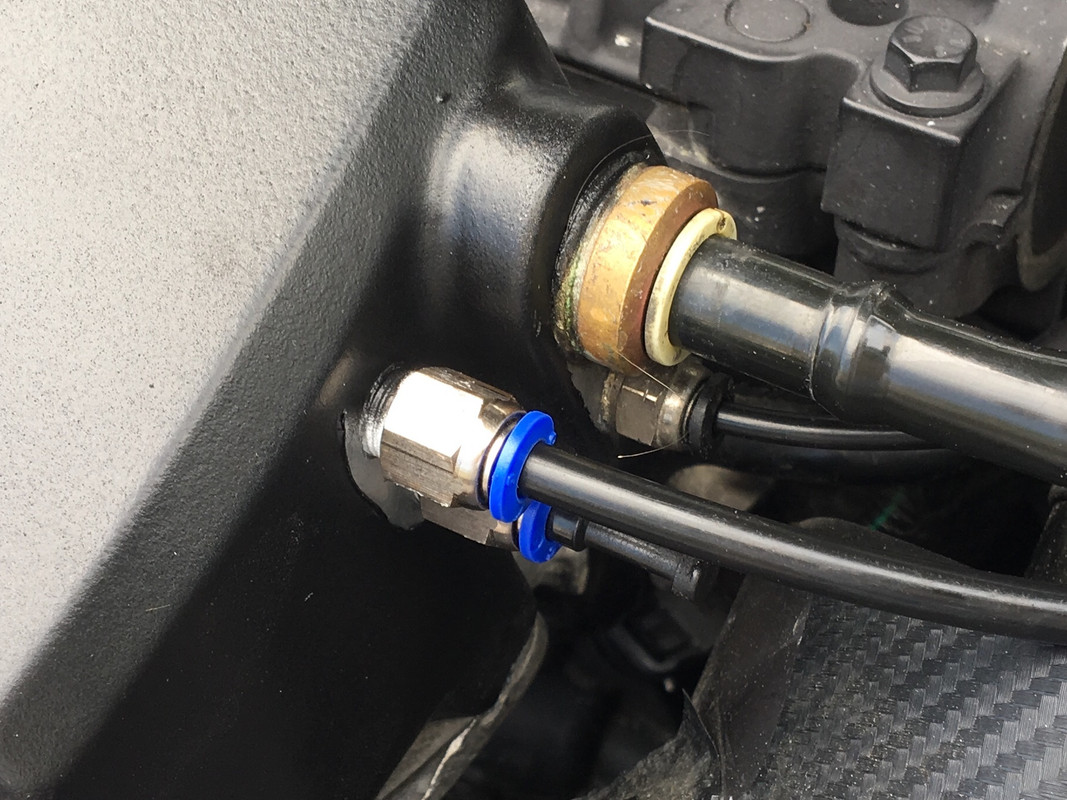
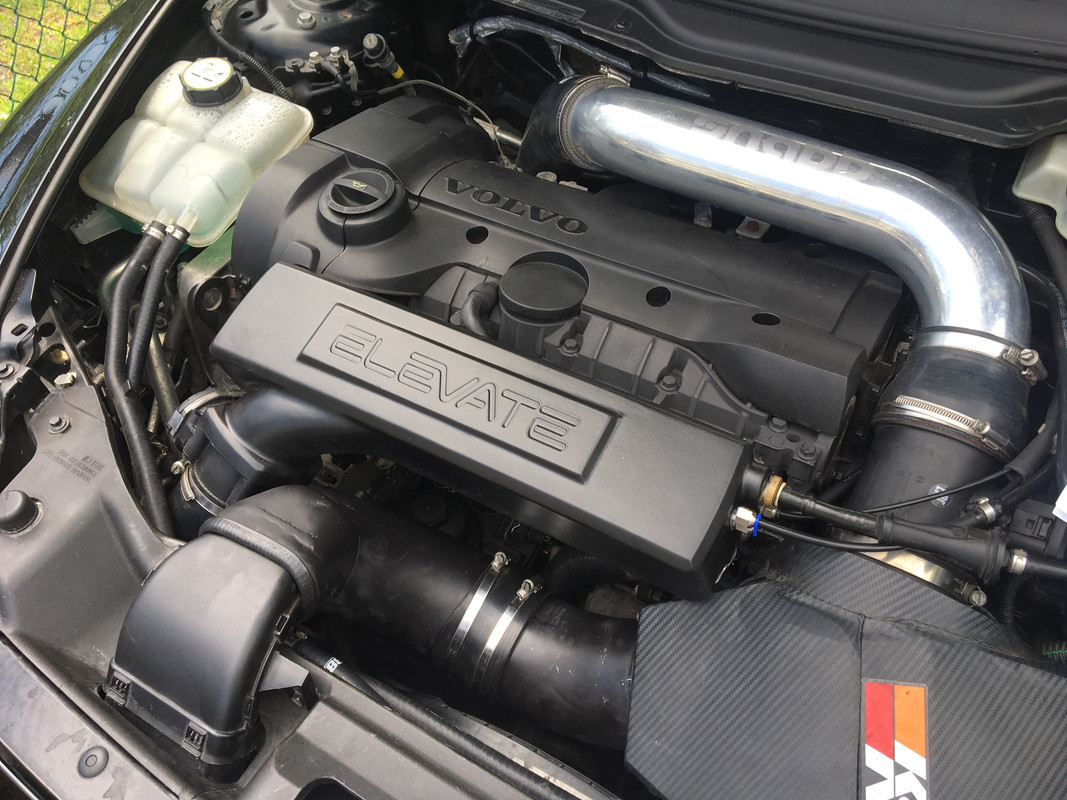
Routed the pressure line along with my boost gauge feed line, inside a DEI heat sheath

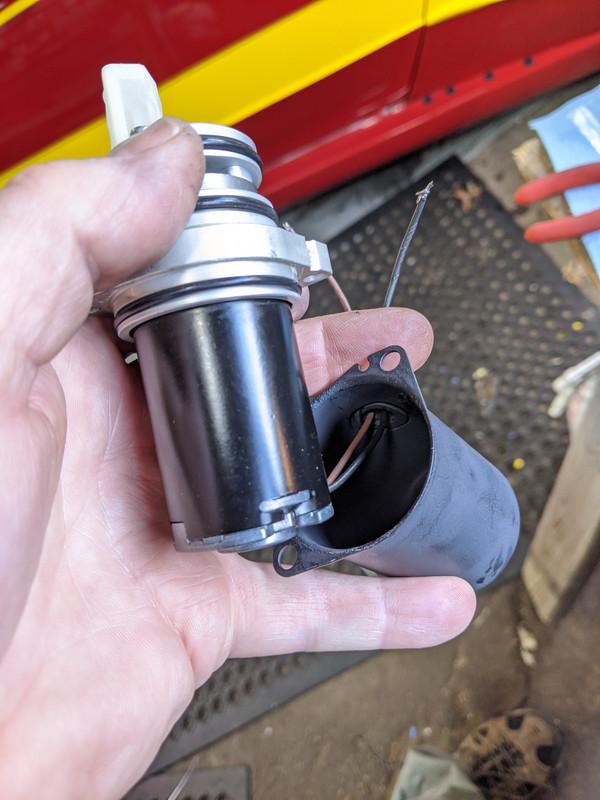
Then I removed the plenum in order to drill the port.

IMG-9175.jpg


Drilled two 21/64 holes & tapped for 1/8NPT. I figured I'd add an extra port, in case I ever need it. I had added the one below the stock port some years back, should have just added extras back then.

IMG-9176.jpg


Back on the car. Painted it black while I had it off the car.
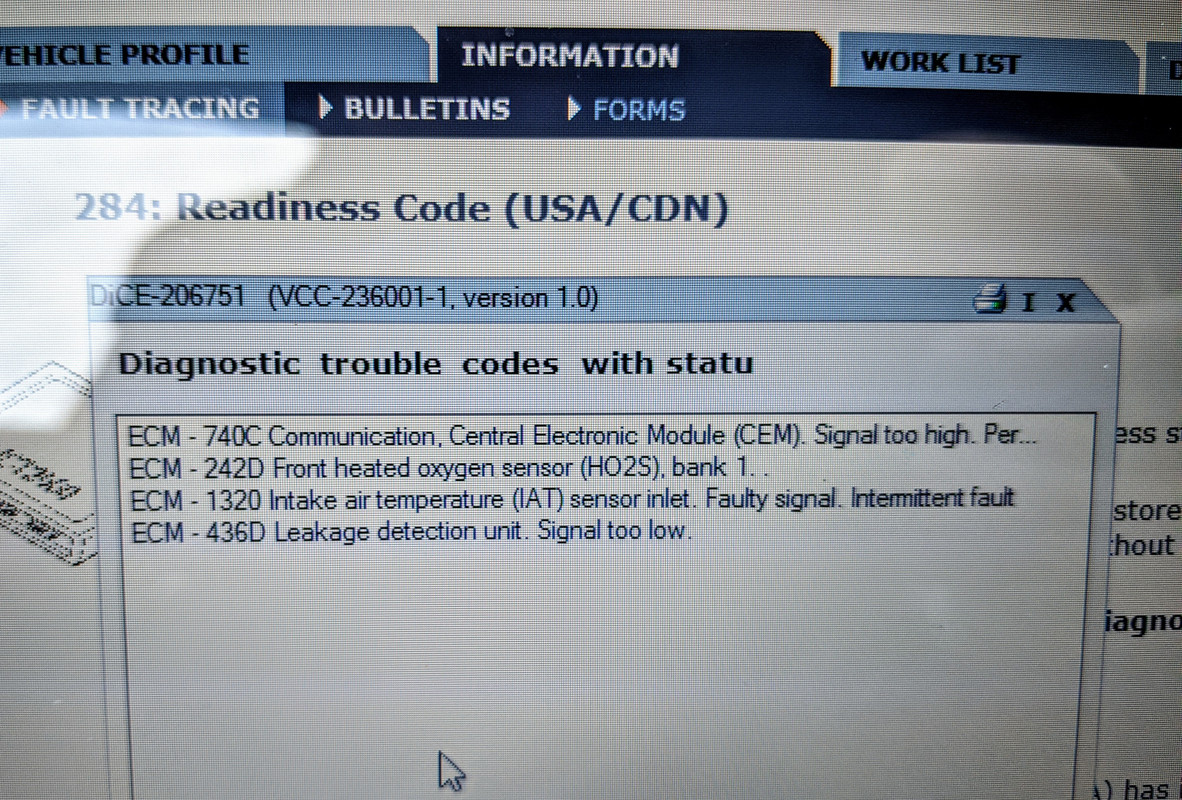

IMG-9177.jpg


IMG-9178.jpg
 
Still trying to figure out the fuel gauge.

Using test code that feeds a voltage to the gauge (with stock input circuit from senders disabled) I was able to make the guage sweep, but only up to 7/8 tank.

supplying single values at a time, gave some indication of what the gauge is looking for. The overall range (in theory) is 0-255 - in practice, a value of 165 drops the gauge below E

IMG-9207.jpg


and 0 puts the gauge at 7/8 tank

IMG-9209.jpg


This is perplexing as the Volvo pocket data booklet gave these values for E - F range:

AWD Sender 1 E=3.6V, 10L=2.3V, 27L =0.6V
AWD Sender 2 E=3.6V 10L=2.5V, 30L=0.6V

FWD Sender E=3.6V, 10L=3.1 30L=2V, Full=0.6V
 
Added separate ground for Arduino, no change. Added sockets so I could switch around resistors. 10K made no difference to gauge reading, neither did 1K.

gauge test unit
IMG-9213.jpg


main unit

IMG-9227.jpg


Using gauge test unit (5v supply) / code
10K resistor added - Voltage between output & ground

IMG-9215.jpg


Voltage between 5V & output

IMG-9217.jpg


Gauge reading

IMG-9216.jpg


Voltage of Arduino wired with factory inputs, 10K resistor between output & ground

IMG-9218.jpg


Voltage at output

IMG-9219.jpg


Voltage between output & ground

IMG-9220.jpg


Gauge reading

IMG-9221.jpg


Voltage at output with bridge connectors, factory circuit (reading main level sender only)

IMG-9222.jpg


Gauge reading

IMG-9223.jpg
 
Last edited:
Still working on the fuel gauge, not resolved yet.

In the meantime, my AC had been cutting out when driving at low speeds / stop n go highway traffic. The common problem with higher miles is that the clutch face wears and the electromagnet can't hold due to the excessive air gap.

Gap here is approx .020". Needs to be about .011" MAX. I removed the outer cover, and removed a 008" shim from the hub. That dropped the gap to approx .012", not exact as the hubs are rarely flat at this mileage, but close enough that it should hold when engaged now.

IMG-20190722-153603.jpg
 
Frustrating problems. NYS inspection was due end of Oct. Back in Sept. I was getting a MIL for a bad EVAP part - the Leak Detection Module. Took awhile to verfiy it was the module that was bad & not the wiring harness. After replacing that (and a new front O2 sensor), one has to wait for all the readiness monitors to set before the inspection can be completed. Problem is, I don't drive long enough or under the 'right' conditions for Cat, O2, and EVAP monitors to set. Just today, I finally got the right combination of highway driving time & start/stop procedures for the Cat to set, but then I got two codes for the rear O2 :( P0133 & P0137.

I figured I'd swap out the rear O2 since I have a spare, and I think I found the issue there. When I assembled the exhaust, I rotated the cat becuase of the front driveshaft crossmember (elbow visible at 9 o'clock, all the way on the left), which dropped the O2 sensor .

IMG-8946.jpg


I rotated it so it sits below level. I'm pretty sure water in the exhaust gases is killing it now, the original one I removed was well-sooted & wet at the tip.

Best I could do today was angle the elbow so that the sensor itself is angled back upward

IMG-20191103-150510.jpg


What I need to do is rotate the cat so the bung sits above the crossmember, and reposition the O2 sensor so it doesn't hit the driveshaft.

I'm just hoping the new O2 will allow the readiness monitor to set so I can get the car inspected! As long as either the EVAP or the O2 sets, I'll be OK. One not ready is passable. Running with an expired sticker is not a good thing around here.
 
Last edited:
Very frustrating. Been almost a week, and still don't have the EVAP or O2 non-continuous monitors set. I made an extra 1hr drive on Tuesday, just to see if I could get them ready. That did reset the Cat, which had turned off after the O2 code. Ridiculous that one has to drive out of the way to make the 'more efficient' system happy. Can't find anything online that describes how many drive cycles it may take for them to be happy.

At this point, I just have to keep driving it & hope they set. My inspection is expired & nothing I can do about it until they set. I can't park the car anywhere on the street in town, as the local parking authority will absolutely ticket for expired inspection.
 
I don’t miss having to get my cars smogged, the Volvo system seems unusually finicky.

I didn’t mind the safety inspections required in New England, here in Michigan anything you can get to roll down the road you are allowed to do so as long as it is registered and insured.
 
Very frustrating. Been almost a week, and still don't have the EVAP or O2 non-continuous monitors set. I made an extra 1hr drive on Tuesday, just to see if I could get them ready. That did reset the Cat, which had turned off after the O2 code. Ridiculous that one has to drive out of the way to make the 'more efficient' system happy. Can't find anything online that describes how many drive cycles it may take for them to be happy.

At this point, I just have to keep driving it & hope they set. My inspection is expired & nothing I can do about it until they set. I can't park the car anywhere on the street in town, as the local parking authority will absolutely ticket for expired inspection.
Hussein, if you give me the particulars of this vehicle, I have access to Alldata website and can look it up. Need the car, year, model, engine and the DTC.

TonyK.

Grimsby Ontario Canada.
 
Thanks to Rich (Moosetech on C30crew) - he suggested running a tank test from VIDA & explained how to do it

IMG-20191114-140435.jpg


IMG-20191114-162354.jpg


These still showed up after,

IMG-20191114-140123.jpg


but running the test 2x & putting a little silicone grease on the gas cap seal made the EVAP set

Screenshot-20191114-165122.png


Still have the O2 not ready, but one is OK.

Drove straight to the station & got is passed.
 
Have to figure these out:
This module was replaced, only leaves the harness / terminals
Screen-Shot-2019-11-14-at-7-48-42-PM.png


Front O2 was replaced when I did the AWD
Screen-Shot-2019-11-14-at-7-48-54-PM.png


This may be related to having a modified tune, I don't know
Screen-Shot-2019-11-14-at-7-49-05-PM.png
 
Last edited:
Been getting whiffs of coolant for some time, and couldn't find any source of a leak. Finally found the culprit - the silicone aftermarket hoses I installed 2 years ago are leaking between the layers, and out around the neck of the T/stat housing and radiator connection

IMG-20191120-162711.jpg


IMG-20191120-162714.jpg


Going back to Volvo hoses. Changed the T/stat (housing & all) as well, since I now have around 130K on the car. Didn't have time to replace the lower hose before I ran out of daylight, so that one is next. It's not leaking yet, so I'm ok waiting on that one.

IMG-20191120-162705.jpg
 
Not really happy with the performance in ice/snow. These later rear diffs do not come with a factory LSD like my old AWD. Car pushes sideways at the rear if I get at all aggressive.

Going to add a rear posi. It's a PITA as the ring gear is welded to the diff.

IMG-20191213-194935.jpg
 
Not really happy with the performance in ice/snow. These later rear diffs do not come with a factory LSD like my old AWD. Car pushes sideways at the rear if I get at all aggressive.

Going to add a rear posi. It's a PITA as the ring gear is welded to the diff.

IMG-20191213-194935.jpg

Sounds like fun.
 
Ring gear is now transferred & welded to the new rear LSD. $250 later it's done. Now I have to install the new bearings (32008X/Q) and check the backlash.

IMG-20200103-132250.jpg


IMG-20200103-132300.jpg


He said it was a royal pita to essentially machine the old diff out of the ring gear, the welds were deep

IMG-20200103-132312.jpg


IMG-20200103-132316.jpg
 
Took the FWD M66 apart today - primarily to remove the WaveTrac LSD for sale, however whilst I was in there I wanted to determine what the problem was I was havng with reverse engagement.

reverse cluster

IMG-20200306-153756.jpg


press out shaft

IMG-20200306-153844.jpg


remove hub ring, found the problem - the synchro hub is broken in two

IMG-20200306-153915.jpg


swapped out with spare parts cone & hub from another stripped M66. Ford never made any internal parts available as spares.

IMG-20200306-154018.jpg


reassembled, pressed bearing back on, loctite on retainer bolt, torque to 18ft/lb (LH thread)

IMG-20200306-155219.jpg
 
Removed the rear muffler section & welded a new flange for the dump valve. I had distorted it when I did the original install, it's been leaking ever since. All good now. I also dropped the offset to give more clearance off the frame rail

IMG-20200315-182557.jpg
 
Worked on the Volvo rear diff today. Getting frustrated with the Fiat - can't figure out the idle surge & can't get the AC system to hold vacuum. Can't see any obvious leak points - no refrigerant oil residue that I can see on any fittings that would indicate a leakage point.

Note: 999-7160 special tool required to remove rear axles without damage to casing

Installed the carrier bearings 32008X/Q x2

IMG-20200317-153703.jpg


about an hour or so to get the mating surfaces free of anaerobic sealant remains

IMG-20200317-152801.jpg


preload shim on right side, left side gets the backlash adjuster

IMG-20200317-152819.jpg


right side cup & preload shim going in

IMG-20200317-153808.jpg


diff in, cover sealed with anaerobic sealant, torqued to 18ft/lb

IMG-20200317-163538.jpg


new axle seals 8653928 x2

IMG-20200317-164116.jpg


preload set (5.25 turns), then used old seal to install new seals

IMG-20200317-164349.jpg


Had to drill & tap the remains of the rear CV, it was jammed in the pinion flange

IMG-20200317-171734.jpg


IMG-20200317-171753.jpg


Next I can remove the flange, and replace the Haldex filter & rebuild the pump.
 
Last edited:
Extracted the torque mount bushing today. The Manual version is a different composition than the Auto. Not a fun job

IMG-20200409-180230.jpg


Used part of a three-jaw puller and a X1/9 rear hub bearing to pull it into the housing

IMG-20200409-181157.jpg


IMG-20200409-181222.jpg


Also changed the two filter/vents fo rth Haldex & Diff

31256914 bush 30681138 x2 filter/vent
IMG-20200409-182621.jpg
 
Replaced the pre-pump, shaft seal, outer seals & filter assembly today

IMG-20200410-165607.jpg


IMG-20200410-165824.jpg

Fuel or is this part of the Haldex system?

The complexity of this car is just remarkable.

On a side note would you consider buying a manual V50? One of my coworkers has one and may be returning to his home country. Anything I should look out for?

These cars have a very specific stereo system, is there a good way to have something a bit more modern preferably with Carplay?

Thanks

Karl
 
Last edited:
Back
Top