Mike Schofield
True Classic
Nice work! Looks good to me!!

Congrats, Michael ! ! ! Having just recently gotten mine back on the road, I know how excited you must be. Great job!DROVE IT AROUND THE BLOCK!! 13 months later and I'm ready for plates - my childhood dream realized. Best. Covid. Project. Ever.
I'm over the moon, thanks. We'll have that ride yet.Congrats, Michael ! ! ! Having just recently gotten mine back on the road, I know how excited you must be. Great job!
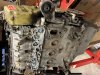
Scrubby scrubby... degreasing time. Betting this poor motor has never seen this kind of love..Motor is out, in the basement, and in the stand. Let the party begin..this thing hasn’t had loveView attachment 38515View attachment 38516 since I believe 1987..
Get set to do LOTS of that on any X. I must be getting old because cleaning old greasy grimy components has become one of my least liked tasks.Scrubby scrubby... degreasing time.
 [Ha, I just noticed this emoji:
  Didn't realize that was considered acceptable. But it fits my comment.]
Did the makeup pads have any chemical cleaner built into them, or were they just dry, cotton pads? Any idea if using headlight buffing techniques would work on the acrylic? Here’s how faded my ‘74 is:@tvmaster 1978, the problem you may find is the acrylic is rivet’d to the surround at the 5 mounting holes so can’t be separated...mine was clear just a bit of surface grime on the inside which I removed the best I could using some ladies round cotton makeup pads...
I replaced the bulbs and cleaned all the contacts with some very fine Emery paper and electrical contact cleaner...
Thanks. Have you ever used any?If you Google "acrylic haze remover", you will find lots of products.
No.Thanks. Have you ever used any?
It’s really hard to tell, but if it’s on the inside, because of the fused system, it will be very hard to polish up. I think I read somewhere there was a chemical in the early plastics which actually caused the acrylic to discolor throughout, which would be permanent, right?@tvmaster no the pads where dry, is that haze on both sides?
Wow, that looks damn good. So the biggest hole was filled with steel mesh, NOT welding?Did a classic "ten-footer" rust-repair job on the back quarter panels. I did a slightly better job of this once upon a time, but that was 20 years ago. The metal on the back right is just absolute Swiss cheese at this point. I used fiberglass body filler as a "base coat" this time, over some steel mesh--hopefully it'll be strong enough to stay relatively straight. Eventually, over the next 30 years or so, I will have replaced all of the rusted-out sheet metal with fiberglass body filler... Rust-proof and lightweight!
The paint is just rattle-can ("Colonial Red", I believe). It's obviously not a perfect match, but once the bumper is back on you won't notice much.View attachment 38498
View attachment 38499View attachment 38500View attachment 38501
View attachment 38503View attachment 38502
Get set to do LOTS of that on any X. I must be getting old because cleaning old greasy grimy components has become one of my least liked tasks.
Before taking the clear cover off, I'd try polishing the outside with something like the others recommended. Then you should be able to tell if it is on the inside also. At that point you can decide if the polish works to your satisfaction and if it is necessary or worth removing the clear cover.It’s really hard to tell, but if it’s on the inside, because of the fused system, it will be very hard to polish up. I think I read somewhere there was a chemical in the early plastics which actually caused the acrylic to discolor throughout, which would be permanent, right?
I don't know if it would work for this, but I recall there have been posts about some "marker pens" that do a good job of recreating that faux chrome look.the difficulty is getting into corners and not damaging the vacuum metallized “chrome”