What did you do to your X1/9 today ?

Do you happen to have a link for one of these LADA window regulators?
I would be EXTREMELY surprised if a Lada (which is based on 124 sedan bodywork) window regulator would fit an X19. A 124 window regulator certainly doesn't fit an X19 , which are also handed (left / right) unlike the 124 type...

Fitting a window regulator isn't difficult once you get the layout and correct crossover of the cables. left and right are mirror image.
x19 right door winder.jpg

SteveC
 
I would be EXTREMELY surprised if a Lada (which is based on 124 sedan bodywork) window regulator would fit an X19. A 124 window regulator certainly doesn't fit an X19 , which are also handed (left / right) unlike the 124 type...

Fitting a window regulator isn't difficult once you get the layout and correct crossover of the cables. left and right are mirror image.
View attachment 70482
SteveC
Do you have to muck with the cabling attached to the windows as well?
 
Last edited:
Do you have to muck with the cabling attached to the wndows as well?
you have the winder cable going thru the two clamping points (for the cable) on the widow lift channel, but don't tighten them up while fitting it / tensioning it, leave them very loose and this will let the cable run thru them so you can then finally clamp the cables in the correct place to have full window movement up/down.

and then lube it all very well once fitted.

SteveC
So that’s a ‘yes’ then? That concerns me. I have bad luck in tight spaces like that.
 
and that odd "egg" shaped thing screwed to the window lift channel is the limit stiop, this prevents the window from going too high and breaking the rubber stopper fitted into the top of the front window guide, you loosen the screw and rotate it (the egg shaped plastic part) to adjust the top limit.

use a piece of broomstick/dowel to hold the window up out of the way while you work inside the door, the cable is going to pass by the point where the clamps are, you just put the small plate over it, and put the screws in very loose so the cable still runs freely and the window stays put (for the moment)

SteveC
 
and that odd "egg" shaped thing screwed to the window lift channel is the limit stiop, this prevents the window from going too high and breaking the rubber stopper fitted into the top of the front window guide, you loosen the screw and rotate it (the egg shaped plastic part) to adjust the top limit.

SteveC
That little guy I've actually had GOOD luck with, lol.
 
was of the understanding that they were "plug and play" in the original locations.
Nope - bumper mounts on genuine bumperette cars are completely different from big bumper cars.

Here are some pics of a genuine bumperette. You can see that the wrap around part has a tapped bolt location. That bolt comes from inside the guard thru a hole you don't have :)

The main mount on the genuine article is completely different from any holes/mounts you have on your car.

People have done mounts to adapt from your tube style to take these sorts of bars. Yours look like fiberglass? If so, they are only decorative so maybe bluetac them on :)

B4.jpgB3.jpgB2.jpgB1.jpg
 
Nope - bumper mounts on genuine bumperette cars are completely different from big bumper cars.

Here are some pics of a genuine bumperette. You can see that the wrap around part has a tapped bolt location. That bolt comes from inside the guard thru a hole you don't have :)

The main mount on the genuine article is completely different from any holes/mounts you have on your car.

People have done mounts to adapt from your tube style to take these sorts of bars. Yours look like fiberglass? If so, they are only decorative so maybe bluetac them on :)

View attachment 70483View attachment 70484View attachment 70485View attachment 70486
@Elanplus2 It would be worth looking at the threads from the past which have images of the brackets people have made to go from a ‘bumper’ car to the decorative bumper solution.

Several of them used the bumper tube openings to carry the mounting and reaching up to where the fiberglass parts should be.

I will look for some of those threads, they may already be labeled in the BOX threads or if you do an advanced search using Tags you can find keywords which have been Tagged onto a thread.

This thread, which still has photos, is the definitive one showing images of finished brackets and even directions from Ricardo on how and what to make. The images show proper placement and so on.

 
Last edited:
That was "relatively" easy to do on the rears however back there his did you secure the wrap around?

Also, I'm CLUELESS as to how to mount the fronts. I have them test fit with tape (pictured), but they certainly don't line up with the factory mounting holes, and there are no directions as how to attach them. Part of my reasoning going with these was I was of the understanding that they were "plug and play" in the original locations. That's not the case, and I'm not a body worker. Any insights/directions you might offer would be greatly appreciated!
If the wrap around doesn't line up with an existing hole, you could leave it unattached (unless it flops) or strong double sided adhesive tape or... drill a hole. I left mine unattached on the side. As for the front, you could ask Andy for instructions. He is very helpful
 
Thanks. Beats me, I figured Dr. Jeff had actually ordered one at some point?
If you look at the site, there's only one type of regulator that has left/right handed versions, just like the X19.... BUT ... look at the pictures and they are obviously different in the bracketing that mounts them' The X19 regulator has all three studs on the same level... the lada one has two studs much lower than the other... and I also doubt the cable length would be the same

I think you could probably use a 78 on X19 regulator, and compare the roller positions from your 74 doors to some 78 doors, and reposition the rollers (if possible) to account for the difference in cable length

SteveC
Thanks man, I’ve sent MWB an email to see what solution they may have in stock - will post results :)
 
Thanks man, I’ve sent MWB an email to see what solution they may have in stock - will post results :)
Well I can't help, I only have OEM FISPA regulators for the 78-84 with the longer cable... got a box full of lefts though, as the passenger side here in Australia seems to be a less popular seller.
20230209_235235.jpg

SteveC
 
Well I can't help, I only have OEM FISPA regulators for the 78-84 with the longer cable... got a box full of lefts though, as the passenger side here in Australia seems to be a less popular seller.
View attachment 70490

SteveC
Guess no scrubs riding in X19's down there?
So wait a second - you've got a box full of 'lefts'? Aka the driver's door in North America, for a '74 (shorter cable)? Is that correct?
 
Last edited:
Kermit is stored for the winter, today it is a good day to open the door garage and warm up Kermit until she get out at spring.

Warming up the car during winter storage to lubricate the top of the engine and other components until spring.
At the same time I try video editor for the GoPro ... Sorry for the "Movavi" Watermark ...

FYI the valve train is more noisy since I have installed a more aggressive cam... Everything is normal with this cam. The valve shim gap is set to the appropriate value but it is little bit more noisy.
Kermit warm up video.
 
Last edited:
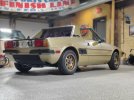
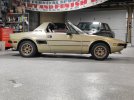
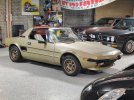
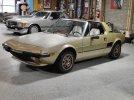
BUMPER UPDATE! After a combined 7 +/- hours, the slim style Euro Bumpers and signal lights ala Andy Shaw ( krellcenturion@yahoo.co.uk ) are installed on #restoration78 ! A few notes...
I knew this going in, but these are STRICTLY for aesthetic purposes.

Be prepared to drill into your sheet metal. Combined my car has 8 new holes to accommodate the installation.

Dremel's are your friend. Some minimal shaving will likely be required to get the fit you want (just on the fronts for me).

I opted not to install the faux over-riders.

My new front indicators (still to be wired) are mounted to the removable panels below the bumper. I drilled them to accommodate the two mounting bolts, and a center hole to pass the wiring through (now that I think of it that adds another six holes in the bodywork). I tach-welded nuts to the back side of the panels to attach to.

Lastly... "What about the ugly original bumper shock holes on the front?"... PVC plumbing plugs VERY close to the i.d. of the factory grommets painted black suit the bill just dandy, IMHO.

Special thanks to my beloved brother @n8-fx for his tooling advice and ability to talk me off the frustration ledge.

Here's to Spring coming quickly, and the rest of the sorting of the car going smoothly!

#fiat
#fiatx19
#fiatx191300
#bertone
#restoration
#refurbishment
#doityourself
#carsovercovid
#vinyardautoclub
 

Attachments

  • IMG_20230211_164350.jpg
    IMG_20230211_164350.jpg
    445.8 KB · Views: 91
  • IMG_20230211_164320_Bokeh.jpg
    IMG_20230211_164320_Bokeh.jpg
    224.1 KB · Views: 82
  • IMG_20230211_164246.jpg
    IMG_20230211_164246.jpg
    363.5 KB · Views: 89
  • IMG_20230211_164231.jpg
    IMG_20230211_164231.jpg
    392.2 KB · Views: 94
  • IMG_20230211_164200.jpg
    IMG_20230211_164200.jpg
    320.6 KB · Views: 92
Back
Top