
You are using an out of date browser. It may not display this or other websites correctly.
You should upgrade or use an alternative browser.
You should upgrade or use an alternative browser.
What did you do to your X1/9 today ?
- Thread starter Eastep
- Start date
JDExSquid
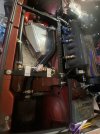
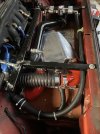
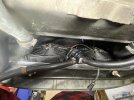
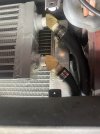
Dodge 2.2TII Swap
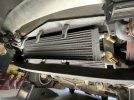
Replaced the air to air Intercooler with a water to air setup. Hopefully this will allow me to safely increase boost.Good progress on the swap. Cooling system is done. Figured I’d mount the refurbished rear light assemblies. Rear control arms done.
Attachments
-
 3BC42BC3-F26F-4618-BFE8-EBAD05AC3FC6.jpeg154.2 KB · Views: 114
 -
 6925B3C2-B548-4893-A219-45E3076C4CD3.jpeg199.4 KB · Views: 101
 -
 FC89D532-8674-4D91-8A84-396BA90BACCB.jpeg272.8 KB · Views: 99
 -
 948E2D7F-15E1-45B5-B3FB-51D7EF1082E1.jpeg322.4 KB · Views: 101
 -
 A703EE2E-59E3-4506-AA52-FAFA4E5B1842.jpeg193.6 KB · Views: 99
 -
 4B75268D-6C84-4CA8-A73A-FEF5471364F1.jpeg344.7 KB · Views: 105
NEG
True Classic
Head re-torque done. All bolts and nuts snugged down further by one flat (1/6) of a turn following Steve's advice. I’d used ARP Torque lube on the threads and under the heads and was surprised at the consistency on each bolt, recommended.
As I had to removed the cambox I rechecked the cam clearances and a few were too tight for comfort so a few shims on order to get them back in spec.
As I had to removed the cambox I rechecked the cam clearances and a few were too tight for comfort so a few shims on order to get them back in spec.
Jonohhh
True Classic
Kind of...
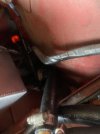
area marked in red is the chassis rail / bodywork.... won't move
area marked in green is the removeable splash shield / tinware... comes off with a few screws to access the front lower engine area
View attachment 70722
SteveC
No. Freaking. Way.
This panel marked in green comes off?!?!
Maybe the car didn't deserve the words I had to say about it whenever I had to replace/remove/rid myself of ever having to look at the mechanical water pump.
I guess we learn something new every day. I'm nowhere near my X1/9 but I figured I'd stop by the forums. I miss you folks

fiatfactory
Steve Cecchele
Remove the cambox, you're doing it the hard way... why haven't you ordered the correct tool for the job, they are readily available and quite cheap, it's a 3/4 inch tool made for an aircraft engine, but fits the 19mm head fasteners of the sohc quite nicelyHead re-torque done. All bolts and nuts snugged down further by one flat (1/6) of a turn following Steve's advice. I’d used ARP Torque lube on the threads and under the heads and was surprised at the consistency on each bolt, recommended.
As I had to removed the cambox I rechecked the cam clearances and a few were too tight for comfort so a few shims on order to get them back in spec.
@NEG At the risk of repeating myself, I'll do a cut/paste of my retorque method here, just incase you missed it.
The M12 bolt / stud combination is always a retorque style engine, and uses a retorque style head gasket. It absolutely needs a retorque after a heat cycle and again after several hundred Km. Failing to do so will lead to a head gasket failure.
First torque on assembly. multiple stages, the more the better so the head clamps down evenly, 15/30/45/60 or 20/40/60 and then finally 69 lb/ft. This is going thru all the bolts /nut one at a time in torque sequence to each value, then stepping up the wrench to the next value, and repeating for the other nine fasteners... it takes a little while, but certainly pays dividends by only having to do the head overhaul / gasket replacement once.
First re-torque after one heat cycle... run car, fan cycles on / off maybe three times, shut her down. Let it completely cool, overnight is best, retorque in the morning when the ambient temp is coolest. A second re-torque, I usually do after maybe 100 miles (160km) again completely stone cold.
For retorques the procedure I follow is...In torque sequence order, one bolt/nut at a time, loosen the bolt/nut around 1/4 to 1/2 a turn with a breaker bar, retighten back the same amount. (I use a paint marker on the bolt nut to get it back to pretty close to its original position) Then swap the breaker bar for the torque wrench and using steady slow and even pressure on the torque wrench, take it straight up to the final torque value (9.5kg/m) Then go on and do the other nine head fasteners in precisely the same sequence, loosen/nip up/retorque.
ROFLMAO... let me guess, you're an engineering student?No. Freaking. Way.
This panel marked in green comes off?!?!
Maybe the car didn't deserve the words I had to say about it whenever I had to replace/remove/rid myself of ever having to look at the mechanical water pump.
I guess we learn something new every day.
SteveC
kmead
Old enough to know better
You are always welcome regardless of what you are doing.No. Freaking. Way.
This panel marked in green comes off?!?!
Maybe the car didn't deserve the words I had to say about it whenever I had to replace/remove/rid myself of ever having to look at the mechanical water pump.
I guess we learn something new every day. I'm nowhere near my X1/9 but I figured I'd stop by the forums. I miss you folks
NEG
True Classic
Many thanks Steve, I did follow your guide so really appreciate your help. I’ve not managed to find one of those 3/4 aviation cranked wrenches here in the UK and buying from the US is expensive. I’ll keep looking though. I needed to remove the cam box anyhow to a change the cam shims, i’ve never managed to get the special tool to work and find it easier just to pull the cam box.
NEG
True Classic
Ah, found it. Just needed the correct search terms…
 www.lasaero.com
Continental / Lycoming Cylinder Base Wrenches LAS Aerospace Ltd
www.lasaero.com
Jonohhh
True Classic
Indeed. Being entirely oblivious to something that makes life far easier is a dead giveaway, huh?ROFLMAO... let me guess, you're an engineering student?
SteveC
I'm really curious if my car has this panel installed. It's been so long since I worked in that area, I can't remember entirely what it looks like. It's possible mines missing and it was the frame/rail in the way of the pulley. We'll see.
I'm slowly learning just how many pars my car is missing.
Jonohhh
True Classic
You are always welcome regardless of what you are doing.
I appreciate it. At the very least, my recent fiat-involving activities are with my Abarth. The tune is getting there, last night I happened to pull bus-lengths on a mid 2000s mustang GT. Not too bad for a little 1.4. I usually shy away from moronic street behavior, but every once and a while it's needed.
Edit: I didn't realize how slow those were. Whatever, I'll ignore that.
fiatfactory
Steve Cecchele
Well, it's more that a lot of engineers tend to focus so hard on what is straight ahead, they don't stop and take the time to look left and right ... tunnel vision.Indeed. Being entirely oblivious to something that makes life far easier is a dead giveaway, huh?
It will serve you well in your chosen profession to remember this from time to time, just saying - not a personal criticism.
SteveC
Jonohhh
True Classic
I could not agree more. It is an extremely valuable bit of advice that I think too many young engineers don't take to heart. I am a mechanic/hands-on type of person from the start, now learning the engineering aspect. However, after years of being buried in books, I occasionally catch myself being oblivious to things "outside the box", and have to remind myself not to hyperfocus (or get tunnel vision) when working in the real world.Well, it's more that a lot of engineers tend to focus so hard on what is straight ahead, they don't stop and take the time to look left and right ... tunnel vision.
It will serve you well in your chosen profession to remember this from time to time, just saying - not a personal criticism.
SteveC
Ironically, those who are proficient in the real world tend to do poorly in the classroom. Most students nowadays have an astounding lack of hands-on experience, and since they are the majority, the courses teaching style is often catered to them. It's unfortunate.
Dr.Jeff
True Classic
My current X project does not have that panel installed. It is the frame / chassis structure that is in the way. However this is a AC equipped car so the alternator is located differently from a non-AC one. Therefore it may depend on your specific situation; there were various alternators and configurations used over the years.Indeed. Being entirely oblivious to something that makes life far easier is a dead giveaway, huh?
I'm really curious if my car has this panel installed. It's been so long since I worked in that area, I can't remember entirely what it looks like. It's possible mines missing and it was the frame/rail in the way of the pulley. We'll see.
I'm slowly learning just how many pars my car is missing.
Jonohhh
True Classic
I'm definitely curious to look at mine now, next time I can. I also have an AC car, and the pump could not come out without removing the pulley first, which is easier said than done given the amount of clearance between the frame rail.My current X project does not have that panel installed. It is the frame / chassis structure that is in the way. However this is a AC equipped car so the alternator is located differently from a non-AC one. Therefore it may depend on your specific situation; there were various alternators and configurations used over the years.
Regardless, if my car does have this panel, removing it probably would have made it less terrible.
Dr.Jeff
True Classic
I purchased a X that had been taken out of service simply because they could not get the old worn-out water pump off. It even came with a new pump, T-stat, belts, gaskets, etc, to do the job. There was a couple of misc hand tools still laying on the passenger side of the engine bay. Apparently this was the last straw that made the prior owner finally give up on X1/9's. It was still parked in his backyard exactly where he had begun working on it 10 years prior, with a handful of parts removed and the old water pump loose but not removed. It was also a AC equipped model.I'm definitely curious to look at mine now, next time I can. I also have an AC car, and the pump could not come out without removing the pulley first, which is easier said than done given the amount of clearance between the frame rail.
Regardless, if my car does have this panel, removing it probably would have made it less terrible.

fiatfactory
Steve Cecchele
My very first Fiat, a 128 sedan back when I was maybe 14 or 15 (so over 40 years ago) ... first task - after a complete used engine replacement as I bought the car for very little money with a rod bearing knock - was a water pump. (which I foolishly didn't do while the replacement used engine was sitting on the ground)I'm definitely curious to look at mine now, next time I can. I also have an AC car, and the pump could not come out without removing the pulley first, which is easier said than done given the amount of clearance between the frame rail.
Regardless, if my car does have this panel, removing it probably would have made it less terrible.
Up to the early 70's Fiat would use studs and nuts for every fastener that threaded into aluminium, this included the fasteners where the water pump mounted to its alloy housing. I managed to get the nuts off that held the pump to the housing, but when I withdrew the pump from its housing, it wouldn't come out of the bodywork as it didn't clear the studs in the housing ... arrgh... I'd just spent what felt like hours just to get those four nuts off.
Stopping / stepping back and having a look at the situation, I realised if I removed one more bolt - the one where the front engine mount attached to the bodywork - and lifted the engine with a jack/block of wood under the sump and tilted the engine up at that end , it would give enough clearance to the frame rail and the pump came out easily...it also gave a lot more room to get to the nuts for re-assembly. Lifting that end of engine should have been step one.
Now I have never worked on an air conditioned X19, it just wasn't an option here in the Australian market. I'm sure it's a tight squeeze, but I'd hazard a guess that tilting the engine up (and removing the splash shields and the trunk access panel) would give enough access to remove the pump and get to the pulley bolts, in what probably is a multi-step process due to the relocation of some components (compared to non a/c)
SteveC
Steve Thomas
True Classic
Which is the correct way to do it.studs and nuts for every fastener that threaded into aluminium,
Jonohhh
True Classic
My very first Fiat, a 128 sedan back when I was maybe 14 or 15 (so over 40 years ago) ... first task - after a complete used engine replacement as I bought the car for very little money with a rod bearing knock - was a water pump. (which I foolishly didn't do while the replacement used engine was sitting on the ground)
Up to the early 70's Fiat would use studs and nuts for every fastener that threaded into aluminium, this included the fasteners where the water pump mounted to its alloy housing. I managed to get the nuts off that held the pump to the housing, but when I withdrew the pump from its housing, it wouldn't come out of the bodywork as it didn't clear the studs in the housing ... arrgh... I'd just spent what felt like hours just to get those four nuts off.
Stopping / stepping back and having a look at the situation, I realised if I removed one more bolt - the one where the front engine mount attached to the bodywork - and lifted the engine with a jack/block of wood under the sump and tilted the engine up at that end , it would give enough clearance to the frame rail and the pump came out easily...it also gave a lot more room to get to the nuts for re-assembly. Lifting that end of engine should have been step one.
Now I have never worked on an air conditioned X19, it just wasn't an option here in the Australian market. I'm sure it's a tight squeeze, but I'd hazard a guess that tilting the engine up (and removing the splash shields and the trunk access panel) would give enough access to remove the pump and get to the pulley bolts, in what probably is a multi-step process due to the relocation of some components (compared to non a/c)
SteveC
It's funny you mention this, as this is how I ended up replacing the snail mount bushing at the same time as the water pump removal. I was able to gain more clearance, just enough for an open ended wrench on the pulley bolts, by lifting the engine. Having to lift the engine was part of the annoyance given the simplicity and how close it was to being possible without all of that. However, I'll trade a few extra steps over struggling for hours any day.
I'm surprised to hear it's a pain on the 128 as well- I figured the lack of access was due to the mid engine placement.
The AC does indeed add some annoyance to just about everything, but at least I no longer have to worry about the split pulley and pump
JDExSquid
Dodge 2.2TII Swap
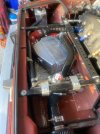
First setup was not good. I couldn’t bleed the pump and it just cavitated. I wound up installing a header tank and installing the pump under it. Now the pump works as it should.Replaced the air to air Intercooler with a water to air setup. Hopefully this will allow me to safely increase boost.
Attachments
One of the local photographers took a nice picture of me and my 85X rolling into the CnC this morning.  It was a little cold and windy, but there was a really good turnout. The parking lots were packed with cars and people. Everybody in STL is getting itchy for Spring to come around.

It was a little cold and windy, but there was a really good turnout. The parking lots were packed with cars and people. Everybody in STL is getting itchy for Spring to come around.