
You are using an out of date browser. It may not display this or other websites correctly.
You should upgrade or use an alternative browser.
You should upgrade or use an alternative browser.
What did you do to your X1/9 today ?
- Thread starter Eastep
- Start date
Brayden_connolly
True Classic
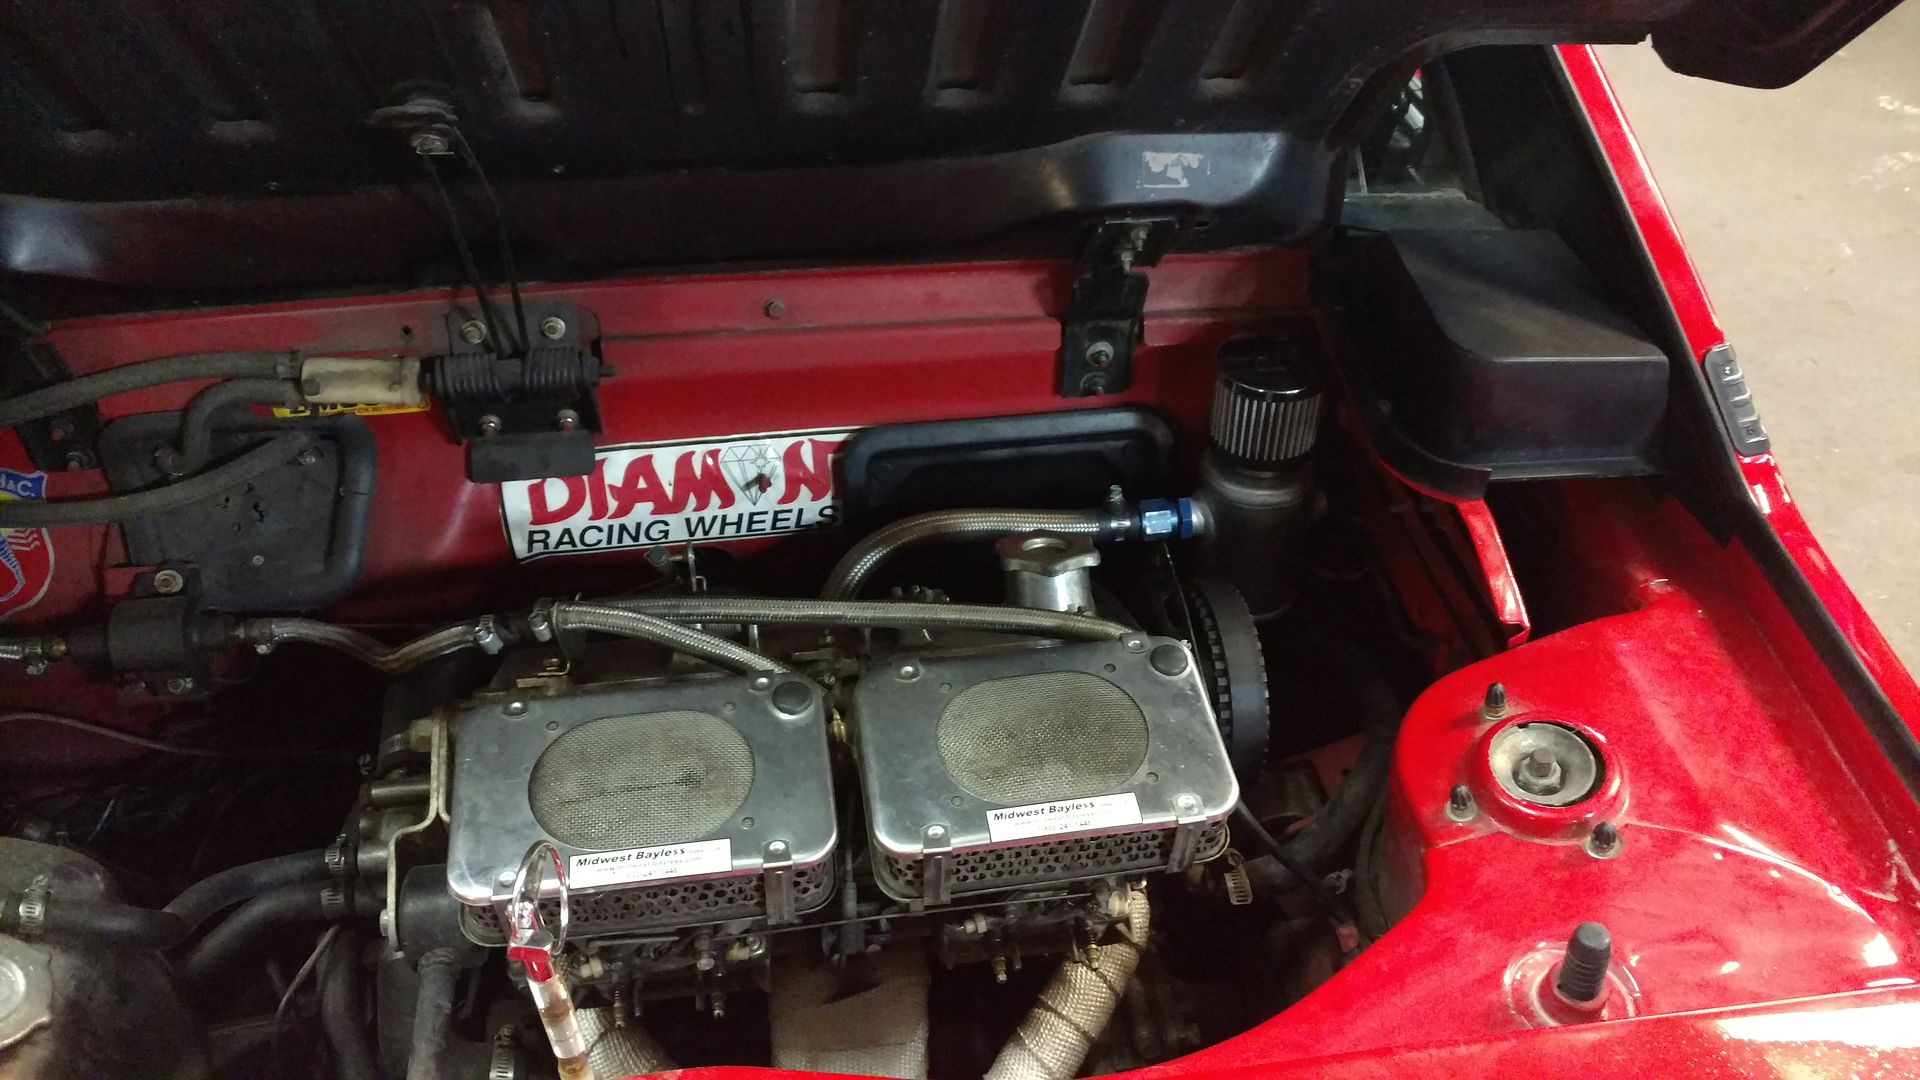
Installed a catch tank today but forgot to detail the engine bay...
Ananda
True Classic
major modification, I replaced the missing nuts on the exhaust manifold. Now it feels relatively civilized. Learning slow over here. I could only see 2 bolts that needed nuts from the top. I'm guessing that if there are others, they probably have nuts or the manifold would've fallen off?
Dan Sarandrea (Phila)
Waitin' On Parts...
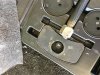
The manifolds have seven studs, washers and nuts that secure them. There are four short studs, two medium length studs, and one long. The four short ones are the two outers on each side. The two mediums are the inners, one on each side. The central stud is the longest as it has to go thru the thickest part of the exhaust manifold.
On my car, I have replaced the standard washers with thin hardened washers (found at the local Ace hardware store of all places!) that "fill up" the machined pad on both the FI runners and exhaust manifold, thinking that it better distributes the clamping load, and replaced the standard nuts with the copper coated self-locking nuts sold by Midwest-Bayless. It's good practice to use anti-seize on both ends of the studs when installing.
The factory heat shield for an FI car may obscure some of the attaching studs and nuts. The heat shield itself attaches to the exhaust manifold on three studs that stick out of the manifold.
On an FI car, if the plenum log is off of the runners, it's easy to see the manifold studs. If the plenum log is in place, then you might need a good mechanics mirror to see. Most of the time that I have futzed with the manifold studs the job at hand also required the Runk-to-engine-compartment panel to be removed, which gives you a direct shot at the studs with a long 3/8" extension.
Last edited:
Rod Midkiff
True Classic
Wife did REAR breaks on her x1/9 today.


I did have to do some repair work on the NEW tool for turning the caliper pistons in. (I twisted the little handle off) so I welded a large nut on instead.

Here is the cause of the sound she asked about.

I am not used to this supervising job....
But she did the break job. I only helped with the tool (We had to run into town to buy it and then spend about an hour fixing it).
We then went on to figure out the dead cylinder issue. (turns out no compression on #2). Open the cam box and turn the motor over so both lobes were up and pushed compressed air in. sounds like it's all tail pipe. Rats.. Well not pulling the head until after the Ashland trip it went last year as a 3 cylinder it will go again. We did replace the missing exhaust nut's that were missing. I don't think it was bad enough to turn burn a valve. But we will see when we pull the head.
I did have to do some repair work on the NEW tool for turning the caliper pistons in. (I twisted the little handle off) so I welded a large nut on instead.
Here is the cause of the sound she asked about.
I am not used to this supervising job....
But she did the break job. I only helped with the tool (We had to run into town to buy it and then spend about an hour fixing it).
We then went on to figure out the dead cylinder issue. (turns out no compression on #2). Open the cam box and turn the motor over so both lobes were up and pushed compressed air in. sounds like it's all tail pipe. Rats.. Well not pulling the head until after the Ashland trip it went last year as a 3 cylinder it will go again. We did replace the missing exhaust nut's that were missing. I don't think it was bad enough to turn burn a valve. But we will see when we pull the head.
Attachments
Isotope9
Daily Driver
Replaced the fuel sending unit. It was the original and the screen was absolutely covered in rust fur (for lack of a better term) and the float was half filled with fuel, which is why I was getting wonky fuel level readings.
I also replaced the rubber fuel filler neck...another original part that was well past due for replacement. The visible section had no cracks, but upon removing it, I discovered why the car would pissed fuel all over the ground when topping it up from a jerry can...which I did frequently because the fuel gage didn't work. I ran out of gas in my driveway when I first brought the car home from my father's and have been paranoid ever since.
Mounted the headlight trim rings...what a PITA that was.
Up next, roll the front fenders, install the spare tire cover and start looking at the suspension.
I also need to find some suitable replacement mirrors that can me mounted on the top of the door...the car currently has the flag style mirrors from MWB, but for some reason, my father mounted them on top of the door, flush against the glass trim, but they 1) overhang by almost a 1/4in and 2) they can't be adjusted low enough to actually be of any use. I'm hoping I can find something that will cover the existing holes as I'd prefer not having to repair/paint the screw holes.
Thx,
Rob

Are those the "IGEE" covers Joe. They look nice, especially for the price. I see a seller named "Covervcraft" sells them also.
kmead
Old enough to know better
On my 1985 two tone gold and brown X I did the following:
Drained the gas tank, replaced the supply and return hoses to the tank and the fuel pump. I learned that when the low level light is solidly on with this fuel sender, that there really is not much fuel left in the tank. Like about a half gallon, so fill it up when that light comes on. I ran it low on purpose so I wouldn't have multiple gallons to drain into a container. Just didn't quite realize how little I had left...
Changed out a right rear tail light housing for one I received a long while ago from Greg Smith (thanks!) they are better than the PO repair on the brake light housing (which wasn't really a repair at all just gloming on a bunch of silicone). I may be looking for a broken housing from someone so I can drill out the contacts for the brake light to put into my old housing which is otherwise in good condition.
The temp gauge has been reading unusually low which had me thinking it was time for a new thermostat and giving me a (false) sense of security that the nice old radiator works amazingly well. So I pulled the rubber boot off the temp sensor to find that the wire was no longer attached to the female spade connector (which was broken off and the wire stripped back to "touch" the sensor), it was making intermittent contact with the connector. The previous owner was definitely a piece of work, the list of other things I have found over the years (and continue to find) are not mind blowing but definitely a bit frustrating. Amazingly the car runs very well and doesn't give me a hard time.
I finally installed my extremely nice red spark plug wires I had bought from Doug (RX1900) a while back. I chose to install them now after pulling off a few of the old leads (bought them from Art Bayless back in 1993 when I bought the car) to find the contacts inside the boot on #3 quite rusty and corroded. Needless to say the new set fits wonderfully with no excess cable length and very nice quality. Thanks Doug great product! Put me down for another set or two.
That's all for today.
After I get home from vacation in August I will be replacing all the injector hoses on both cars which looks to be a "fun" little job with lots of secondary disassembly to get to the fiddly bits...more parts to buy from MWB")
Drained the gas tank, replaced the supply and return hoses to the tank and the fuel pump. I learned that when the low level light is solidly on with this fuel sender, that there really is not much fuel left in the tank. Like about a half gallon, so fill it up when that light comes on. I ran it low on purpose so I wouldn't have multiple gallons to drain into a container. Just didn't quite realize how little I had left...
Changed out a right rear tail light housing for one I received a long while ago from Greg Smith (thanks!) they are better than the PO repair on the brake light housing (which wasn't really a repair at all just gloming on a bunch of silicone). I may be looking for a broken housing from someone so I can drill out the contacts for the brake light to put into my old housing which is otherwise in good condition.
The temp gauge has been reading unusually low which had me thinking it was time for a new thermostat and giving me a (false) sense of security that the nice old radiator works amazingly well. So I pulled the rubber boot off the temp sensor to find that the wire was no longer attached to the female spade connector (which was broken off and the wire stripped back to "touch" the sensor), it was making intermittent contact with the connector. The previous owner was definitely a piece of work, the list of other things I have found over the years (and continue to find) are not mind blowing but definitely a bit frustrating. Amazingly the car runs very well and doesn't give me a hard time.
I finally installed my extremely nice red spark plug wires I had bought from Doug (RX1900) a while back. I chose to install them now after pulling off a few of the old leads (bought them from Art Bayless back in 1993 when I bought the car) to find the contacts inside the boot on #3 quite rusty and corroded. Needless to say the new set fits wonderfully with no excess cable length and very nice quality. Thanks Doug great product! Put me down for another set or two.
That's all for today.
After I get home from vacation in August I will be replacing all the injector hoses on both cars which looks to be a "fun" little job with lots of secondary disassembly to get to the fiddly bits...more parts to buy from MWB
Last edited:
Joe F
Hi Miles, Lo Maintenance
Are those the "IGEE" covers Joe. They look nice, especially for the price. I see a seller named "Covervcraft" sells them also.
Yes, the box said "IGEE". They are a tight fit, I had to remove the seats to install them. Actually, separating the seat back and bottom would have been ideal, but the PO stripped the hex bolts on the side plate on the seats and I didn't want to fuss with it. They are comfy too!
Thanks Joe. Does that mean you left the original covers on? I was planning to take them off before putting the new ones on. Of course, I haven't ordered them yet.Yes, the box said "IGEE". They are a tight fit, I had to remove the seats to install them. Actually, separating the seat back and bottom would have been ideal, but the PO stripped the hex bolts on the side plate on the seats and I didn't want to fuss with it. They are comfy too!
Joe F
Hi Miles, Lo Maintenance
Thanks Joe. Does that mean you left the original covers on?
I slipped them over the original (torn) fabric. I did both seats in about 3 hours, of course the 87's have an easier seat mounting scheme than earlier cars.
kmead
Old enough to know better
Coolant temp still reads low going down the road but will rise when sitting to 190. I haven't let it idle for longer than it took to get a bit past 190 so although I believe the fan will run, I dont know that it runs properly. More experimenting to come.
Glad I changed out the fuel lines, they were not tight anymore and the clamps were no longer possible to tighten given rust and line compression.
Glad I changed out the fuel lines, they were not tight anymore and the clamps were no longer possible to tighten given rust and line compression.
ecohen2
True Classic
I replaced the original distributor cap and rotor today... The original one only had about 8k miles on it, but was making a loud clack clack noise as the rotor spun. I am not sure what was going on, but the new one is quiet and seems to work fine... Thanks Midwest Bayless!
kmead
Old enough to know better
I replaced the original distributor cap and rotor today... The original one only had about 8k miles on it, but was making a loud clack clack noise as the rotor spun. I am not sure what was going on, but the new one is quiet and seems to work fine... Thanks Midwest Bayless!
It may have been placed off center or the plastic cover over the coil in the distributor may be work allowing you to install it slightly off. Making sure the cap is fully seated down on the distributor is important, I know I have managed to not put it on properly.
Was there evidence of the rotor hitting the interior of the cap and its contacts?
Not today, but this past weekend.
Lots of rust fixing.
-Fixed mild to moderate rot on both doors
-Fixed mild rust on drivers side front and rear fenders and passenger side rear fender.
-Fixed moderate rust on rear section of drivers side rocker pannels.
-Fixed moderate rust underneath the trunk weather stripping.
-Fixed mild rust around flying buttress rear trim.
-Fixed mild rust on top of rear quarter pannel.
-Welded in a new frunk rain gutter (P/O cut it out with tin snips).
-Scrapped off all old peeling undercoating on the whole car, sprayed everything with rust neutralizer, and then applied new undercoating.
Car is now rust free except for:
-Moderate rust around the windshield
-Floorpans that have rotted to nothing.
-Extremely rotted rear valence.
Rear valence is no big deal - just buy a clean one and bolt it on.
I'm hoping to address the windshield rot this weekend, and the floor pans next weekend. (Have to do the windshield rot first because theres a small leak in one spot that would quickly rot out new floor pans.)
------------------------------------------------------------------------------
Couple weekends before that:
-Installed new aluminum radiator
-Installed new rubber coolant hoses
-Installed new water pump
-Installed new thermostat
-Installed new alternator and water pump belts.
-Installed new axle shaft seals, shift rod seal, preload gasket.
-Repaired crack in transmission case
-Fixed drivers side door alignment
-Installed new steering rack passenger side bushing (the one inside the rack).
-Installed new shift linkage boot, lolipop, and screw pin.
-Fixed driving light wiring issues
-New fuel pump, fule pump mounts, filter, fuel lines
-----------------------------------------------------------------------------
Next big things on my list are:
-Full set of struts and mounts (all are completely shot)
-Full set of suspension bushings (current ones aren't the worst I've seen, but it'd definitely help)
-Refresh entire ignition system (coil, cap, rotor, wires)
-Replace timing belt. Usually I'll drive a car until it breaks if it's non-interfereance. However this way I'll have a good excuse to make certain the timing and ignition are set right.
-Blower motor.
-Pull the fuel tank and confirm whether or not everytihing is in good shape. I need to figure out how to get the tank to fill faster. Going to the gas station is a major PITA for me. Can't stand NJ not allowing you to pump your own fuel. Every single time the sequence is like this:
Pull up to pump. Tell gas attendant the car is really hard to fill. Offer to do it myself. Gas attendant says "No, I can do it." Gas attendant proceeds to try to fill tank for about 3 minutes, says "sure your tank isn't full." I reply, "no not full, the pumps just push too much gas through the narrow filler neck so it backs up and trips the pump." Gas attendant proceeds to try for another 2 minutes. I offer to do it myself again. Finall agrees to let me do it. Takes me about 15 more minutes to fill. It's driving me insane. People have told me this is "normal" or is a "factory designed feature" for these cars. I don't believe it. I'd much rather pull up to the pump, give the attendant two 5 gallong jerry cans to fill and then turn around and pour them into my tank with a funnel. *End Rant*
Then there's about 1 billion small things. My goal is to make the car drivable (got there), then dependable (almost there), then presentable (about 35% there).
Last edited:
Pete Whitstone
True Classic
Pull up to pump. Tell gas attendant the car is really hard to fill. Offer to do it myself. Gas attendant says "No, I can do it." Gas attendant proceeds to try to fill tank for about 3 minutes, says "sure your tank isn't full." I reply, "no not full, the pumps just push too much gas through the narrow filler neck so it backs up and trips the pump." Gas attendant proceeds to try for another 2 minutes. I offer to do it myself again. Finall agrees to let me do it. Takes me about 15 more minutes to fill. It's driving me insane. People have told me this is "normal" or is a "factory designed feature" for these cars. I don't believe it. I'd much rather pull up to the pump, give the attendant two 5 gallong jerry cans to fill and then turn around and pour them into my tank with a funnel. *End Rant*
My tank is nowhere near as hard to fill as this, but it can be can-tank-erous...
I've found it helps to hold the fuel filler so the handle is facing the back of the drivers seat. Basically 180 degrees from the position you would logically put it in. It seems to give a somewhat straighter shot down it's throat and trips the pump less often. Still can't blast it in there on full handle, more like the first locking click.
Pete
I've tried basically everything I can think of including that. The big problem is the vast majority of the gas stations around here have pumps that are either operating at 100% flow or 0% flow regardless of how much you pull the handle.
If I get lucky and find an older pump that will let you control the flow by changing the pressure on the handle and position the pump as you suggested, I can get it to fill at a constant, but extremely slow rate. That will get the job done in about 10 minutes instead of 20.
But I still have to go through the whole routine with the gas attendant which is really annoying. If there is indeed genuinely nothing wrong with the car, then I have to come up with a better custom solution. Maybe frankenstien together a filler neck from a different car. . .