What did you do to your X1/9 today ?

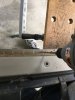
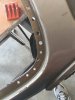
The new cable I purchased did not have enough tail to either bend over the Ferrel or put a cable clamp on. So I just crimped the Ferrel with everything I could do. And carefully tested it and it pulled right now with hardly any pressure. (was already not overly happy with going back to a solid cable and had kinda kicked myself for not just doing the stranded cable thing anyway, but just want it to work I went with factory. It works well now with stranded cable.

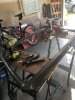
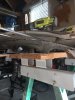
I still have the solid cable that I removed and tossed on the scrap pile I can take pictures to try to show what I am talking about if that would help.
 
I get what you mean, thanks.

If I'm not mistaken this might also depend on what year X you have. The early ones don't have a "pull and push" mechanism like the newer ones. Aren't the early ones spring loaded, so you only need to 'pull' to open and it self-latches when closed? A stranded cable may not work as well for the later version that needs to be 'pushed' back in to latch the hood. Which one are you using it on?
 
So a "stranded cable" may not work on the later 'pull/push' type latch? It would be like "pushing rope" (old expression used in a completely different context).
 
No, I just put in a stranded cable in my 86 (the latch also pulls with a spring) so you are not really pushing the cable at all just pulling it back with more force then the spring is pulling it away from you.
 
Hummm, I'll have to look closer. My '79 is definitely a pull-push lever. My '85 has a broken cable so not sure, but I assumed it was the same as the '79. Not so? And I believe the '74 to '78 are all the pull-only (spring loaded) latch?
 
The cable on the late units only really pulls. The latch is such that when you release the cable tension, the upward force of the seals on the hood act against the well lubricated latch to open and the cable moves the rest of the way back.

If you watch the hood when you latch put the hasp down onto the lock, first the lock latch rotates to start the locking process and then with the handle, the lock continues to rotate and pulls the hood down into the seals and against the adjustable stops.

You really want to keep the hood lock well lubed, if it gets to the point where it doesn’t want to rotate the lock latch you are going to break the cable and it won’t automatically rotate around when the tension releases from the now broken cable and you pull the hood upward. Not a happy circumstance.
 
I lifted my X1/9 today.

IMG_1278[1].JPG
 
Yes it VERY close to the lights above and still not as high under the car as I would like. Next step is A) put a roof over this structure and move this structure down the driveway (making the shop space longer) B) use the lift to raise the room and add some extenstions to the 4x4 posts. (even if I do plan B plan A is still on the list of wants) as this structure is rotten and leaks on the left side. Was thinking about this most of last night after taking the picture.
 
Made some more progress this weekend.
Get the car waayyy up in the air.
20180527_123558.jpg
20180528_081548.jpg
It went in very easy. It was almost seemed like the car wanted its motor back in.
20180528_081045.jpg

Topping up the fluids.
 
Looks great. What type of paint did you use for the trunk?

Thanks for the good comment.

After completing rust repair, I put two coats of por 15 then top coated with two coats of Rustolium high heat engine paint.

I am very happy with the por 15 properly prepped I think it is a very durable base coat.
Of coarse a proper automotive paint with hardener would have been the best option. But for me, the Rustolium worked surprisingly well it layed on a nice and smooth satin finish.
 
Especially with the outrageous prices of automotive paints these days. For places like under-carriages, wheel wells, engine bays, trunks, even interiors, where there will not be a lot of exposure to sunlight and the elements, a basic paint like Rustolium is great. I've even seen some very nice results from rattle-cans. Perhaps it would be different for a pro-level show car or a quarter-million dollar collectible. But for a old project car that is intended as a fun driver, no need to get carried away with twice the car's value in paint materials. Looks good.
 
I've been using the Rustoleum 500F engine paint and primer on engine parts, suspension, brake, and all the lower panels in the engine compartment. It has worked well except for a bad batch that had a strange problem. The recoat time is specified as less than 1 hour or greater than 24 hours. I ran into a couple of cans that worked fine with an under 1 hour recoat, but after 24 hours they acted like paint remover. I waited a week to recoat and that seemed to work. This was all under pretty nominal conditions (~65F, low humidity). I contacted Rustoleum and they were very apologetic. They sent me a check for the bad paint and also for new primer. No check for the several hours of rework time however.

I have also used their 2000F high heat paint and primer for my headers and exhaust. They recommend a three step heat curing cycle (you can do it on car using engine heat as an alternative) culminating in a 600F bake. The results look excellent - just like powder coating. The headers only have about a minute of run time on the engine run stand so I cannot comment yet on the durability. The last time I painted the headers, I used the Rustoleum 500F engine paint and most of it survived a few thousand miles of use and 22 years of storage. The 2000F stuff is supposed to handle the exhaust temperatures much better.
 
I spent most of the day working on the donor windshield surround. Drilled out 54 spot welds three times each to get to the correct diameter to consume the weld. Most of the spot welds have surrendered but some still hang on. Love it when they spot welded twice in almost the same spot when they built these beauties. Now I have to repeat the same on my ‘81. Tons of work goes into theses cars that no one sees when the car is finished.
 

Attachments

  • 2AB73EE8-7A2B-44DE-BA49-865536F382C2.jpeg
    2AB73EE8-7A2B-44DE-BA49-865536F382C2.jpeg
    166.4 KB · Views: 138
  • 0ADA9322-10AC-408A-9DCE-B106C05C011F.jpeg
    0ADA9322-10AC-408A-9DCE-B106C05C011F.jpeg
    150 KB · Views: 136
  • 017C27BC-0691-4F8A-A8EA-E7D2542D8EC5.jpeg
    017C27BC-0691-4F8A-A8EA-E7D2542D8EC5.jpeg
    212.9 KB · Views: 139
  • C57A2863-6587-4A7E-A2D5-F8D51385DAB5.jpeg
    C57A2863-6587-4A7E-A2D5-F8D51385DAB5.jpeg
    165.5 KB · Views: 128
Tons of work goes into theses cars that no one sees when the car is finished.
Totally.

BTW, you do have a spot weld drill for the part on your '81 (not that more that 25% of the holes are likely to match up). I've never seen how the windshield frame was repaired with a donor piece either - always assumed that one somehow completely removes the old rotted frame and welds in a new frame. If just the top part is rusted out, what you're doing will make the job much easier (well, relatively).
 
I've never seen how the windshield frame was repaired with a donor piece either - always assumed that one somehow completely removes the old rotted frame and welds in a new frame. If just the top part is rusted out, what you're doing will make the job much easier (well, relatively).
Likewise. However it will help considerable to make everything align and match up with the top and windows, etc.
 
Likewise. However it will help considerable to make everything align and match up with the top and windows, etc.
Totally.

BTW, you do have a spot weld drill for the part on your '81 (not that more that 25% of the holes are likely to match up). I've never seen how the windshield frame was repaired with a donor piece either - always assumed that one somehow completely removes the old rotted frame and welds in a new frame. If just the top part is rusted out, what you're doing will make the job much easier (well, relatively).

Guys my plan was to remove the rotten part of the surround on my ‘81 which comprised the bottom of the windshield surround above the heater box from pillar to pillar. I am removing just the exterior sheet metal from my car leaving the inner lip of Surround in the passenger compartment. I will overlay the donor bottom surround and weld in all the drill holes that once contained the original spot welds. I am not going to touch the inner structural supports of the pillars on my 81 where they join the fenders as I didn’t want to disturb that bees nest. My inner structure of my car is in good shape relatively speaking. I plan on drilling out the spot welds on the 81 with a spot weld cutter then grinding off the resulting discs that are left behind. This will leave a smooth surface for the donor bottom surround to lay up against and to be welded in place. The inner surround will be the guide to make sure the donor piece is in the correct position when welded.
 
That was understood, we were just surprised the inner portion was still good. Often if there is rust on the outside, then there is much worse rust underneath (as gravity takes the water down below). So usually both halves of the windshield frame are in pretty bad shape. Your plan is great because it will not disturb the nest as you say. Keep us informed how it goes. :)
 
Back
Top