
Rupunzell
Bernice Loui
Driver side window drive (aka Crank) arrived busted. No drive connect when the window is in the lowest position. Took it apart to figure out why.
Window drive is done with essentially a coil spring with a long filler of felt to hold oil. Apparently the oil dried out LONG ago and the previous Gorilla decided it was best to apply a vise grip to the window crank to ... make it move... This is VERY typical moto folks dude stuff, not moving apply more force.. Well, more force stripped out the coiled spring drive. Lucky the pinion gear appears to be OK. Given how this drive mechanism is designed_made, flip the coiled spring around to use an area of the coiled spring that has never been used.
To get the coil spring out, straighten out the drive tube's folded over ends (it's typical soft body steel).

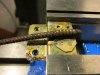
Set the window drive plate up in the BP mill & Kurt Vise, locate the center of the spot weld.

Center drill the spot weld:

Drill out the spot weld with a# 20 (0.161" dia) drill:

Once both spot welds are drilled out, lift up the retainer plate, remove the spring drive cable, flip it around, make sure the retainer plate lines up with the spring spirals before clamping the retainer plate down.

Retainer plate with the drive cable flipped, almost ready to check for alignment.
The# 20 drill was chosen to provide a close fit for# 8-32 screw. Once the retainer plate is down, use a shallow tapered pin or punch to line up the holes and use a CV joint ear clamp plier to pinch down at the base of the retainer plate. That area of the plate must fit easily inside the groove of the drive tube. If there is not enough clearance, the entire drive cable assembly will bind.

Put two 8-32 x 3/8" long stainless steel button socket head screws into the holes noting the alignment requirement and pinched area at the bottom of the retainer plate.

Apply two stainless steel 8-32 nylock nuts on the back with anti-seize DO NOT TIGHTEN yet, leave them loose enough to allow rotation of the window drive plate on the drive cable.

Push the drive cable back into the drive cable housing after the cable housing has been cleaned and felt core of the drive cable clean with new oil applied. As the drive cabe is installed into the cable housing experiment with drive cable -vs- cable housing position as the drive cable has a set and need to have a matching position with the cable housing to achieve the lowest friction as a unit. One this has been achieved, tighten the 8-32 screws-nuts. Test the function and friction of the assembled drive with the window crank making sure all is good. Once proper operation is ascertained, fold over the drive tube ends. This is the drive cable travel limiter.

Replace the cable drive end hose with a new oil tolerant 3/8" ID hose (Parker 821 or similar), clamp it down.
Check window drive assembly again before installing back into the door.

")
Bernice
Window drive is done with essentially a coil spring with a long filler of felt to hold oil. Apparently the oil dried out LONG ago and the previous Gorilla decided it was best to apply a vise grip to the window crank to ... make it move... This is VERY typical moto folks dude stuff, not moving apply more force.. Well, more force stripped out the coiled spring drive. Lucky the pinion gear appears to be OK. Given how this drive mechanism is designed_made, flip the coiled spring around to use an area of the coiled spring that has never been used.
To get the coil spring out, straighten out the drive tube's folded over ends (it's typical soft body steel).
Set the window drive plate up in the BP mill & Kurt Vise, locate the center of the spot weld.
Center drill the spot weld:
Drill out the spot weld with a# 20 (0.161" dia) drill:
Once both spot welds are drilled out, lift up the retainer plate, remove the spring drive cable, flip it around, make sure the retainer plate lines up with the spring spirals before clamping the retainer plate down.
Retainer plate with the drive cable flipped, almost ready to check for alignment.
The# 20 drill was chosen to provide a close fit for# 8-32 screw. Once the retainer plate is down, use a shallow tapered pin or punch to line up the holes and use a CV joint ear clamp plier to pinch down at the base of the retainer plate. That area of the plate must fit easily inside the groove of the drive tube. If there is not enough clearance, the entire drive cable assembly will bind.
Put two 8-32 x 3/8" long stainless steel button socket head screws into the holes noting the alignment requirement and pinched area at the bottom of the retainer plate.
Apply two stainless steel 8-32 nylock nuts on the back with anti-seize DO NOT TIGHTEN yet, leave them loose enough to allow rotation of the window drive plate on the drive cable.
Push the drive cable back into the drive cable housing after the cable housing has been cleaned and felt core of the drive cable clean with new oil applied. As the drive cabe is installed into the cable housing experiment with drive cable -vs- cable housing position as the drive cable has a set and need to have a matching position with the cable housing to achieve the lowest friction as a unit. One this has been achieved, tighten the 8-32 screws-nuts. Test the function and friction of the assembled drive with the window crank making sure all is good. Once proper operation is ascertained, fold over the drive tube ends. This is the drive cable travel limiter.
Replace the cable drive end hose with a new oil tolerant 3/8" ID hose (Parker 821 or similar), clamp it down.
Check window drive assembly again before installing back into the door.
Bernice
Attachments
Last edited: