Today I had a chance to get back to these clocks. Here is a little more info on the differences between the Veglia models.
When I first read
@twincam69's excellent discussion on doing the conversion I looked at his pics and my clocks and thought at least one of mine was the right style for the Luch innards to fit. Afterall mine had three mounting studs/posts on the back like
@twincam69 showed, and seemed pretty much the same:
His...
Mine:
But the spacing between the three mounting posts are different:
Here are the measurements for the correct style Veglia, and the replacement Luch. Use this to check your Veglia to see if the Luch will fit:
The overall height of the bodies is also different, however that might not matter as we will see:
As far as I can tell the difference in height is only at the other end where the face, lens, and light refraction ring are located. And the light ring is thicker on the taller unit, making up the difference in overall height. So I believe the Luch would still work in a taller housing:
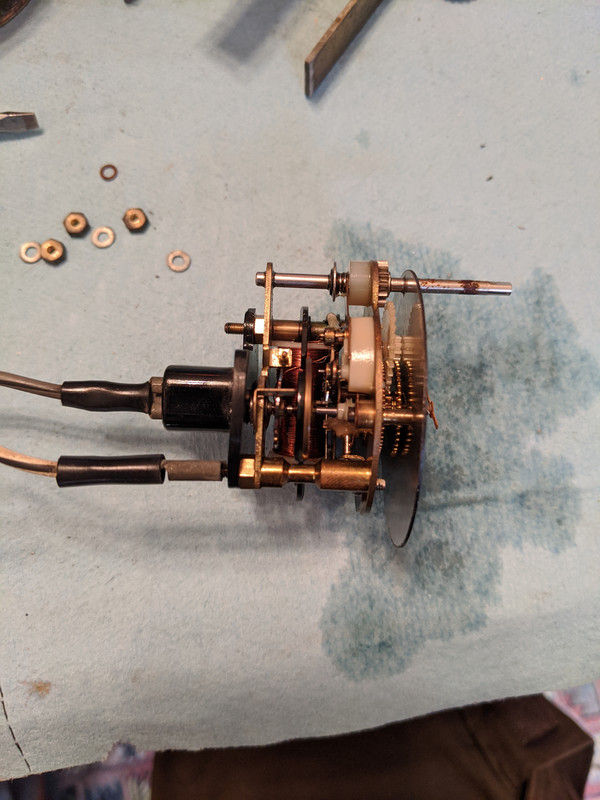
The main difference however is how the +12V connection is made on the back. The Luch and correct type Veglia have a 'spring metal' contact post on the inner side of the rear cover that makes contact with a corresponding plate on the mechanism:
While the other Veglia's have something different. Such as a 1/4" slide-on connection directly on the inner mechanism, which sticks up through a hole in the back cover:
(the other Veglia I have is yet again different)....
The reason that's a problem is you won't have a convenient way to connect the power lead with the newer Luch mechanism inside the older Veglia body.
Another possible difference is the body/housing material. Mine were both plastic, while
@twincam69 and
@lookforjoe both said theirs are metal. I don't know if that indicates any real difference in being able to do this conversion, but it might be a sign that you may not have the correct model Veglia?
Next I want to offer a couple of tips when doing this conversion (assuming you have the right Veglia).
I suggest you take pictures of your new and old clocks at each step before taking things apart. Even something as simple as the order of assembling the hands when going back together. While they only work one way, it might look confusing without a reference. Here is another excellent example; when removing the face from the Luch mechanism, hold it upright (face up). There are two plastic posts that connect the face onto the mechanism (I used a small pair of needle nose pliers to squeeze them while removing):
If you have it facing upside down (like in that last pic), there are some gears that will fall out when the face comes off:
Here is where they were before dropping out:
If you held the clock the other way around (face up) when removing the face, here is where the gears will remain (in proper place):
Again, they only go on one way but when things drop all over the place unexpectedly you panic for a second.
Another tip has to do with reducing the diameter of the Luch face to fit inside the smaller Veglia body (as
@twincam69 explained). If you cut it to the same diameter as the case then the illumination won't get past it to light up the face at night. Normally light passes around the face to refract through the plastic surround, and disperse onto the face evenly. However this mod changes things a bit, using the Veglia face, light ring, and bezel which are a little different from how Luch did it. So there needs to be room around the Luch face, yet not too much room (i.e. don't trim the Luch face too much) as that will also affect the illumination.
These are the refraction rings on my Veglia's:
And here is the Luch face trimmed accordingly. Also, don't cut too much from under the little hole where the adjustment knob passes through (arrow). The spring and post are supported by this hole in the face:
I should have taken a pic of the trimmed Luch face and Veglia light ring assembled, but you will see how it works when you get to that point.
Furthermore, the Luch face also acts as a support for those gears behind it (the ones that fell out when removing the face and causing all sorts of panic). So the Luch face needs to be left pretty much intact for everything to work. As
@twincam69 said, you will be covering it with the Veglia face, so appearances don't matter - but function does.
As I mentioned previously one of the most difficult tasks is removing and reinstalling the bezel cleanly. Tips on that were already mentioned.
So where did all of this leave me, having the wrong models of Veglia clocks? I don't have one of the correct type, and I already bought the Luch, so I decided to see what could be done to make it work on a "wrong" one.
I started by cutting out the bottom (rear cover) from the Luch housing/case:
I looked at possible ways to incorporate the electrical connection from it into the Veglia housing. One thought was to add it to the rear over the existing case, but that proved not viable. Then I decided to trim it down and mount it in between the Luch mechanism and the inside of the Veglia case - sandwiched with the mounting studs:
That allowed the electrical contact on the Luch rear cover to still work on the Luch mechanism, but fit in the Veglia body:
Note that some additional scallops were needed to clear other internal components, making for the rather odd shape.
I had to drill three holes in the back of the Veglia body for the mounting studs, and cut a square hole for the Luch electrical connector to stick through:
The placement of those three holes is important in order to get the clock mechanism centered in the body, and therefore the hands to fit the face correctly. When the components are mounted together the rear looks like this:
Also note that there were little molded plastic "bumps and ledges" on the inside aspect of the rear Veglia body that needed to be removed to allow the trimmed Luch back to lay flat against it...which was a little difficult to do:
And the front looks like this (here you see the orientation of the light refraction ring around the face):
Just need to finish assembling the hands and face/bezel and it should be a new Veglia clock again. Overall with the "wrong" Veglia this is doable but a bit of a pain in the arse. I'd suggest making sure you have the "right" Veglia to begin with. If you don't then consider either buying one (they are cheap because they never work), or go through the extra work I just described to modify yours. Hope this clears things up a little.


 First took apart both clocks. Pretty similar, remove the setting knob, uncrimp the bezel and remove the 5mm nuts on the back of the case. The works can then be removed.


 Carefully remove the hands then the face can be removed. On the Veglia there are two tiny screws and on the Luch two plastic clips. The positive socket can be pulled off the three mounting studs on the Veglia and pushed onto the Luch since they have the same pattern.


 You’ll notice the face on the Luch is too large to fit into the Veglia case so just grind it down so it fits. You don’t need to be perfect since the Veglia face will be glued on top of it. Now install the adjustment shaft and snap the face into place. I then put a couple of drops of super glue on the back of the Veglia face and attached it to the Luch.


 Now you can tighten up the 5mm nuts on the rear of the case and reinstall the hands, lens and bezel assembly.


 Now slip the little spring on the adjustment shaft and push on the knob. And you’re done!! Rebuild cost $12 and an hour or so of time.


")