Russe11
True Classic
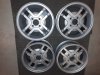
One of my winter projects was freshening up my wheels (CD-91’s). It wasn’t intended to be a pursuit of perfection, just intending to spruce them up, a bit. Here’s how it went:
A conversation at a local automotive paint store led us to choose rattle-can products to do the job. Step one was bead-blasting, to get down to bare metal. Some careful filing was done to remove some curb-scuffs. Then Cleaning with a pre-paint solvent, Primer, Color, and Clear coats. Setting them up to rotate on a spindle mounted to a ‘Lazy Susan’ bearing made it much easier to give an even coat.
After painting, I applied some blackout-decals I got from Myron Samila. The only tricky part was the notch for the tire valve. To deal with that, I made a card-stock template the size & shape of the decal, and pressed it against the edge of the valve cutout, to get the location. I cut the template on the witness mark with a ¾” punch. Then checked the template on all 4 wheels, to make sure they were close to uniform. (close enough for jazz, anyway…) Then, I punched 4 of the decals using the template as a guide. Installing the decals was a little finicky, but peeling the backing halfway, then holding it with a pair of pliers let me get down in the groove without too much difficulty. These decals were a great time saver, which made the job go quickly and smoothly.
(EDIT: Sorry the pictures are upside down... I don't know how to fix that.)
Last edited: