tvmaster
True Classic
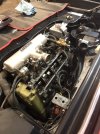
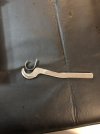
Time to add that tray nowMy X has a battery clamp for the first time in it's life:
View attachment 58920
I think that I was able to confirm that one had never been installed at the factory as the bolt hole threads still had fresh paint on them, and they definitely looked much different after I ran the bolt in and out. As I don't have the tray, I keep the battery wrapped in a heavy duty plastic bag, thus the strange appearance of the white plastic over the battery.
")