Fuel hoses replaced, busted bolts, and a very happy ending.

Cratecruncher

True Classic
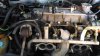
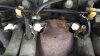
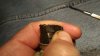
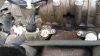
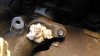
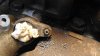
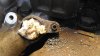
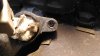
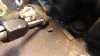
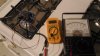
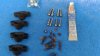
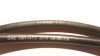
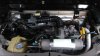
I knew when I bought my '86 there would be some maintenance to deal with. Nothing but oil changes was ever done to this car. Soon after I brought it home it started dripping fuel in several places. My first thought was maybe it's those 32 year old fuel lines. Hey, gas is expensive. I'd like the gas to go into the engine not on the ground. I tried catching some of the gas in a pan but the exhaust manifold I perched it on got so hot it all evaporated before I could pour it back into the tank. Then I thought about the fire thing. Austin is a crowded place and lots of people get really mad if you stop traffic for any reason. I don't want to be that guy stopping traffic and causing the fire department to have to postpone their pinochle championship to come put me out. I decided the best thing for everyone would be to replace those leaky-ass fuel lines.
 
causing the fire department to have to postpone their pinochle championship
Sounds like your fire departments are much more ethical than ours. Here they pass their 'on-the-clock' time with hookers, in the fire house, on tax money, including the chiefs. Kind of puts a different spin on your title - happy ending. True story.

There are a number of fuel lines that should be replaced with modern material, high pressure (fuel injection) hose. Don't forget the 4 short pieces that connect to the injectors. Don't keep any of the old hoses on your car.
 
Well Jeff, those firemen have to do something with all that hose just lying around...

I bought an o-ring kit and 7.5mm fuel hose from one of our suppliers so I would have all the parts I would need on-hand. An initial inspection showed some corrosion on the allen-head bolts I would need to remove so I bombed them with PB Blaster for a couple of days. I just cut off the brittle fuel lines at the inlet exit and cold start valve. There was more heat damage than I thought there would be. The injector cooling vent tin was a bit cumbersome working around but I eventually discovered the secret handshake that made it drop out of the way. All the allen-heads holding the injectors in came loose with just that satisfying factory "crack" you get when you know you are the first one in there.

Then I was down to the last two bolts and disaster struck. They wouldn't budge. I tried rocking them back and forth. I tried more PB Blaster. I tried using a heat gun. The heads of both middle bolts just sheared off. Well, I figured once the injectors are removed I'll have a bit of length to get some vice grips in there and back 'em out that way.
 

Attachments

  • P_20181110_125003.jpg
    P_20181110_125003.jpg
    250 KB · Views: 120
  • P_20181110_135716.jpg
    P_20181110_135716.jpg
    242 KB · Views: 107
Last edited:
I had a low spot where I started questioning whether I could have had a better outcome if I'd done things differently. Did I screw this up? Am I a hack?

I decided to back away from the X and work on something unrelated for a while. That restored my confidence and put me back on task. The first thing I did is rebuild my fuel rail. You'll notice in the photos there is some cracking where fuel soaked into the lines. The previous owner told me he only bought Sinclair gasoline because it is ethanol free. Unfortunately, here in Austin there are no Sinclair stations or any ethanol-free sources. (If any Austin XWebForums members know a source PLEASE tell me. I'd love to be wrong.) I think just the short time I've been running ethanol-laced fuel was enough to cause the sudden leaks. The hose looked undamaged where the fuel hadn't touched it.

Edit: I should also mention here that getting the old hose off the collared connectors was difficult. The hose was old and age hardened and did not want to come off. I found that warming up the rubber a little helped. Then I used an Exacto knife with a new blade to cut a lengthwise slit through the outer layer of rubber, then peeled it away. I then cut through the fiberglass layer and peeled it away. At this point the remaining rubber was easy enough to just yank off on some. But others I had to again cut a slit lengthwise about half way through the rubber and tear it the rest of the way with some pliers. It is tough stuff! When using a blade be careful around the metal barbs. The blade will cut a valley in it and your hose could leak. The new 7.5mm hose from MWB slipped on with no trouble at all.
 

Attachments

  • P_20181113_131237.jpg
    P_20181113_131237.jpg
    391.4 KB · Views: 92
  • P_20181113_131258.jpg
    P_20181113_131258.jpg
    162.3 KB · Views: 103
Last edited:
If you replace the fuel lines with modern hose, 10% Ethanol fuel won't affect them. Those lines look like they are original, not intended to last 30+ years no matter what fuel is running through them.
 
Yeah, those lines were toast and scared the be-jesus out of me even before they started leaking Hussein. No way would I move this car more than four feet from a water hose until this situation was resolved. I was kidding about catch-pans on exhaust manifolds etc.

I did a search of the XWebForums and the internet in general to help me develop a plan for attacking those broken bolts. Solutions were vague and all over the place. Use an extractor, don't use an extractor, weld a nut to it, use a drill press, etc. What I needed was a plan! At first I thought I'd take the intake manifolds off so I could get a good purchase on the bolts. Then I got to looking at the corrosion on my exhaust manifold and started envisioning even more broken bolts and how this job could go from setback to disaster.

I decided to try the vice grips in situ. The bolts didn't budge, They simply sheared off cleanly, albeit closer to the castings. I had no choice but to drill them out. I knew maintaining concentricity would be paramount to success. At this point I also realized these bolts were made by Land-o-Lakes, pure butter at this point. Here were the steps I took:
  1. File away surface of each bolt to reveal a perfect circular cross-section.
  2. Punch a starter divot as close as possible to the center of the broken bolt using a hardened steel nail.
  3. This was a 5Mx0.8 bolt so I enlarged the point divot with a #45 bit "pushing" it closer to the ideal center using the "directional drilling" technique.
  4. My first through hole was using a #50 drill bit very slowly using cutting fluid and pulling the bit out periodically to clear the chips.
  5. After the first hole I assessed how close I was to concentricity and did more adjusting with each larger bit.
  6. As I got the final bit #19 I was using each successive bit number 22, 21, 20 etc until I got to 19. At that point the remaining screw above the hole unwound into a piece of sharp wire and I was able to pull out a couple of threads inside the hole before it broke off.
  7. The next step was the most critical. I used my Craftsman 5Mx0.8 tap and handle. A broken tap at this point is game-over. The cleared threads were enough to start the tap in. I felt some resistence initially but then everything got easy and I knew I was chasing existing threads in the aluminum. A coil of loose steel threads emerged out the back end of the hole as the tap turned to the hilt.
 

Attachments

  • P_20181122_142138.jpg
    P_20181122_142138.jpg
    262.6 KB · Views: 96
  • P_20181122_143804.jpg
    P_20181122_143804.jpg
    239.3 KB · Views: 86
  • P_20181122_145346.jpg
    P_20181122_145346.jpg
    251.9 KB · Views: 92
  • P_20181122_150553.jpg
    P_20181122_150553.jpg
    258.9 KB · Views: 112
  • P_20181122_153517.jpg
    P_20181122_153517.jpg
    211.9 KB · Views: 99
  • P_20181122_154421.jpg
    P_20181122_154421.jpg
    226.5 KB · Views: 98
Last edited:
Now that the broken bolts fiasco was firmly in the rear view mirror I could get back to actually assessing the problems and getting on with it. As I mentioned there was a good deal of advanced corrosion about a foot in all directions of the exhaust manifold. I had never heard the injector cooling system come on since purchasing the car so started looking into that. There is an aluminum cube with a brass thermoswitch bolted to the head which is supposed to go from infinity to 0 resistance at 100c and then back to Infinity at 90c. I had a lot of trouble pulling the tube-style connectors apart and concluded this connection hadn't passed electrons in decades. In addition to cleaning up the connection with solvents and sandpaper I also jury-rigged a test apparatus on the stove to make sure the thermostat was working properly. All checked out but I realized 100c is really HOT! MWB sell a 90c unit I'm seriously considering changing to.
 

Attachments

  • P_20181123_121357.jpg
    P_20181123_121357.jpg
    167.9 KB · Views: 71
Last edited:
As a piece of info, I got both intake and exhaust manifolds off my two 79s recently. I only bathed in pb blaster, worked bolts back and forth. I had only one break, but lots of stud left. Hopefully you can drill out in situ. Good luck!
 
Yeah, those bolts were a pain but I got past it Tedd. I've broken more bolts in the last three months working on this X1/9 than in 40 years of wrenching on other cars.

I also looked into replacement fasteners. Whoever was responsible for specifying black oxide finish mild steel fasteners in a high heat wet environment needs to have a torsion test performed on their man-nipples. I mean seriously... I decided that corrosion resistance was more important than strength in this application so went with stainless steel bolts and washers. I also used generous amounts of Permatex anti-seize goop for added insurance.

As mentioned earlier, I bought a few feet of the 7.5mm NBR/CR N18030E from MWB to do the collared connections just to be safe. It came marked with a 02/10/17 date. I wanted a backup though. While at O'Reilly's I also inquired about some 5/16" high pressure fuel line they carry. It was marked SAE 30R14T2 and had a 2018 date on it. I used it on all of the hose clamp connections and was surprised to find it runs small and was really tough to get over the barbs. I tightened everything down and turned the ignition switch to run without starting the car. I checked all the hose connections and not one drip anywhere. I fired started the car up and she purred like a kitty. Job done, lessons learned. I'll keep the thread informed if there are any new developments.

At least now I don't have to worry about snarling traffic or inconveniencing any firepeople.
 

Attachments

  • P_20181122_163011.jpg
    P_20181122_163011.jpg
    244.6 KB · Views: 93
  • P_20181124_211331.jpg
    P_20181124_211331.jpg
    93.7 KB · Views: 91
  • P_20181124_171932.jpg
    P_20181124_171932.jpg
    200.3 KB · Views: 82
Last edited:
I will be going through this on my ‘83. Thank you for posting all the issues you had to go through. The only thing I can add too this job is: while the injectors are removed, use a 9V battery to open them and spray carburetor cleaner backwards through them to clean them. Or send them out to have cleaned and balanced. FIC in Georgia has done a few sets for me in the past. He has an injector dyno to cycle them at running speeds and pressures. Jon is very helpful as well.
 
I had a low spot where I started questioning whether I could have had a better outcome if I'd done things differently. Did I screw this up? Am I a hack?

I decided to back away from the X and work on something unrelated for a while. That restored my confidence and put me back on task. The first thing I did is rebuild my fuel rail. You'll notice in the photos there is some cracking where fuel soaked into the lines. The previous owner told me he only bought Sinclair gasoline because it is ethanol free. Unfortunately, here in Austin there are no Sinclair stations or any ethanol-free sources. (If any Austin XWebForums members know a source PLEASE tell me. I'd love to be wrong.) I think just the short time I've been running ethanol-laced fuel was enough to cause the sudden leaks. The hose looked undamaged where the fuel hadn't touched it.
Try this site
https://www.pure-gas.org/index.jsp?stateprov=TX
I've found that it's sometimes out of date so be prepared to not find "pure gas" at the stations they list.
 
Nice work on replacing all those fuel hoses. It isn't a easy job, but definitely necessary. Old fuel hose will lead to massive problems. And broken bolts are a common occurrence with these cars; in my opinion they used really poor grade hardware compared to other makes. So nice work on getting those out as well.

I agree it would have been a good time to check the performance of the injectors while they were out. A simple test rig can be made to see how they are doing, and even to try some basic cleaning. Although attempts to clean injectors without the proper equipment usually offers little improvement. But at least by testing them you would know if they are ready for replacement or send out for rebuilding (I've always found it less expensive to buy new ones).

Regarding the injector cooling fan. In my opinion it is completely unnecessary. Back when the engines had a carb it might have helped with fuel vaporization. But on a fuel injected engine the fuel is constantly circulated through the system to/from the tank. So cool fuel keeps everything from getting too hot. And injectors don't hold any accumulation of fuel like carbs do. So there isn't a need for external air circulation. And the way the cooling fan was designed it did little anyway. I'd suggest eliminating it completely rather than trying to make it work. But that is just my opinion.
 
Last edited:
Now that the broken bolts fiasco was firmly in the rear view mirror I could get back to actually assessing the problems and getting on with it. As I mentioned there was a good deal of advanced corrosion about a foot in all directions of the exhaust manifold. I had never heard the injector cooling system come on since purchasing the car so started looking into that. There is an aluminum cube with a brass thermoswitch bolted to the head which is supposed to go from infinity to 0 resistance at 100c and then back to Infinity at 90c. I had a lot of trouble pulling the tube-style connectors apart and concluded this connection hadn't passed electrons in decades. In addition to cleaning up the connection with solvents and sandpaper I also jury-rigged a test apparatus on the stove to make sure the thermostat was working properly. All checked out but I realized 100c is really HOT! MWB sell a 90c unit I'm seriously considering changing to.

For future reference - don't use any abrasive on electrical connector pins/receptacles. They are (were) tinned/coated, and sandpaper will destroy that. If the terminals are already so bad that the coating is gone, it would be wiser to cut out the connector & use a more modern waterproof connector & terminal arrangement.
 
Regarding the injector cooling fan. In my opinion it is completely unnecessary. Back when the engines had a carb it might have helped with fuel vaporization. But on a fuel injected engine the fuel is constantly circulated through the system to/from the tank. So cool fuel keeps everything from getting too hot. And injectors don't hold any accumulation of fuel like carbs do. So there isn't a need for external air circulation. And the way the cooling fan was designed it did little anyway. I'd suggest eliminating it completely rather than trying to make it work. But that is just my opinion.

Jeff, FI systems do hold fuel in the rail and injectors, there can be close to regulated pressure in the rail for hours after shutdown. The fan prevents (in theory) vaporization and hard hot starts.
 
Well the fuel is constantly circulated through the fuel rail as long as the fuel pump is running. Being a high pressure pump, there is no delay in fuel movement. So it is never stagnant when the pump is running, which is when the key is on. Yes, after you shut it off there will be some fuel sitting in the rail, but as soon as you turn the key on it will be removed/replaced with cool fuel. Therefore there will not be a chance for vaporization when starting. I don't know of any other vehicle that has a cooling fan on a EFI system, including air cooled engines that run much hotter than these.
 
Guys, this car is a time capsule from 1985. I changed the fuel hoses and bolts for obvious reasons. But I want to keep everything as close to stock as possible. The only reason I will change something is for safety, to prevent further damage, or if it can be reversed easily, such as wheels. I really don't want to go hacking into the harness or stripping off systems. This really isn't the car for that.

Injector inspection: The car was running fine, idling smooth and there was absolutely zero evidence of any contamination in the fuel system. It was cleaner than my daily. I looked over the injectors to see if there was any evidence of damage or a faulty spray pattern and didn't see anything that would raise a flag. The car has 21k miles so I decided to just clean them up and drop them back in. There are three different o-rings on each injector assembly: a large one that has a square cross-section that fits around the body of the injector, a smaller square section that fits around the nozzle and finally a standard round section o-ring that fits between the nose of the plastic adapter block and the manifold. The square section rings were still pliable and reusable. The little round o-rings were hard and flat and needed replacing. If you do this job hold off buying the ring kit until you open it up and know you need it. The round o-rings you can get anywhere.

After buttoning everything up I ran the fuel pump without starting the engine so I could check for leaks. It was an informative exercise because remember the circuit was completely devoid of fuel. I heard the pump change pitch instantly. As I turned to face the engine I could hear air gurgling through the filter into the rail and finally hissing past the pressure relief diaphragm at the opposite end of the rail. The fuel circuit went from dry to steady state in about 5 seconds which in my Bosch experience is pretty quick!

I forgot to mention that the easiest way to check and see if the fan motor and relay are working properly is to disconnect the thermal switch and loop the pin connector back on itself. It is an unswitched circuit so you should hear the motor kick on and feel forced air coming out of the duct.

About that pin connector: the tin coating had provided no protection apparently because there was turquoise copper oxide all over the pins. I scrubbed and removed the oxidation, expanded the pins slightly for a tight fit, then coated inside the connectors with heavy grease to keep the water out. I also checked the resistance through the connection once put together and it's good to go. No need to replace anything there.

I won't try to convince anyone the FI cooling is necessary but I do know I have a lot of heat-related corrosion around my exhaust manifold. There must be some benefit to having cool air circulating over the components even if it is just to lower surface temps by a few degrees. I said above I want to keep everything as stock as possible but am thinking about ceramic coating that exhaust manifold. My concern is it will just push all the heat into the catalytic converter and bloom rust somewhere else. I have had manifolds ceramic coated in the past to prevent heat damage to other components and panels with excellent results. Has anyone tried it on an X1/9?
 
Last edited:
Just be sure to use Viton O-rings or they will not last. I've found that the large square ones are usually hard and deformed, so you were lucky that yours were not. They are what provide the sealing pressure for the injector against its seat on the manifold...something of a 'spring' of sorts under the hold-down clamp. So it is necessary for them to be pliable.

After the fuel system has been initially primed (as you did), there is a check valve that keeps everything full of fuel. So the normal response time for the pump to circulate fuel through everything is considerably faster than what you experienced with a dry system. Works very well to cool everything down.

Ceramic coatings have been done by many on the X, and it seems to have a very good effect with temp management. It is a bit expensive, but I believe it is worth it. Especially on any cross-flow design head where the intake is directly above the exhaust. And the added bonus of offering excellent corrosion protection is almost worth it alone. Additional heat shields are also very beneficial. Basically the more you can help manage temps the greater the benefit in many ways. If you wanted, you could go even further with internal (in addition to external) coating of the exhaust manifold, heat barrier coating on the bottom of the intake manifold, heat dissipation coating on the top of the intake manifold, etc. And there are excellent heat insulation products that can be used in many places.
 
Well the fuel is constantly circulated through the fuel rail as long as the fuel pump is running. Being a high pressure pump, there is no delay in fuel movement. So it is never stagnant when the pump is running, which is when the key is on. Yes, after you shut it off there will be some fuel sitting in the rail, but as soon as you turn the key on it will be removed/replaced with cool fuel. Therefore there will not be a chance for vaporization when starting. I don't know of any other vehicle that has a cooling fan on a EFI system, including air cooled engines that run much hotter than these.

I don't think so. On the X1/9 setup any air trapped in the rail/Inj line won't go anywhere until the injectors open, which won't happen until cranking. Fuel overheating in the rail is potential issue on many performance builds. I would say you would want to consider ways to reduce potential heat soaking of the fuel components from the turbo/header setup you are planning. At the very least an oversize rail would reduce the potential impact.
 
Back
Top