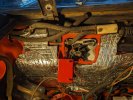
As Carl notes, simplicity is good. And as Eric suggested, you need to make sure you vent the tank. Here's how I did it on a '74 that has DCNFs on it. Not so simple, but effective.
I did away with the vapor separators and just ran the two vents together using a "T" from the original system to connect them to an old fuel filter so that the air entering the fuel tank (as the gas is pumped out) is filtered. Note - the IN end of the filter is open to the atmosphere. Then I mounted the pump low so that it wasn't trying to suck the gas up hill, and put a pre-filter before the pump. (You might want to consider using some kind of rubber isolators to mount the fuel pump. I didn't and it's pretty noisy.) Next I placed another filter after the pump, kinda belt and suspenders because my fuel tank isn't new.
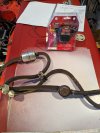
I didn't use the fuel return nipple because there is no return on the DCNFs like there is on the original DMTR, so it's capped. It hasn't caused me any issues.
I also used the original solenoid for the carb cooling fan to power the fuel pump. And, because there was an extra stud available on the old carb fan mounting bracket I added a start button - because I could. It helps to check valve clearances, etc. (BTW - I have a start solenoid in the starter circuit too.)
View attachment 82792
Yes, the larger nipple is fuel out, the smaller fuel return.
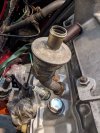
For the engine crankcase vent you can run a hose to a catch can, and then vent the can. Or, you can do what I did and just add a valve cover filter up high above the cyclonic vent.
View attachment 82793
There is no vent on the head. You may be referring to the air injection one way valve that the '79s used. If you no longer have an air pump, remove it and plug the hole.
BTW - it always helps to add the year of your car to your signature. It can help folks help you.