
I have a Midwest-Bayless performance fuel injected head I plan to install on a 1500 block in my 78 soon. I wanted to plug the head's intake manifold coolant holes since they are not used for the FI manifold, but the holes had no threads. (By plugging the holes you can remove the intake/exhaust without the coolant draining out of the head)
I mentioned I had never done this before and Bernice was kind enough to send me a M8 tap, a tap guide and some stainless set screws.

I gathered up the proper allen wrench for the set screws, some air tool oil for the tap, a tap handle and a can of air.

When Midwest-Bayless sent me the head they had all the holes masked off to keep them from accumulating dirt, etc. I trimmed out the area around the two coolant holes and left everything else covered to keep the cuttings from falling in the other holes.

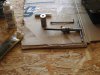
Next I put some oil on the business end of the tap and then set up the tap in a T-handle and used the guide to make sure I was square to the hole to be tapped.

I gently twisted the wrench and could feel the tap cutting into the aluminum. As I worked on the threads, I turned the tap about 3/4 turn in and then 1/4 turn back out. This back and forth motion is supposed to allow the cuttings to fall out via the flutes on the tap. I will have to assume it worked since I never had a situation where I felt the tap bind up.
Patience is the key. Take your time and remove the tap often to check the depth. Each time I removed the tap to do a depth check I cleaned the tap and the new threads of any chips. Here you can see the threads aren't quite deep enough yet.

It will take a few iterations of twisting and then removing the tap to get the depth correct. When putting the tap back in the new threads I twisted it with my fingers till it stopped at the uncut metal. I did not want to force it for fear of messing up the new threads.
You want to end up with the set screw seated just below the mating surface of the head as you can see if these two pictures.


As a final step I cleaned up the outer edge of the hole with a file. Each hole felt like it had a very small burr on one side and a gentle rub with the file removed it and left the surface smooth.


Repeat the procedure on the second hole and you are done. I was much more comfortable working on that second hole, I was pretty nervous on the first one.")
I still need to get some Loctite to seal the threads, but the hard part is finished. Here you can see the final result. Two holes successfully plugged.

Many thanks to Bernice for the loan of her tools, the set screws and of course her infinite patience in answering my newbie questions!!
I mentioned I had never done this before and Bernice was kind enough to send me a M8 tap, a tap guide and some stainless set screws.
I gathered up the proper allen wrench for the set screws, some air tool oil for the tap, a tap handle and a can of air.
When Midwest-Bayless sent me the head they had all the holes masked off to keep them from accumulating dirt, etc. I trimmed out the area around the two coolant holes and left everything else covered to keep the cuttings from falling in the other holes.
Next I put some oil on the business end of the tap and then set up the tap in a T-handle and used the guide to make sure I was square to the hole to be tapped.
I gently twisted the wrench and could feel the tap cutting into the aluminum. As I worked on the threads, I turned the tap about 3/4 turn in and then 1/4 turn back out. This back and forth motion is supposed to allow the cuttings to fall out via the flutes on the tap. I will have to assume it worked since I never had a situation where I felt the tap bind up.
Patience is the key. Take your time and remove the tap often to check the depth. Each time I removed the tap to do a depth check I cleaned the tap and the new threads of any chips. Here you can see the threads aren't quite deep enough yet.
It will take a few iterations of twisting and then removing the tap to get the depth correct. When putting the tap back in the new threads I twisted it with my fingers till it stopped at the uncut metal. I did not want to force it for fear of messing up the new threads.
You want to end up with the set screw seated just below the mating surface of the head as you can see if these two pictures.
As a final step I cleaned up the outer edge of the hole with a file. Each hole felt like it had a very small burr on one side and a gentle rub with the file removed it and left the surface smooth.
Repeat the procedure on the second hole and you are done. I was much more comfortable working on that second hole, I was pretty nervous on the first one.
I still need to get some Loctite to seal the threads, but the hard part is finished. Here you can see the final result. Two holes successfully plugged.
Many thanks to Bernice for the loan of her tools, the set screws and of course her infinite patience in answering my newbie questions!!
Attachments
Last edited:
