Those that have installed a Delco Alternator

Dallarax19

Builder -Dallara Replica
Exactly what does your bracketry look like???? I am looking for pictures. I don't need explanations, I need photos. Tony, Tom?
 
If you have done it post a pic and label it as AC or NON AC - simple

I want to see exactly how people have done this. I am changing to the Delco alt but I do not like how it is turning out. The alternator is cantilevered at the pivot and at the upper mount, the stock unit has a clevis style attachment at the pivot. It is the upper mount I want to see. I have had to add a spacer making cantilever problem worse. This mod has been posted as an easy mod and I want to see how easy it was and other solutions. Just a note the costs have come down - $45 Alt (Autozone), $10 Mr. Gasket bracket, and $5 for the belt and was cheaper than the Marelli Reman, $63 best quoted
 
Well...

The DESCRIPTION in items 3 and 4 in my update should be clear enough...

http://www.network54.com/Forum/1215...008+UPDATE...++Some+thoughts+and+observations...

Do you have a '79 or later NON-A/C car? If so... working through the rear trunk access panel is the best and easiest way to do this. If your Dallara is a '78 or earlier, then I would suggest you cut an access panel for this installation and for all future work. Makes life much easier...

(Cutting the panel for just THIS mod will probably take less time than attempting to install the mod without doing it!)

Secondly... if you have an A/C equipped car, I don't think I can help you. You'll need to fab your own mounts.

Lastly... if you have a non-A/C car and still NEED to see an installed foto... then call me and I will pull apart my trunk, remove my access panel, and snap a few fotos for ya... 661-296-7277.
 
Yep, read it before; looking for pics

I want to see exactly how it turned out and how it looks today. Pictures are worth a thousand words. If you got them post them.
 
Yes, this is what I referenced to install the alt but..

I used a little longer belt for ease the belt install. This is one of those changes I did not really think through. The alt and mounts are subject to cyclic fatigue. I am sure many folks have had the the stock upper alt bracket fracture along the adjustment slider, common failure and happened to me twice. After installing the Delco alt I see the belt when tensioned puts a significant moment on the alternator at the lower and upper mount. I can actually see the twist, this is NFG. I am not a tool around town kind a guy, my car is abused at high rpm and induces a significant harmonic in the Alt system. I have the parts installed so I will monitor the system and likely redesign the mounts, but am disappointed in myself for doing this change without thinking it through.
 
Consider this too, Brian.....

Recently, I changed out the Delco 10SI alternator on my car because the old junkyard alternator I had wore out.

I had the electrical shop where I bought the alternator fit a larger pulley - about 50% larger diameter. With the "standard" size pulley, meant for a small block Chevy, my old alternator was running up to 18000 RPM, the recommended limit from Delco, at 8000 engine RPM. I lowered the alternator RPM by about 4000 RPM. Maybe you can move the harmonics out of the critical range. And pick up horsepower, too.

Check this thread: http://xwebforums.com/forum/index.php?posts/63962/

The setup has worked great for me.

Another thought - maybe the alternator rotor could use a sharper balance.

Ciao,
 
Last edited by a moderator:
This article...

..is an interesting read on the use of Delco 10 & 12si series alternators.

I did not realize that small increases in output amperage create such significant changes in heat issues. Given the location of out air intake right next to the exhaust, the lack of an intake vent tube as currently supplied may be a serious issue, especially with the extra heat from the AC compressor when in use...

I guess I'll look into the 78a 12si as an option, a bit further, as that would be closest to the Bosch alt I have.

I'd like more info on what application pulleys have been used, and what clocking designation was chosen, if it made any difference - I'd assume either 12 or 3 o'clock for the trigger..
 
Try this 79 no A/C


Uploaded with ImageShack.us


Uploaded with ImageShack.us

p5110544.jpg


Uploaded with ImageShack.us


Uploaded with ImageShack.us

Custom bracket. Milled .980" off of one side of the alternator mount.

TonyK.

Grimsby Ontario Canada


Uploaded with ImageShack.us
 
Last edited:
Well I have a couple of pictures.

The trouble is, mine is a ‘79s and ‘79s are a slightly different beast than later “late model” Xs. At least this is certainly true of the alternater-waterpump-crank pulley belt arrangements. On ‘79s with AC, the alternator is piggy-backed on the compressor rather than mounted in stand-alone brackets, the compressor pulley was driven directly from the crank pulley, and the alternator and water pump were driven from the compressor pulley. Totally different from other AC models.

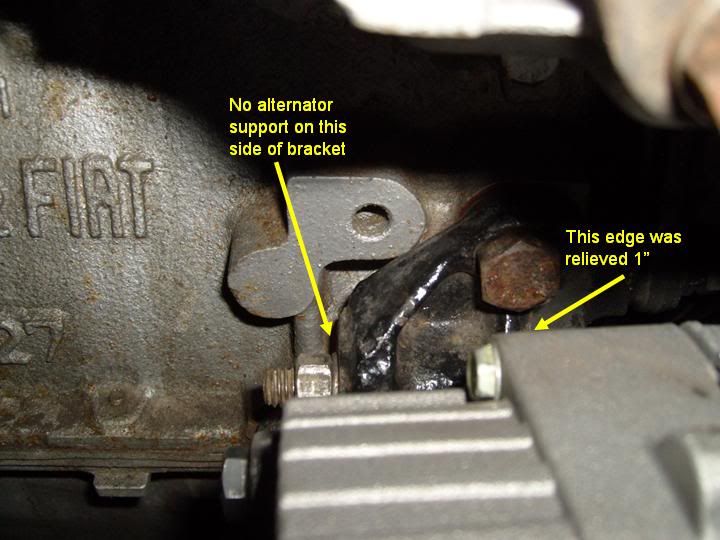
Mine was converted a few weeks out of the dealer’s lot in 1979. The bracketry was poorly done, and although I have tried to clean it up over the years, frankly I have never succeeded in getting it the way I would like to see it. (I think this may be where my psychosis originates about not liking it when people change things from stock.) Poor design or not, I guess it must be o.k. because it has worked for 30 years with no problems.

The key in installing one is to get the Delco positioned precisely in the “sweet spot” between the carb/FI superstructure, the intake manifold, the rear trunk wall, and the upper rear engine compartment frame structure. Once that is done, you have about a half inch of adjustment, optimistically speaking, the rearward motion being constrained by the rear engine compartment frame structure and trunk wall, and the forward motion being limited by the intake manifold.

It seems like a lot of work, but it pays off. These alternators seem very happy with life in an X’s engine compartment. I think I have replaced the alternator maybe twice in 30 years.

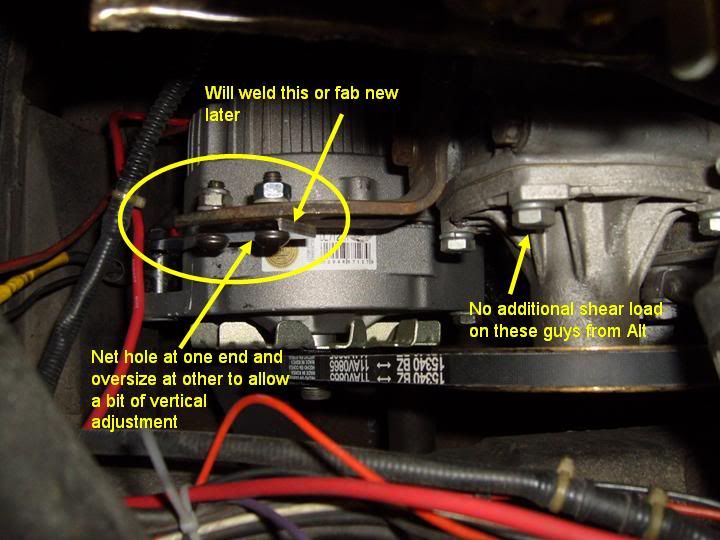
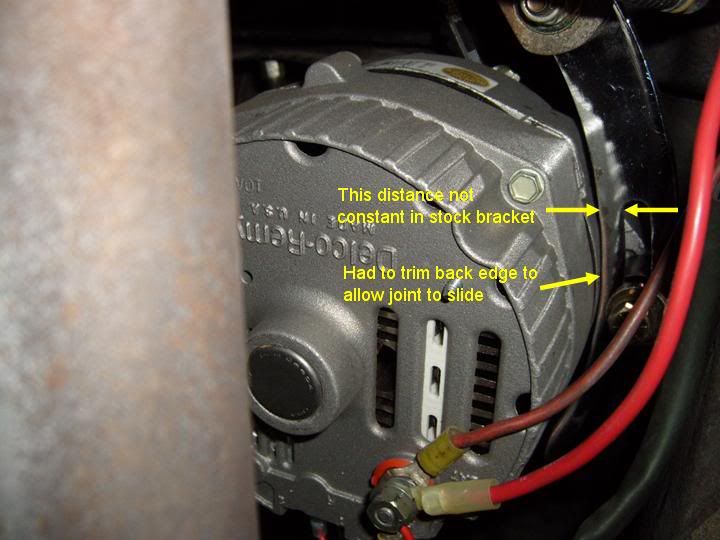
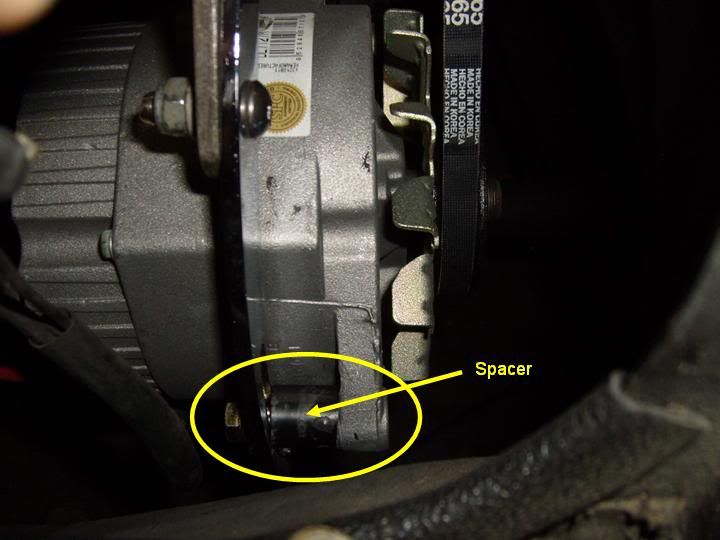
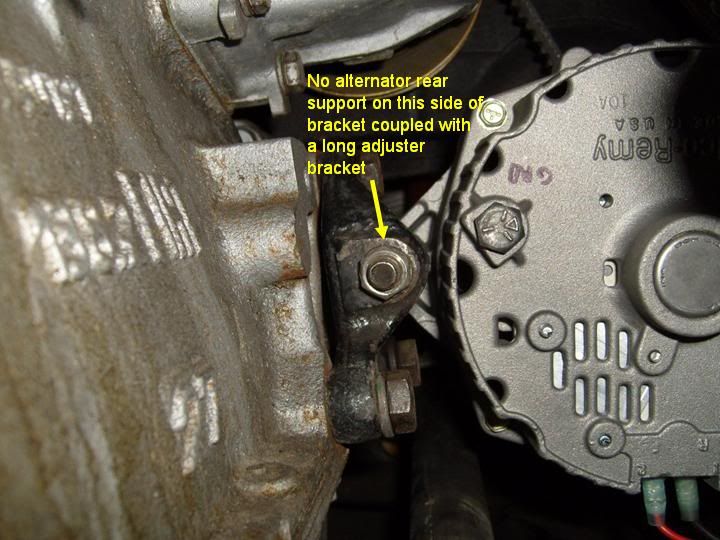
AC-Delco Alternator Pictures:
79_alt_rear.jpg


79_alt_rear_top_1.jpg


79_alt_rear_top_3.jpg
 
Delco CS144

Delco CS144 fitted to 1980 X1/9
dscn0021ab.jpg


dscn0023eh.jpg


dscn0024f.jpg


dscn0025l.jpg


dscn0046f.jpg


dscn0051e.jpg


dscn0066s.jpg

The intake for the cool air ended up pointing in the wrong direction so I reworked it later, but apparently I didn't take any pictures of it.

I did this much of it back in 2004 but got stalled with other issues and haven't done any more on it since. This is not yet installed on my car.
 
Excellent pics, very good ideas

I like the rear tie down bar concept. Easy and robust and I can easily add a bracket tying into the ground bolt point, I will look at that option further. Here are my pics for reference:

Alternatorpics.jpg


Alternatorpics2.jpg


Alternatorpics4.jpg

Alternatorpics5.jpg


Alternatorpics3.jpg
 
Back
Top