‘82 X19 not starting

Tommy Vx19

Low Mileage
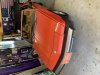
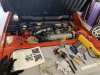
Hopefully I’m posting in the right place… I’m new to the forum and somewhat new to X19 ownership. I picked up an 82 fuel injected one a few months back with just under 60,000 miles on it. Car seemed to be running fine and while I’m far from a mechanic, I was hoping this could be a fun project car with my son. I’m now on my second frustrating project with the car. The first task was a full brake job and pretty much went according to plan. The car had been sitting for a while so next I was looking to do some engine compartment clean up with the air filter and a few of the hoses and hardware in the filter and air flow meter vicinity. Although there was no major work, when everything was back and secured, the car will crank but not start. Since I had painted the bracket that holds the fuel filter, I thought maybe that I disturbed some junk within the 40-year-old filter so I replace that since I wasn’t getting any fuel flow out of it. After sitting for a couple of days, the car started up and had been running fine with really no reason as to why it wouldn’t start previously. After a few weeks of it running well, I decided to change the distributor cap, wires and plugs. Again, all pretty straightforward work but then the same problem where the car will crank but not start. The plugs are gapped appropriately, there’s spark and the fuel pump is pushing gas. I just got a new ignition coil from Midwest but it’s still not starting. I get 12v at pin 15 on the coil. Any thoughts? I don’t know how critical it is, but I see the resistor near the coil should be 1.8 ohms. I measure 1.1. As I mentioned up front, I know some car basics but hoping for some guidance on next troubleshooting steps.
 
86_coil.JPG

take a look at your coil. I would bet the terminal on the left is missing like in this picture.
86_coil_wire.JPG

here is a picture of what should be on that terminal, (the way it'routed it only takes little bump/tug to pull off the terminal and the way the two wires are ran together it tends to not get noticed.)
86_coil_wire_on.JPG


here is what it should look like.
 
Thanks! I’m seeing four connections going to the coil. On pin 15, there’s a green wire from one side of the resistor and the black wire that’s tied to a capacitor (?) Underneath the hinge of the hood. On pin 1 toward the back, there’s a green wire that heads over to the electronic control module and a black wire that looks like it loops back toward the center and through the fire wall.
 
Suggest cutting off the quick discount spade crimp connector and replace it with a properly crimped on to the end of the wire ring terminal, then put it all back on to the coil. This is a no-start trouble maker connection.

The other EI gremlin is flooding the Bosch EI control box inside the LH side compartment. This happens when the drains at the bottom of these compartments are clogged (majority are clogged due to a kinked drain hose as installed at Bertone), which causes the compartment to fill with water drowning the Bosch EI unit.


Bernice
 
View attachment 34523
take a look at your coil. I would bet the terminal on the left is missing like in this picture.
View attachment 34524
here is a picture of what should be on that terminal, (the way it'routed it only takes little bump/tug to pull off the terminal and the way the two wires are ran together it tends to not get noticed.)
View attachment 34525

here is what it should look like.
Those pictures look familiar!! ;) You saved me some effort there Rod!! :)
 
I’m new to the forum and somewhat new to X19 ownership


Welcome to Xweb Tommy!

Make sure that the spade connectors on the coil are tight. You can give them a little squeeze prior to sticking them back on to get a better connection. If that is your problem area, take Bernice's advice and replace the push-ons with ring terminals. Another thing to check is your ground wire. In stock form, it is a copper braided strap that connects from the low on the transmission housing over tot he frame. Remove it, clean up the ends and contact areas and reinstall. Then check the negative wire on the battery for a good connections.

Pictures are helpful when describing what you see. We love pictures, so let us see the car. :)
 
I didn’t have any ring connectors but I had a couple of spade connectors so I took off that Siamese type connection on the coil and re-terminated it so it’s tight. Unfortunately that didn’t do it. I’ll have to trace out that ground wire. Also, how do I drain the potential clog Bernice mentioned? Two pics coming...the first is the front which makes me happy, the second is the engine which stresses me!
 

Attachments

  • AB929B19-4CDE-46E1-9038-4E19A6993634.jpeg
    AB929B19-4CDE-46E1-9038-4E19A6993634.jpeg
    350.5 KB · Views: 72
  • 5D961A89-CD22-4D4E-878F-D6F54890BE93.jpeg
    5D961A89-CD22-4D4E-878F-D6F54890BE93.jpeg
    348.5 KB · Views: 67
Those pictures look familiar!! ;) You saved me some effort there Rod!! :)

Yes, they are cut/paste pictures! it being such a common point of failure. I did something similar to what Bernice suggestions on my yellow car
(I added a kill switch and starter button at the same place)
 
Also, how do I drain the potential clog Bernice mentioned?

The drain hole Bernice refers to is below the silver EIC box in the passenger side pod. Follow the slope to the lowest corner and you should find the drain hole.
EIC into 78-1.JPG

There is a tube hooked to the drain that guide the water down past the frame rails onto the ground. I could only find a picture of the tube on the drivers side, so that's what you get. :) It starts at the point where the firewall insulation meets the side wall of the bay. It is about 1/2" diameter and travels down to a clip on the frame rail.
firewall insulation 3.JPG

If you put water in the pod and it drains right out, you have no problem. If it is plugged up you can, try poking out the blockage or try blowing compressed air up the drain tube.
 
Hi, no sign of water restriction in the EI module compartment. I took the braided copper cable from the transmission to the frame off and cleaned the connections. Unfortunately, still just cranks with no start. Since this happened (for the second time) recently after I just replaced the distributor cap and rotor, is there any chance that that work could’ve caused this problem? Also, is there a way to diagnose the electronic control module as a culprit?
 
It doesn’t appear that I have water retainage issue in the control module pod. I disconnected and cleaned the braided copper terminals going from the transmission to the frame but unfortunately still no start. Is there a way to diagnose the electronic control module? Or could this have been something I did when I changed the distributor cap and rotor?
 
Hi, no sign of water restriction in the EI module compartment. I took the braided copper cable from the transmission to the frame off and cleaned the connections. Unfortunately, still just cranks with no start. Since this happened (for the second time) recently after I just replaced the distributor cap and rotor, is there any chance that that work could’ve caused this problem? Also, is there a way to diagnose the electronic control module as a culprit?

Several folks who have R&R'd their caps have noted that the spring loaded carbon button in the top of the cap can become dislodged, not make contact with the center of the rotor and thus prevent the spark from reaching the plugs.

And if you replaced the cap and/or wires there's always the possibility of a "D'oh!" firing order/spark plug wire screw-up :)
 
It doesn’t appear that I have water retainage issue in the control module pod. I disconnected and cleaned the braided copper terminals going from the transmission to the frame but unfortunately still no start. Is there a way to diagnose the electronic control module? Or could this have been something I did when I changed the distributor cap and rotor?

Have you checked your new cap? Check the contacts inside, maybe try the old cap again is you hung on to it. If the cap's center button isn't making contact you won't get any fire. Oops, I see Dan beat me to it. :)
 
Why did you change the coil? As stated above do you have the leads in the correct firing order?
 
Hi, I did try the old cap and had the same problem so I put the new one back on again. I checked the plug sequence a few times just to make sure I had that right. I have not timed it to #4 cylinder; I don’t know how to do that. I was shooting in the dark with the ignition coil but obviously it wasn’t the problem.
 
If you have a timing light, try setting the timing using #4 cylinder. If you don't have a timing light, you can either eyeball it or get an ohm meter so that the points just open when the rotor is pointing at the #4 cylinder contact on the cap. That should get you close enough for it to start. To get it tuned in, use a timing light.
 
Back
Top